
Mar26

I always love to get out my felt conversation heart garland when February rolls around! Remember to show extra love to everyone in your life this month, and have a fun Valentine’s Day! ♥
Other Valentine’s Day Craftiness:

(Visit THE Inspired WREN for the tutorial!)

 Even though the new year begins on a Friday this time, I always like to remember “Short Monday Poem” by Ellen Grace Olinger on Poems From Oostburg, Wisconsin when January 1 rolls around:
Monday
and planning
the week
what will grow
what should rest
By replacing a couple of words, it’s also the perfect way to frame the new year. What needs to grow in 2016? What needs to rest? Thank you once again for the inspiration, Ellen! ♥

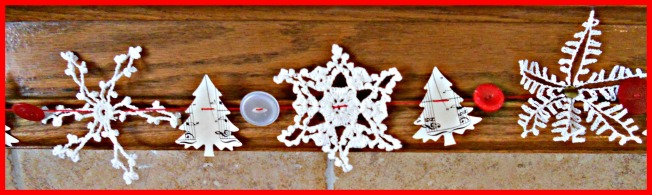
Snowy blue fleece + mini crocheted doilies + stuffing = snowflake pillows to gift as gifts this winter! ♥

I’ve never won anything at the aforementioned benefit auction, but this year I did! I came home with this beautiful decoupaged pumpkin made by an artist name Alyson who is also in my writing group and this gorgeous handmade necklace made by a busy mom, teacher, and grad student named Linda. I decided that the pumpkin could wear the necklace for the rest of the autumn season, because “Joy” and “Thanksgiving” go hand-in-hand, right? ♥

Two of my ruffle aprons are heading to a silent auction benefiting my favorite youth group’s mission trips next summer. I fancied up some hangers by wrapping them in coordinating fabrics and added rolled-flower brooches to the aprons for a little a-la-mode. Maybe someone will be wearing them to prepare Thanksgiving dinner this year! ♥

More aprons . . .
I decided to refresh my autumn garland this year. While digging through my fabric stash, I found a leaf print and cut out one of each leaf. Then I stitched each leaf to one half of a yellow rectangle, doubled the rectangle. stitched the sides together on the sides and bottom, and stitched a casing at the top. After threading them through a piece of baling twine (yes, I was raised on a farm!), it was ready to hang. It makes me smile when I walk in the room! ♥

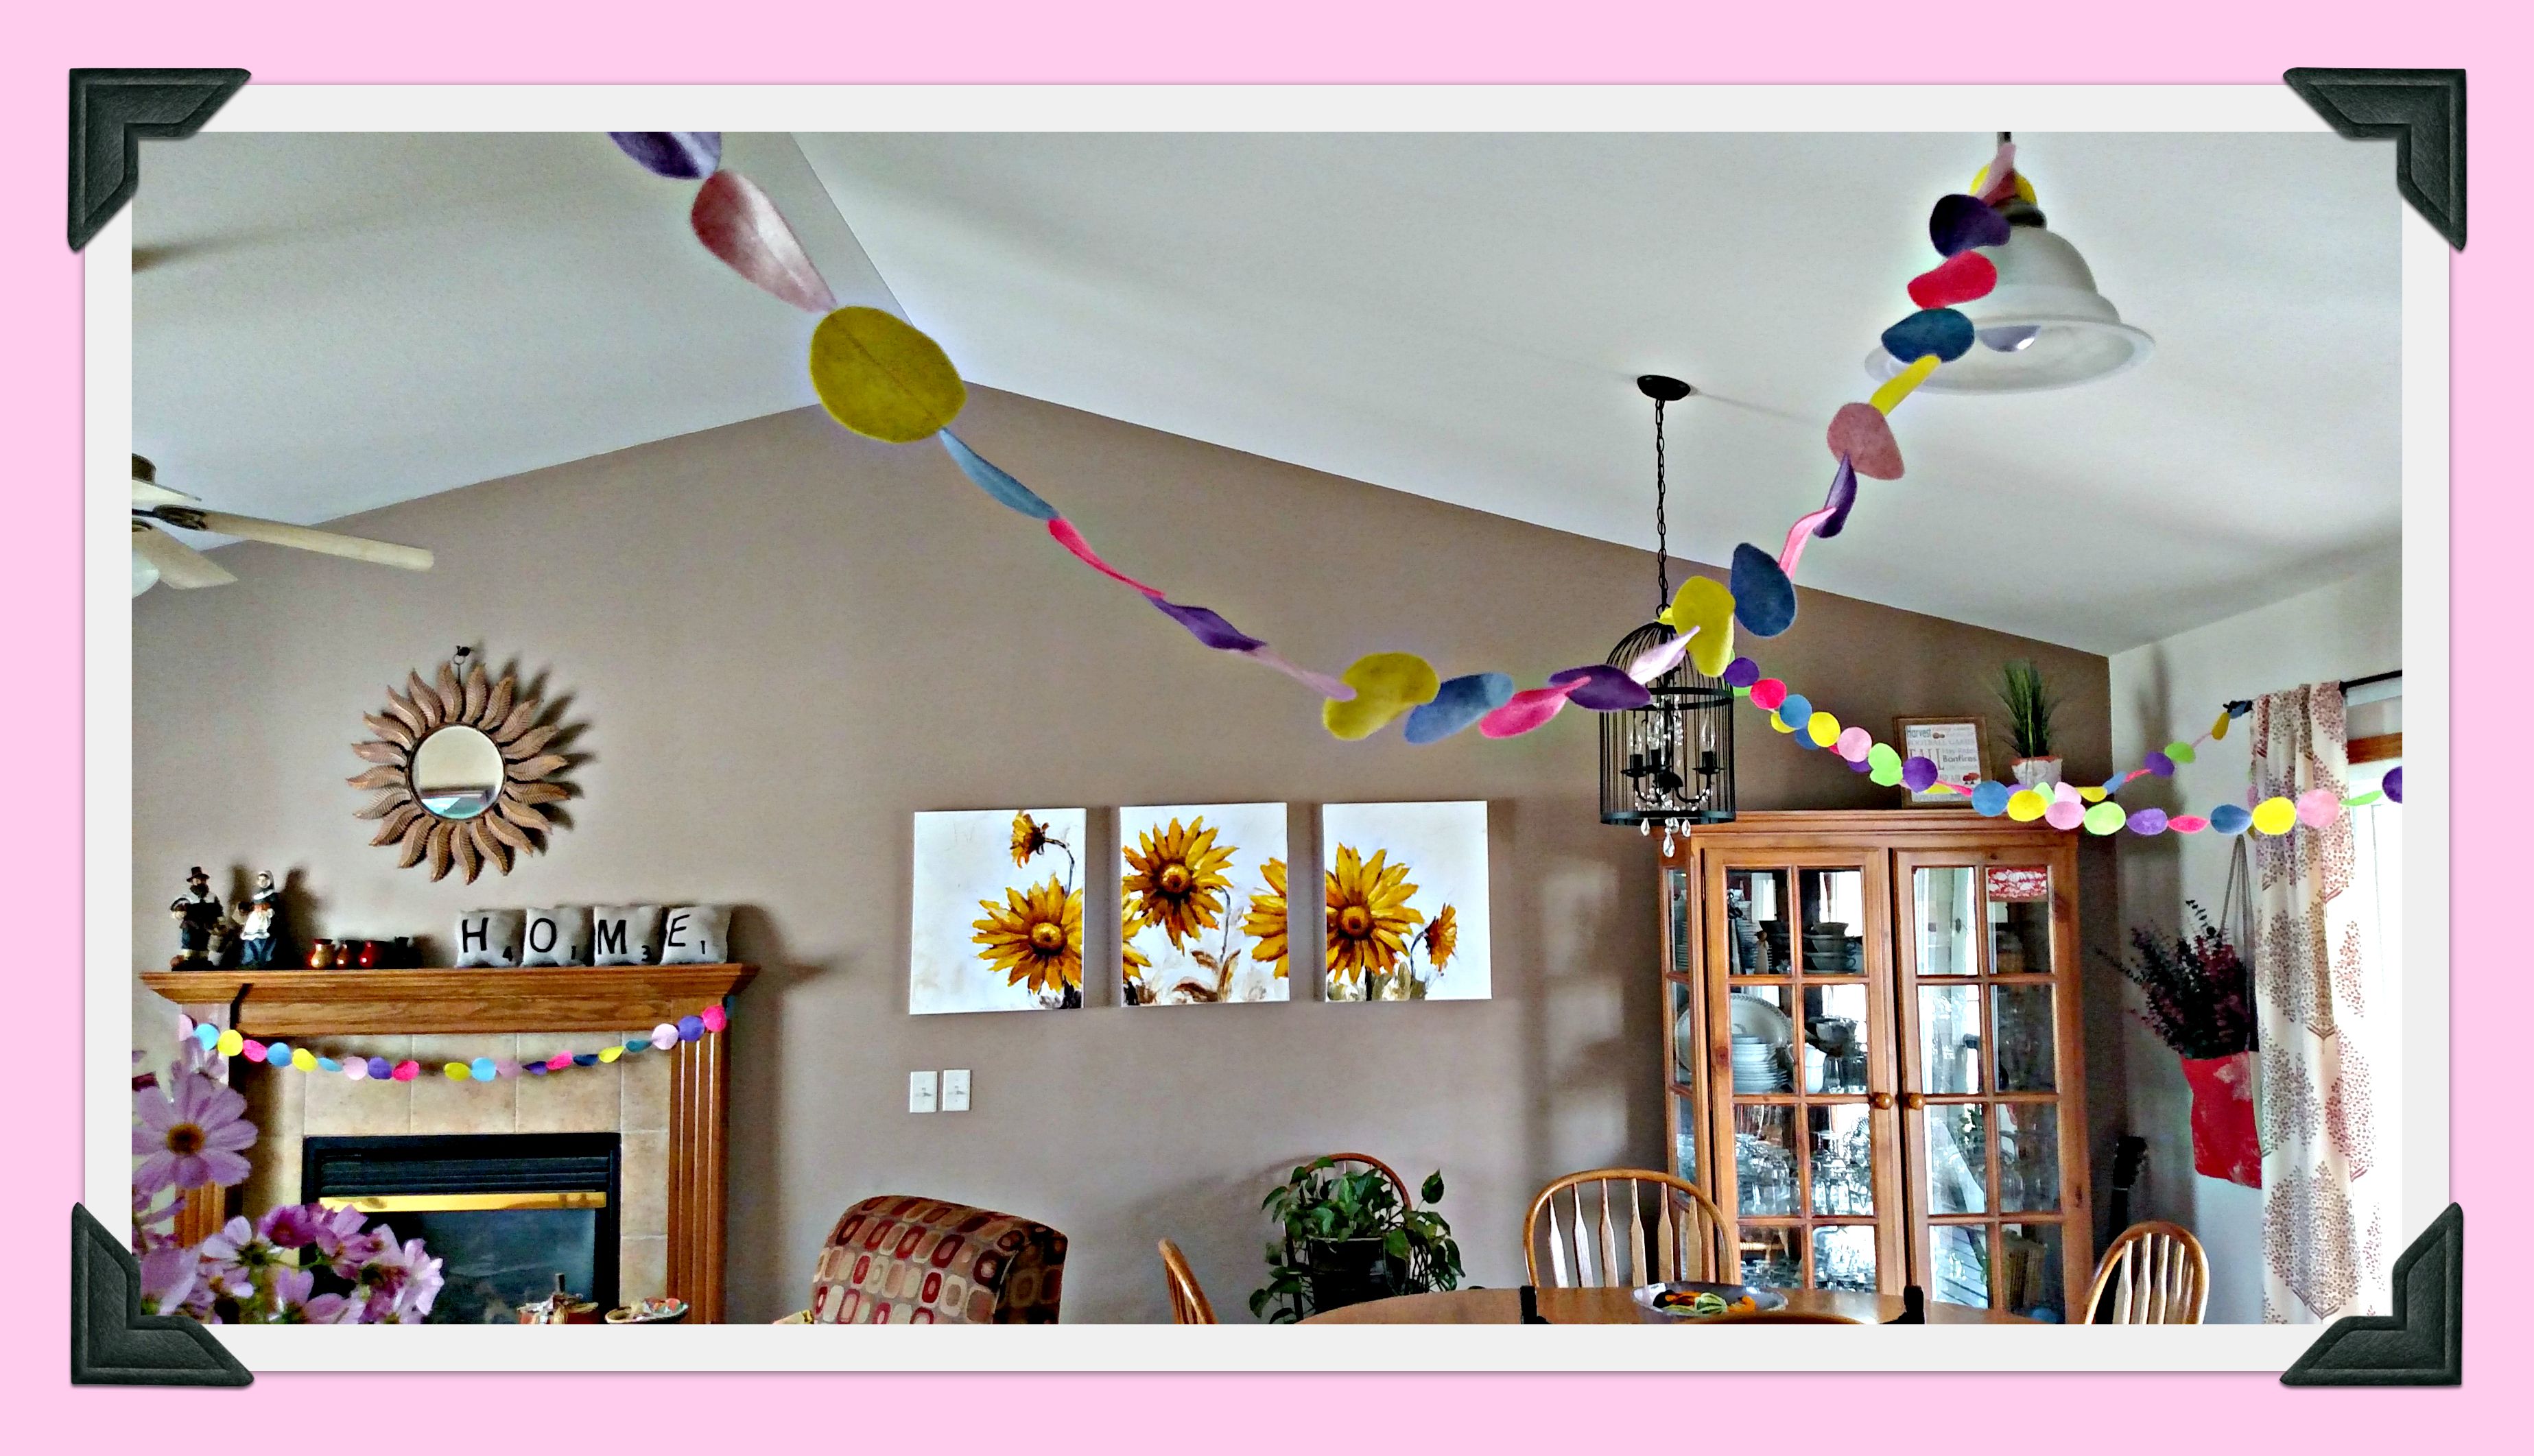
Our granddaughter Ally asked to have her family birthday party at our house (happy face!), so I decided to make some colorful, festive, girly garland to offset the autumn décor. First, I put on a good movie and cut out a bazillion or so circles from my felt stash (using a peanut butter jar lid as a template). Then I arranged the circles in color patterns, moved to the sewing machine, and stitched them together down the middle with edges touching. Finally, I draped them around the room, ready to add table decorations, balloons, a cake, and gifts. She loved it! ♥

A fun way to present a handmade or store-bought gift is in a bag made of a fabric design that fits the gift. Sometimes you can use a bit of fabric left over from the project itself, such as this bag for Katy’s superhero cape with a “K” logo for a-la-mode:

Other times, you can use a themed fabric, such as this beach-designed bag for the swimsuit cover-up I made for Danielle and bunny/carrot fabric for a carrot and book for a toddler Easter gift:


It’s also fun to find fabric that matches books. Here is some Mr. Men fabric for a drawstring bag for a set of books for Kira and some Nancy Drew fabric for a tote bag full of books for Ally and Miranda:


A final idea is to add embroidery to “regular” fabric to fit the theme, such as this bag for cookie cutters:

I love making drawstring bags and totes when I need a quick “sewing fix,” so this is definitely win-win. Thank you for checking them out! ♥
Katy is turning three, so it’s time for another superhero cape! Click on the post about Josh’s cape to get the tutorial for this super-safe version (worn by slipping the child’s arms through the elastics rather than tying the cape around his or her neck). I found the fun fabric on ebay by searching for “girl’s superhero fabric” and used star fabric from one of my Wonder Woman aprons for the tips and back. Happy birthday, dear Katy! ♥

Brown and pink for girls . . . gray and chevron for boys . . . bunny pattern available from Positively Splendid . . . bunnies embroidered with names and attached with Heat n’ Bond and outline stitch . . . use any lined tote pattern . . . time for an Easter egg hunt! ♥

![pillow[1]](https://pillowsalamode.files.wordpress.com/2015/03/pillow1.jpg) It’s always fun to switch out the winter decorations for spring things! Here’s my favorite pillow (and the story behind it!) and links to some other handmade goodies. Enjoy! ♥
It’s always fun to switch out the winter decorations for spring things! Here’s my favorite pillow (and the story behind it!) and links to some other handmade goodies. Enjoy! ♥
 . . . is only one week away! The only new things I’ve made for the occasion this year are some infinity scarves from red-on-white and white-on-red dotted chiffon that I had in my stash. They’re super-easy to sew (check out Pinterest for tons of tutorials!) and perfect for gifting. But it’s also fun to put out some treasures from previous projects, such as:
and my February Shantilly Frame.
Have a happy week sharing *a little extra* love with your family and friends. ♥

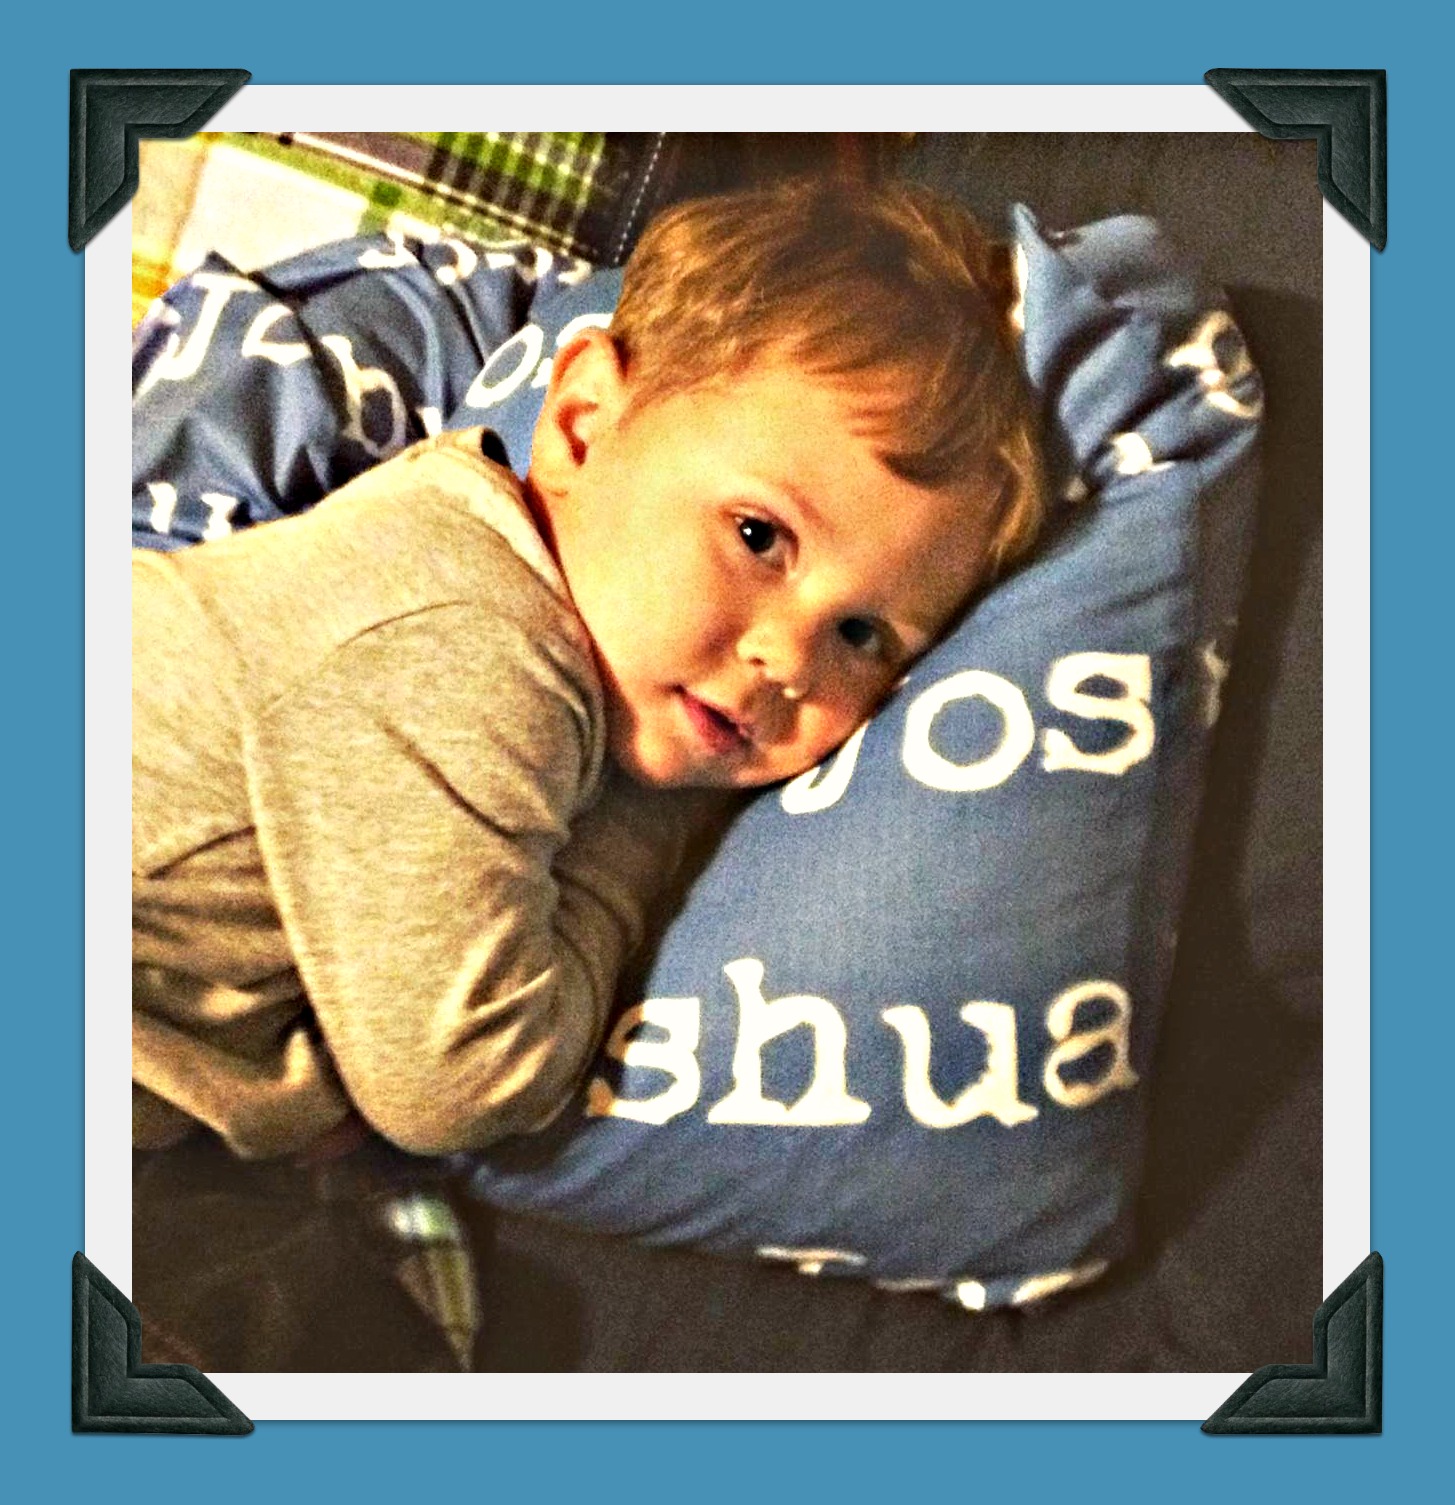
 When I saw this fun fabric on Pick Your Plum, I HAD to get one each for grandchildren Allyson, Kira, Miranda, Brody, Tyler, Ryan, Joshua, and Kaitlyn. It’s exactly the right amount for a “sweet dreams” pillowcase, but it would also make a perfect cape, tote bag, or other personalized item. The photo below is Joshua, who immediately snuggled in and told his mom, “I sleep on it!”
If you sign up at Pick Your Plum, you’ll get daily emails with fun crafty items and accessories at amazing discounted prices. With a little luck, this fabric treasure will come up again soon! ♥
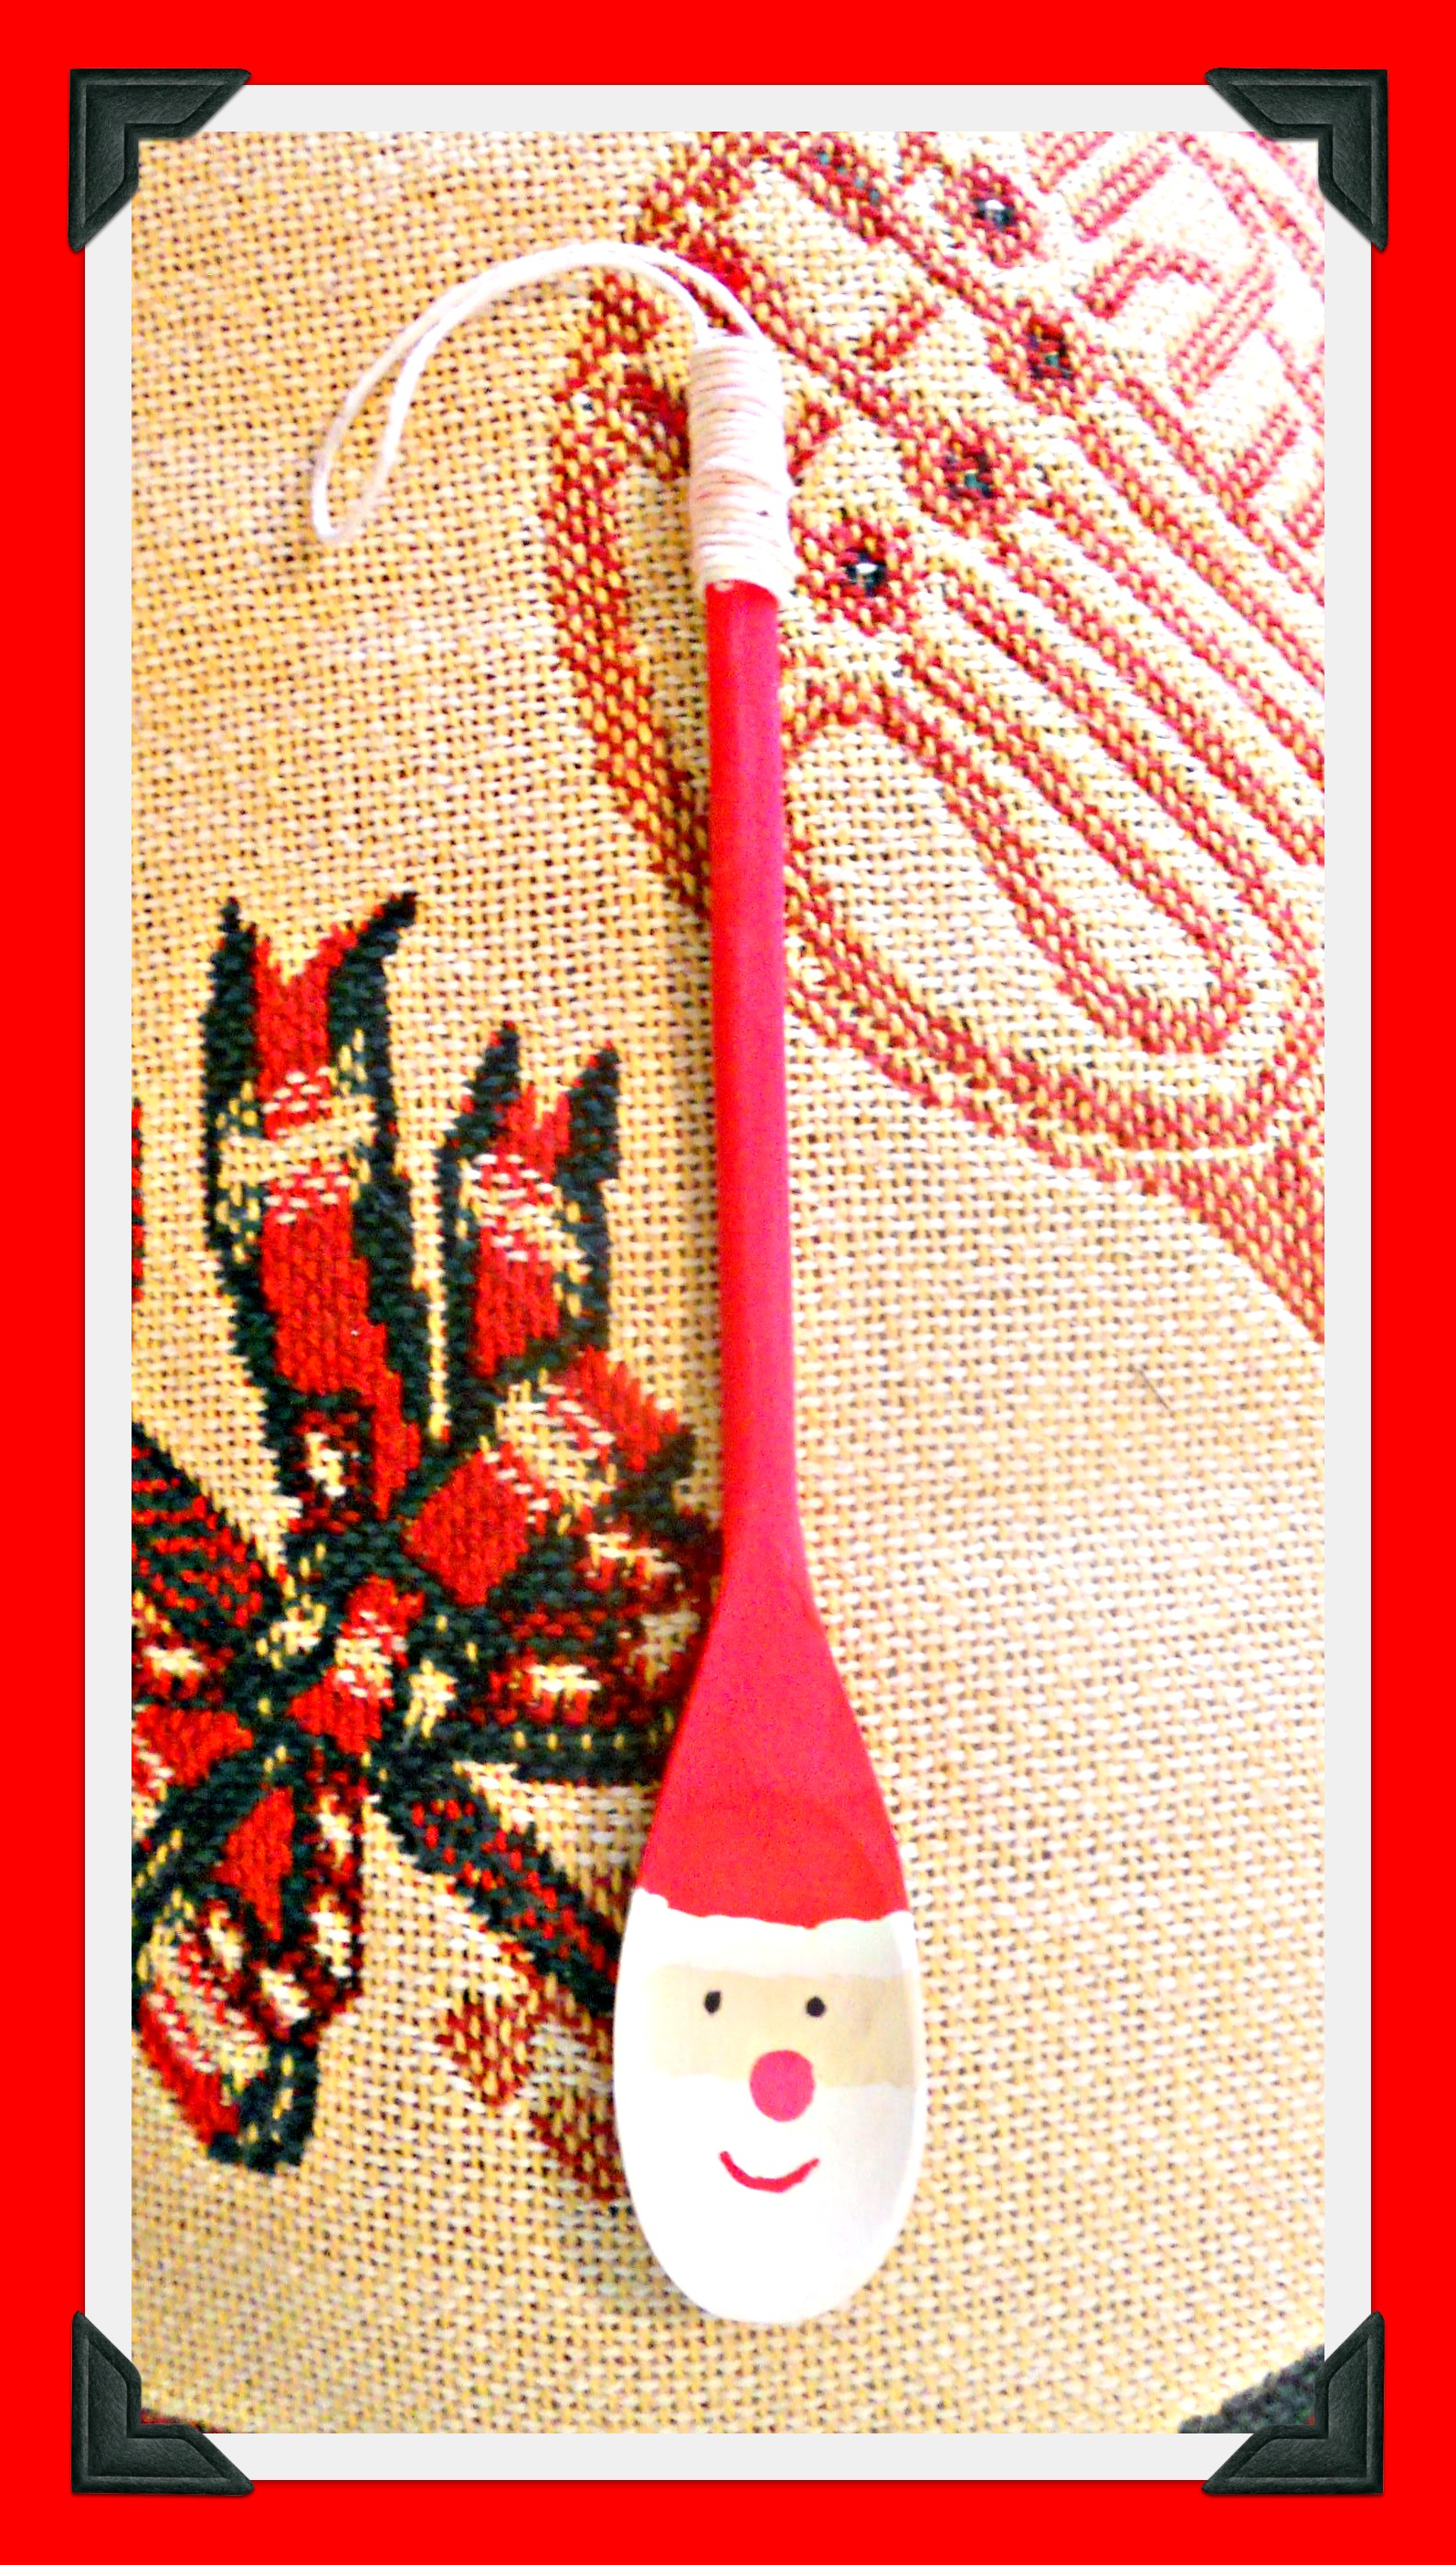 What do you get when you combine a Saturday morning, 8- and 10-year-old granddaughters, a roll of twine, red and white Tempera paint, and a package of dollar store wooden spoons? Sixteen Santas for teachers and friends on the girlies’ gift lists! You’ll find directions on Real Simple, and here are some other crafty ideas from Christmases past:
My blog has been on the back burner since summer, but I think of you often . . . sending love and best wishes for a joyous Christmas season to you and yours!
 Hello, my long-lost friends! I hope everyone is well. I miss reading your blogs and hope to catch up soon.
My friend Sewing Machine and I haven’t spent much time together this summer, but I did find a spot o’ time to make an apron for my adorable granddaughter Katy’s 2nd birthday. This fun pattern is SUPER easy to stitch up, since it uses bias tape instead of hems around all the edges. I bought this pretty pink-flowered tape for Katy’s apron at a craft show, but I now own a bias tape maker and can’t wait to try creating some myself with Beth’s tutorial at The Renegade Seamstress. Katy especially loves her name embroidered on the pocket!
Click here for the pattern from Joan Giammalva. And, if you want a fun cookbook to gift with the apron, I recommend Pretend Soup and Other Real Recipes by Mollie Katzen . . . perfect for toddlers and preschoolers.
Thank you for taking a peek! ♥


My niece Amanda made this clothespin wreath . . . isn’t it festive? Here are some of her tips:
I bought 100 clothespins at Target and painted them with acrylic paint I already had. I like to paint, so it was fun for me, but it would be easier/faster with spray paint. Then I got a wire wreath and a bag of little wooden stars at Jo-Ann using a 40% off coupon and put it together! The clothespins just clip on and I used hot glue to attach the stars. I made sure that there were 7 red and 6 white “stripes.” (My Pinterest inspiration photo didn’t do that and it was driving me crazy!) I love it and it goes great with my blue front door.
Total cost? Eight dollars! Thank you for letting me share your fun project, Amanda! And happy holiday to all my U.S.A. blog friends. ♥ P.S. Click here to see the apron Amanda and I sewed together last summer!

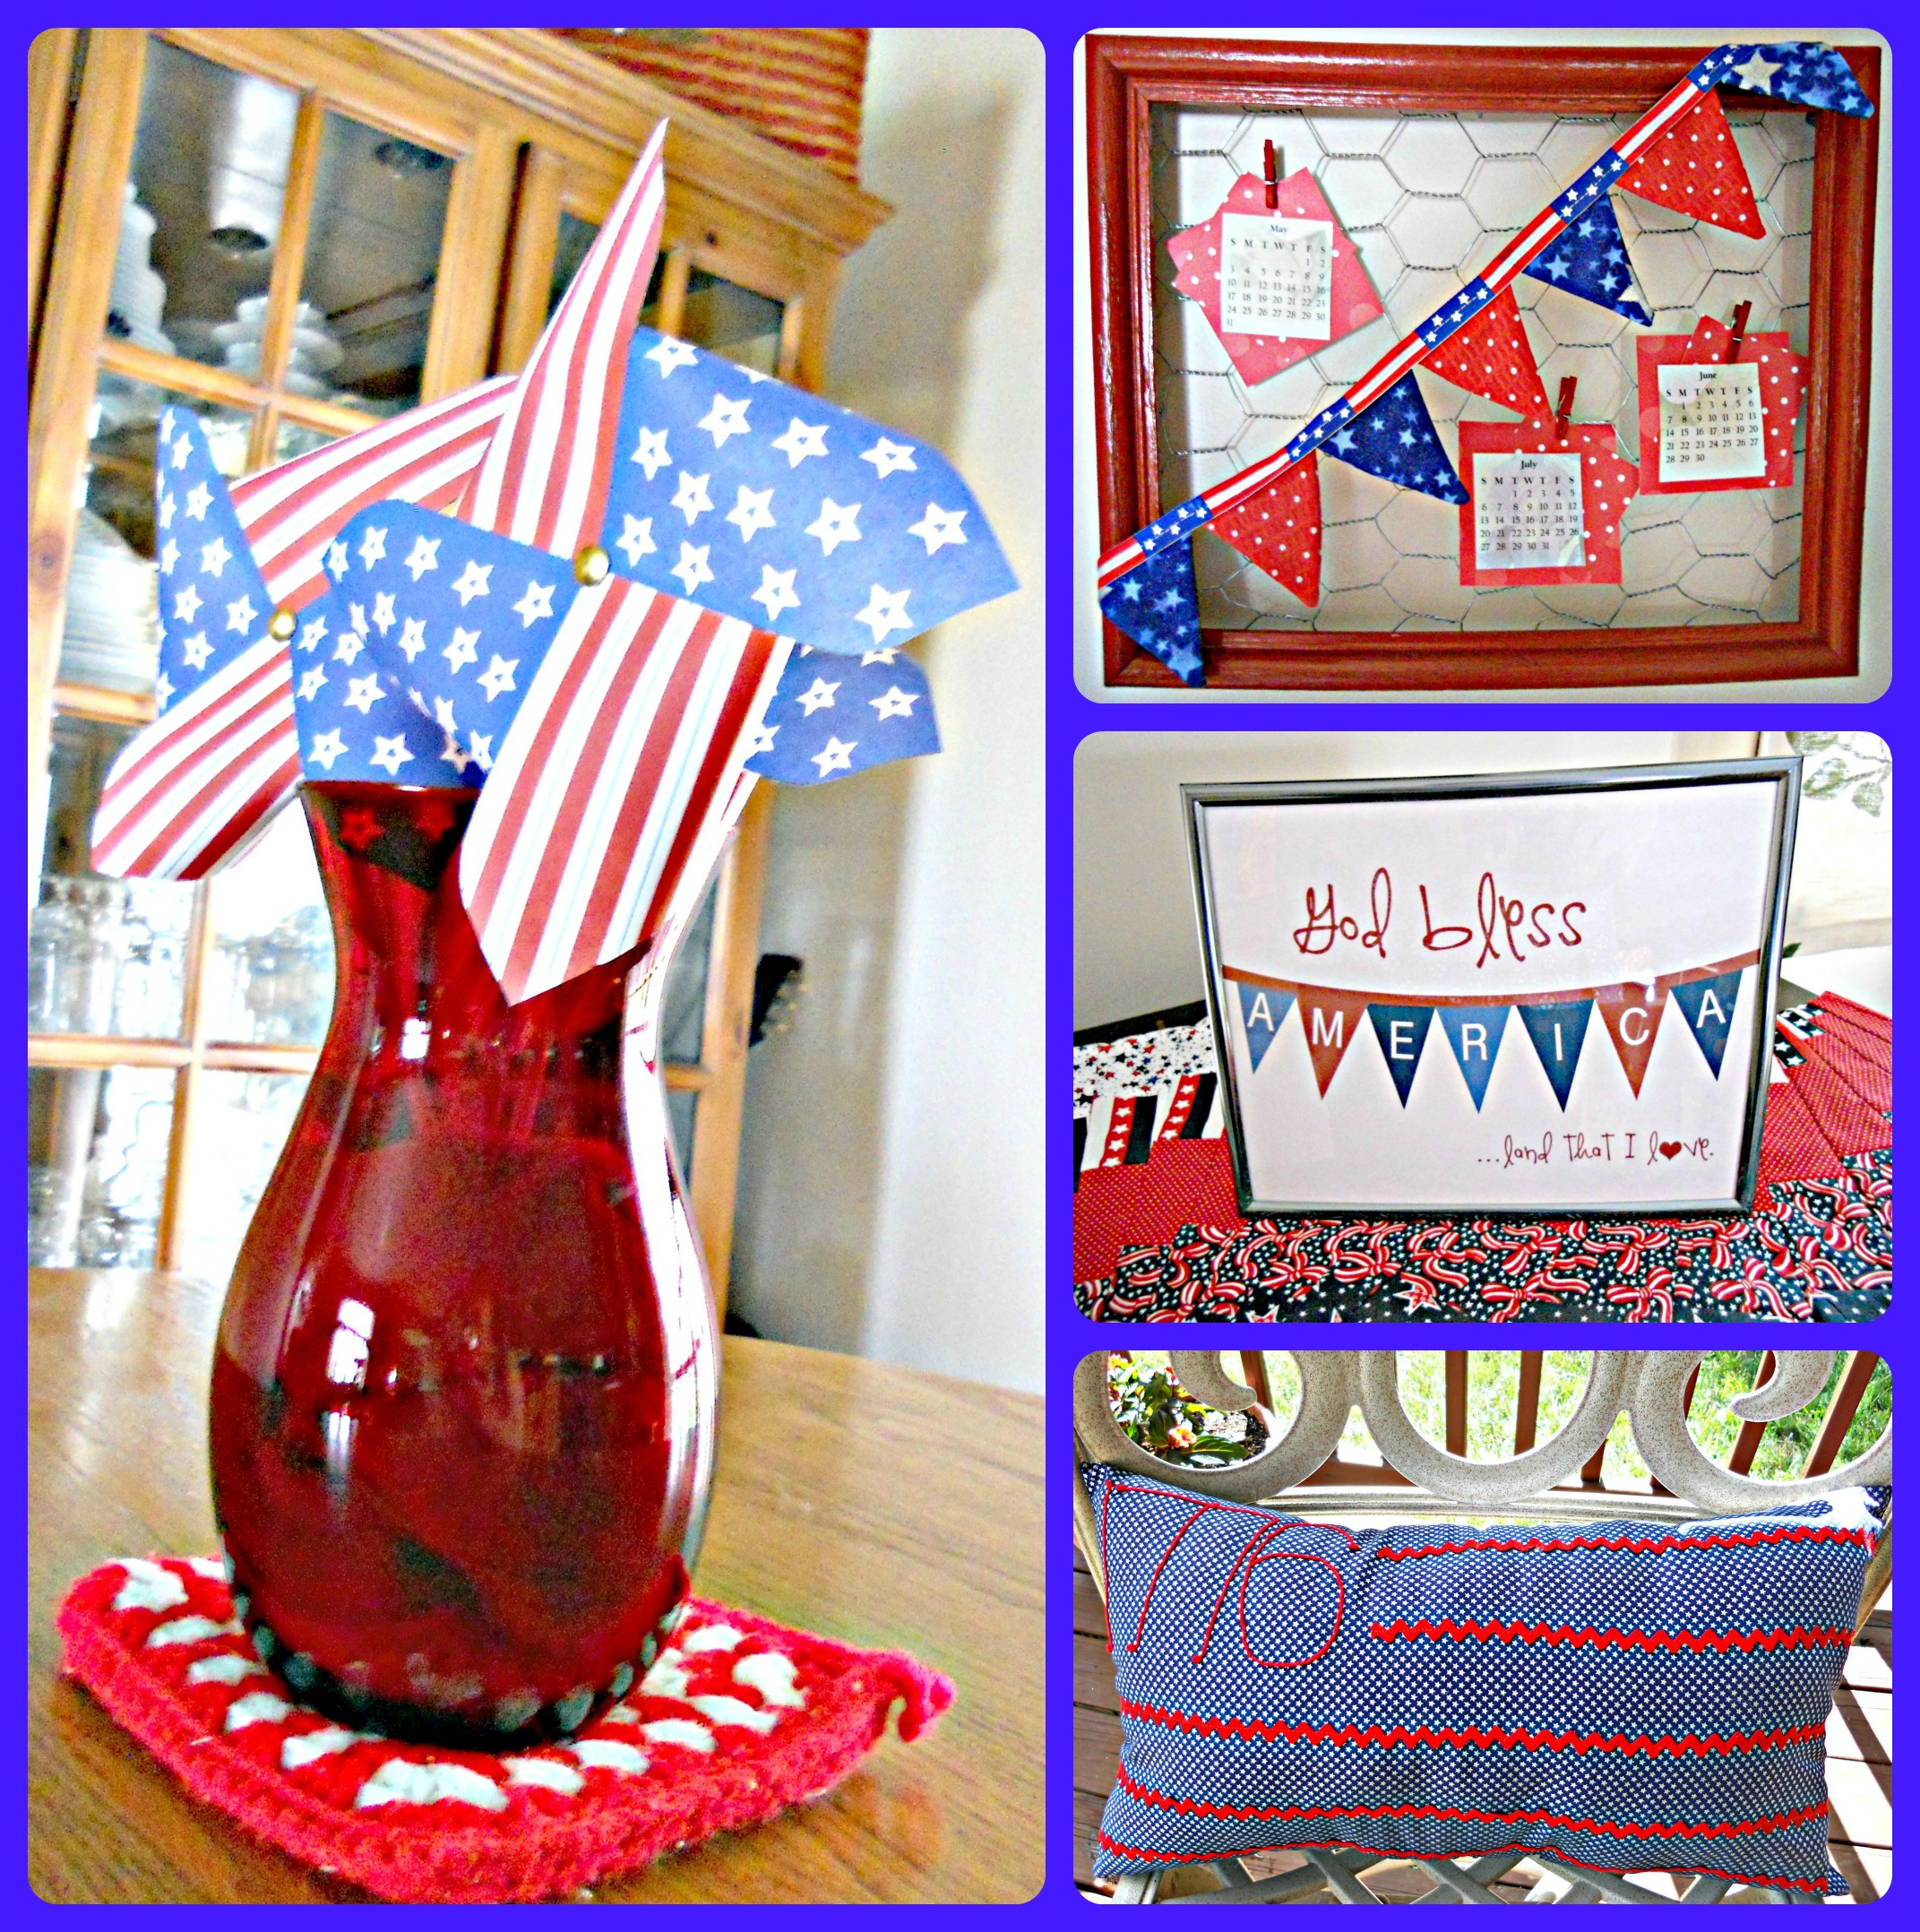
In the U.S.A., Memorial Day is today, June 14 is Flag Day, and July 4 is Independence Day, so you can’t go wrong with a bit of patriotic decor this time of year. Here is my restyled Shantilly frame, a free art print on a hand-quilted table runner my daughter-in-law Tiffany gave me for my birthday, the 1776 pillow I made last summer, and a pinwheel bouquet (also a free printable!). Happy summer! ♥
 What’s inside these upcycled scrapbook paper/washi tape/twine wrapped potato chip cans? Cookies! We received some lovely invitations for the Memorial Day holiday weekend, so I made treats for hostess gifts. Here is a recipe my sons LOVED when they were little that’s no-fail and easy to transport. Enjoy, and I wish you a happy time of remembrance with your family and friends. ♥
RANGER CRISPIES
1/2 cup + 1/3 cup butter
1 cup each sugar and brown sugar
2 eggs
1 teaspoon each baking powder, soda, salt, and vanilla
2 1/2 cups flour
3 cups crisp rice cereal
Heat oven to 375 degrees. Cream butter and sugars. Beat in eggs. Add dry ingredients and stir until well blended. Stir in cereal. Drop by rounded teaspoon onto prepared cookie sheet. Bake for 8-12 minutes. Let stand one minute before removing from pan. Makes five dozen.
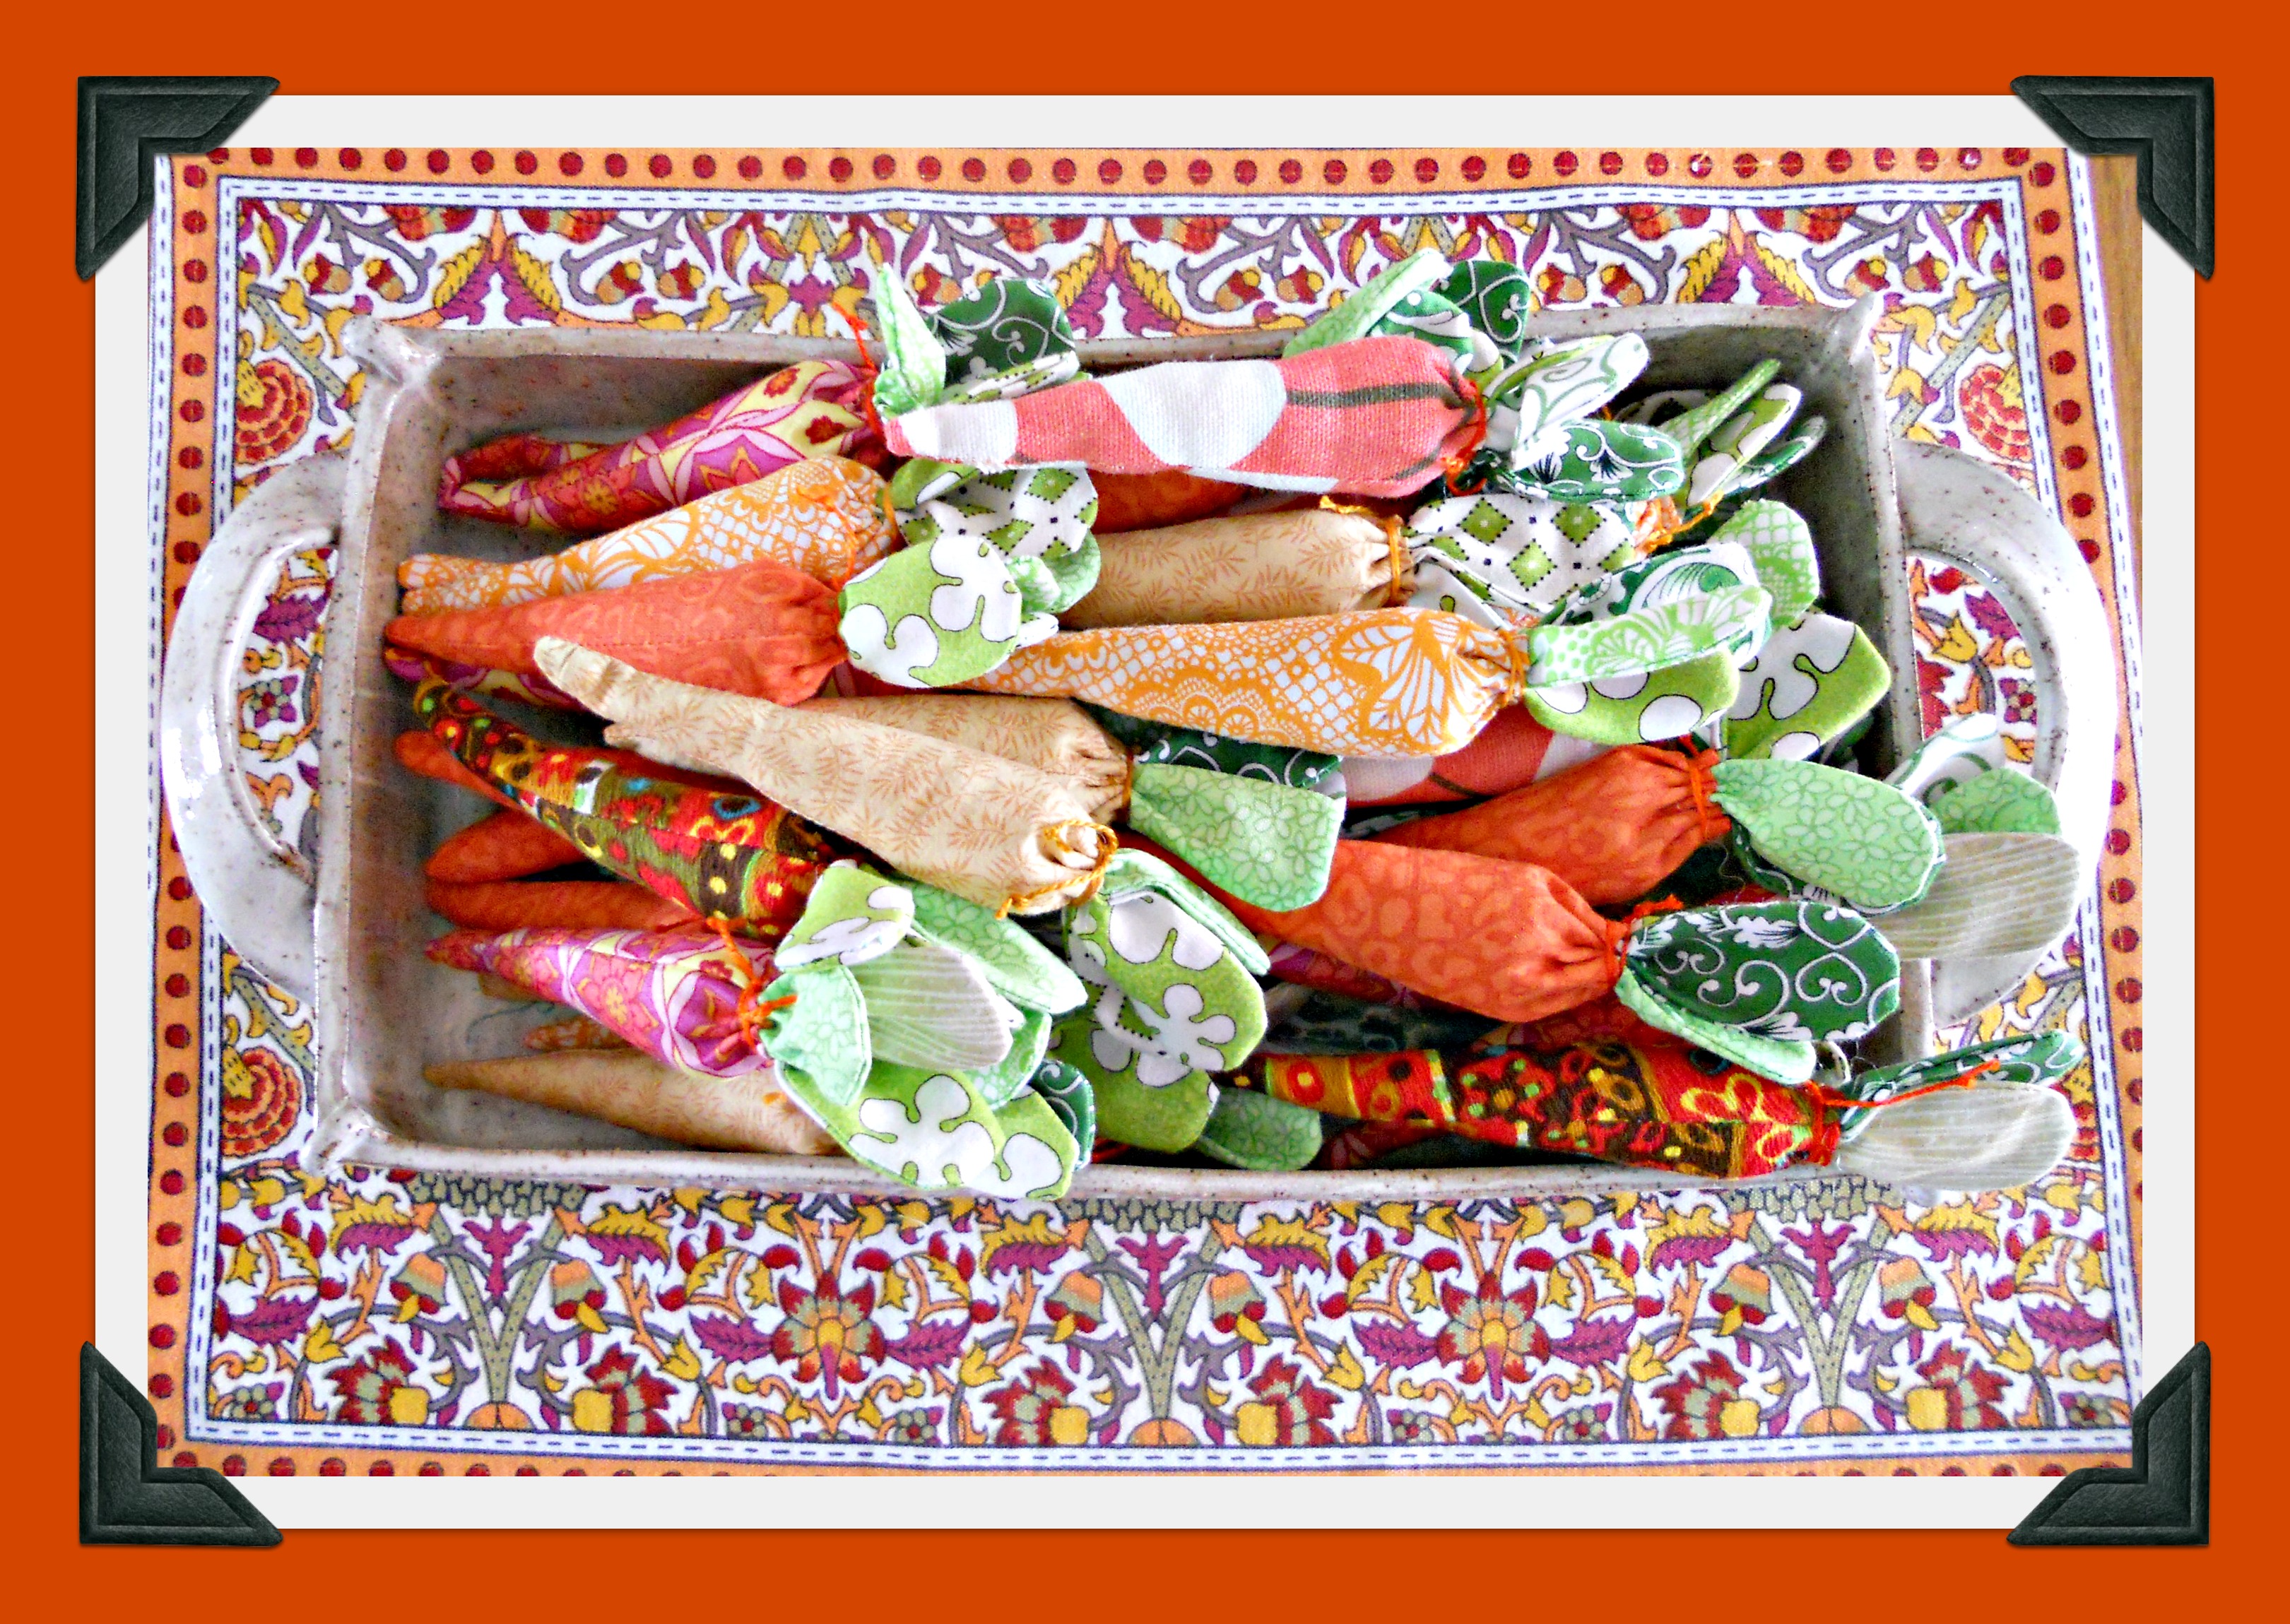
Soooooo . . . have you made your fabric carrots yet? I went a little crazy with mine! Now that I have enough to completely fill the tray, it looks like a little veggie patch! Find some orange and green remnants to mix and match, go to this tutorial at Clare’s Craftroom, and you, too, can have a garden growing on your dining room table! ♥

On a recent visit to our Missouri family, we were greeted by a fun St. Patrick’s wreath on the front door. Our daughter-in-law Tiffany made it from a wire form + decorative mesh + a-la-mode. Then she was kind enough to pull out the ones she had made for Valentine’s Day and Christmas so I could photograph them for you. Tiffany said to check out “decomesh wreaths” or “decorative mesh wreaths” on Pinterest for tutorials and ideas. In the meantime, enjoy these three! ♥


I recently hung the Peeps garland I made last spring (out of felt, not the candy!). Here are the super-simple directions:
(1) Draw a simple bunny shape or find a free template online.
(2) Make the bunnies from felt, fabric scraps, construction paper, or scrapbook paper.
(3) Add the eye and nose dots with fabric paint, permanent marker, or embroidered French knots.
(4) Attach the bunnies to ric-rac, ribbon, rope, string, or twine using glue or hand or machine stitching.
You’ll soon have a cheery pop of color for your spring décor. Have fun! ♥
I was so happy when I got out my spring decorations and found a bunch of these left over from last spring’s bunny sewing bonanza that I promptly plopped them into a basket to display in the living room. You can find the pattern and tutorial from Angie on The Little Fabric Blog. And they’re so quick and easy that you can even make a whole Bag o’ Bunnies for a special little one in your life. Now . . . hop to it! ♥

Who knew that carrots could be THIS cute? I made this springy tray of rabbit food from orange and green remnants using this tutorial at Clare’s Craft Room. I’m pretty sure that a few of them will end up in Easter baskets, too! ♥
Dave requested a sour cream chocolate cake for Valentine’s Day this year, and I found just the one on Taste of Home. Since the recipe is for a layer cake, I used my heart-shaped pans. It’s a keeper! ♥

Do you have hearts all over your home these days? My favorite new display is the clay heart my granddaughter Ally made, my collection of heart necklaces, and the beautiful mixed-media canvas Shannon of Shantilly made for my birthday. From my heart to yours . . . have a happy Valentine’s Day! ♥

During my last spring cleaning, I found NINE unopened decks of cards in the game chest. If they haven’t been claimed yet for their intended purpose, they’re up for grabs for crafting, right? So, when I saw several versions of Valentine garland made from hearts playing cards on Pinterest, I had to give it a try! I punched holes in the corners, strung them with red baker’s twine, and added a few hearts cut from the backs of the Jokers and advertising extras for a-la-mode. So easy, and they made great gifts for some special people I love! ♥ P.S. Here’s the red sweater heart pillow that’s sitting on my favorite chair this month and the felt conversation heart garland I hung across the mantle.


My Shantilly frame got a makeover for February! The inspiration was this fun suit-on-a-hangar bookmark from my BFF Susan, and the words are letters snipped from alphabet fabric glued onto rectangles cut from last year’s February calendar paper. Here are the ones for November, December, and January. Happy new month! ♥ 
It’s birthday party time again in our family! Five-year-old Tyler chose Disney Planes for the theme. I had fun searching out a yard of DP fabric (found it on ebay and got it in two days!) to use for bunting and then sewing a big pile of red goodie bags for Tyler to fill with treasures and send home with his friends. Now for some cake and ice cream! ♥


CORNBREAD SALAD
DIRECTIONS: Layer all but the last three ingredients in a clear glass bowl. Mix mayonnaise, sour cream, and ranch dip together and spread over the top. Garnish with green onions, bacon bits, or cheese. Chill and serve. ♥
This Christmas I had the opportunity to help Darilyn of Thehighnotedotnet surprise her brother-in-law with a Kansas State University guy apron to wear while serving as the family chef. (See the tutorial tutorial here at The Purl Bee.) She was sweet enough to write a lovely blog post about it, complete with photos, that truly put a smile on my face. If you haven’t had a chance to visit Darilyn’s blog, please check out her creative projects! She also has a My Fave DIY’s page and an Etsy shop specializing in items made with vintage sheet music, like these paper Christmas trees that I used while making my snowflake garland last winter. Thank you, Darilyn! ♥

In autumn I bought a fun chicken-wire frame at a craft show from Shantilly, and since then I’ve had fun restyling it for different holidays and seasons. November’s design reminded us to give thanks, December’s spoke of joy, and January’s is all about snow . . . a clip-art mitten illustration mounted on scrapbook paper, letters snipped from alphabet fabric, and tiny clothespins to hold everything in place. ♥

Look at the lovely ornament my sweet art-teacher-writer-friend Ginger gave me at church on Sunday! She twisted and turned a piece of wire into a heart surrounding my L-O-N-G name . . . thoughtfulness and handcrafting at its finest. And now, with Christmas Eve just one week away, I’m off to finish my end-of-year writing assignments, bake, and celebrate with my family. I wish you and yours a very merry Christmas and happy, happy New Year, and I’ll see you in 2014! ♥

Since I have so many colorful red and green decorations and busy prints up for Christmas (like here, here, here, here, here, here, and here!) I decided to go completely the other way on my newest idea . . . somewhat of a visual trick since “Deck the Halls” is such a cheerful song! I used turquoise chevron flannel with the same color embroidery floss, then I played around with the size and placement of the words to replicate the chorus’s inflection, pauses, and pitch. I love the way it makes your eyes say, “Ahhhhh . . . ” Oh, and the embroidery hoops were hand-me-downs and I already had the fabric and floss in my stash, so this was a “free” project. I love those, don’t you? ♥

 In our smaller house, we’ve downsized to a smaller Christmas tree . . . but we still have lots of special ornaments we enjoy having out. So, I like to separate them into “categories” and display like items together.
Pretty, easy, and fun! ♥

Look what I got in the mail this week! My sweet bloggy friend Sharon of Gentlestitches sent these lovely, handmade pillow ornaments for my Christmas tree all the way from Victoria, Australia to Kansas, USA! I just love them! If you haven’t had a chance to visit Sharon’s blog yet, please go take a look . . . she even has a page full of free patterns! Thank you, dear Sharon! ♥

Another favorite Christmas decoration at our house is the “fabric forest” I made last winter. I enjoyed getting these colorful little trees back out to display on top of the china hutch again! You can make the trees any size, and they’re a great way to use up some remnants that might not work for other projects. For a step-by-step photo tutorial, click here. ♥

Besides my felt peppermint wreath, another favorite decoration at our home is this set of decoupaged J-O-Y letters . . . I made them from upcycled Christmas cards! Click here for complete instructions as well as links to lots of other fun, crafty Christmas projects. ♥

One of my FAVORITE holiday decorations is the felt peppermint wreath I made last winter. Click here to learn how to make the garland, and remember that you can use leftover “peppermints” to decorate anything from a package to a tree skirt to a headband. Enjoy! ♥

Ever since I found the perfect giant sunflower paintings by a local artist at one of my favorite little shops, I’ve enjoyed them in spring, summer, and fall. However, when December rolls around, they become Christmas decor! In the past, I’ve always wrapped them in Christmas paper, but this year I purchased some pretty $1/yard cotton fabric that I can use year after year for a little more Earth-friendly approach. Click here and here for the 2011 and 2012 versions! ♥

Remember the chicken-wire frame I bought at the craft show from Shantilly? And how I decorated it for Thanksgiving with cut out burlap letters and a fabric flower? My granddaughter Miranda helped me restyle it for Christmas with new letters, then we added the scrapbook paper ornament my friend Debbie taught me how to make. Perfect . . . and I’ve already got ideas for when Valentine’s Day rolls around! ♥

I made these for our houseguests the day after Thanksgiving for a little change from turkey, and they were a hit! I was lucky to have my sister Susan’s yummy homemade crescent rolls to use, but my friend Janet uses Sister Schubert’s frozen rolls, and my daughter-in-law Tiffany uses sweet Hawaiian rolls, so you definitely have choices. Here’s the recipe for one dozen sandwiches:

In my book, winter has arrived! I changed the calendar to December, the house is decorated for Christmas, I’ve heard some of my favorite carols, and the falling snow magically appeared on my blog (thank you, WordPress!). And, to add the perfect scent, I can use these lovely homemade holiday sprays I won from a giveaway on Peg’s Gotta Do! If you haven’t visited Peg’s blog yet, you must check out her fun creations, such as this hot cocoa gift cone bag, paper Christmas wreath, cupcake stand, bird seed wreath, and award-winning triceratops costume. She also has a brand new Etsy shop! Thank you, Peggy! ♥

 First of all, THANK YOU for all the lovely comments, good wishes, and over 100 LIKES on my Christmas Bunting post! I met my writing deadline for work and had an extra-special time with our Thanksgiving guests. Before I straighten the house and start decorating for Christmas, I want to make sure you’ve heard about our friend Mahe’s newest “green crafting” e-book that you can get TODAY through DECEMBER 4 for FREE by clicking here! (If you don’t have a Kindle, you can get a Kindle app for your computer—also for free—right here.) The book includes step-by-step photos and directions for a Christmas tree, snowman, package toppers and tags, ornaments, placecards, a mobile, bunting, cards, envelopes, gift bags, and LOTS of fun handmade gifts. Most of the projects are designed by Mahe herself but (as always!) Mahe welcomes guest artists, such as:
You can read about the rest of Mahe’s books here, here, here, and here. Enjoy the rest of your weekend, and I’ll be back with new posts starting Monday! ♥
I’m going to take off the rest of November from blogging to finish a big writing assignment (for my “real” job!), host Thanksgiving dinner, and attend some family events. But first, here are my new strings of Christmas bunting! Last year I cut out bazillions of squares of Christmas fabric to make mini-pillow ornaments but didn’t use them all, so I turned the rest into triangles that I could stitch into seam binding. Simply turn under the ends and fasten them with buttons to create loops, and they’re ready to hang. Thank you for stopping by, and I’ll see you in December! ♥


When my boys were little, they loved Mr. Men books. My first-graders loved them, too. Now my grandchildren love them! The stories are odd and quaint and preachy, but the characters are totally loveable . . . and we can all relate to their funny foibles. After Mr. Men Books became so popular, the author/illustrator Roger Hargreaves also started writing Little Miss books. Imagine how excited I was to find Mr. Men fabric at Fabric.com! I ordered a yard to make a drawstring gift bag for a set of Little Miss books for an upcoming birthday girl (there’s even a birthday book in the set!) and had enough for a pillow, too. Oh, and this drawstring bag was so much fun! I’ve made dozens of these bags in my life, but never with this super-cool design by Jona of Stop Staring & Start Sewing. Thank you, Jona! ♥


 1. In a ziplock bag, put:
2. Put the filled bag in your car, tote, or backpack to give away . . . you’ll know when.
3. Repeat. ♥
P.S. This lovely drawstring tote was made by one of the great-great-grandmas in my family. She would be so happy to see its new job!

In my Sleepover! post I told you about Shantilly, a new crafty business launched by my daughter-in-law Shannon and her sweet mom and sister. Their popular handmade items include different sizes and colors of chicken-wire frames to use for memo boards. (My friend Karen bought one for each of her nieces for Christmas!) With mine, I made a new wall decoration for our upcoming Thanksgiving dinner. The letters are snipped from a remnant of the burlap I used for my mini-screen bag, the teeny wooden clothespins are left over from my t-shirt garland kit, and for a-la-mode I pinned on one of my fabric flower brooches. I just love it, and the best part is that I can update and reuse it for Christmas, Valentine’s Day, and more! Thank you, Shantilly! ♥

A couple of weeks ago I showed you the tutus and tops I made for Ally and Kira, and you made me promise to post a photo of them in costume. Here they are with their mom! (I have many amazing daughters-in-law, including Catwoman!) Click here for a link to the tutututorial. ♥

Ally and Kira found some adorable “superhero in tutu” photos while checking out Halloween costume ideas on Pinterest, and of course I said, “Let’s make some!” The girls decided on Batman and Robin, so first we poured over illustrations of the real characters to figure out our colors and designs. For our versions, their mom first bought appropriately-colored tank tops. I found logos on Bing Images, which I traced onto fabric, cut out, and appliqued onto the fronts of the tanks. Next, I made short capes (so they won’t get in the way of the tutus), ruffled them at the tops, and attached them from shoulder to shoulder along the backs of the tanks. Then I studied dozens of cut-and-tie and sewn tutu tutorials (tutututorials???), and I decided on this this lovely version from Rachael Rabbit. Now all the girls will have to do is add simple black masks, tights, and boots . . . plus long-sleeved t-shirts for warmth (black for Batman and green for Robin, which their mom has ready to go). Here are the finished pieces . . . I can’t wait to see them on my little superheroes! ♥


I had some bits of orange and yellow jersey, so I stitched them into a ruffled skirt, added color-coordinated ric-rac, and attached it to a new white baby t-shirt for a cutie in our family! The a-la-mode is a strip of “treat” fabric from last year’s Halloween pillows twisted, coiled, and stitched into a flower and centered with an orange button. Happy candy corn season! ♥

Saturday I had a fun craft day with three lovely ladies . . . my daughter-in-law Shannon, her mom Debbie, and her friend Lori. First we went to a “crafter’s sale” where very friendly people sold their gently used or leftover craft books, supplies, and tools for REALLY REALLY low prices. I came home with a delightful bag of goodies! Then Debbie taught us to make these fun ornaments . . . perfect for decorating packages or hanging on a Christmas tree. Click here for a detailed how-to video and here for a shorter version. As someone who has never scrapbooked before, I had a LOT to learn about terminology and how to use the equipment and tools, so I appreciated my very patient teacher. We all love our finished projects . . . thank you, Debbie! ♥

 Even though Kansas is still REALLY hot, I couldn’t resist getting out my fall decor this weekend.
After I set up the mantel, Dave added a bouquet he picked from his wildflower garden.
Isn’t it just perfect?
Thank you, Dave! ♥

Since I donated last year’s 4th of July pillows (here and here and here) to a charity auction, I whipped up a new one over the weekend using a remnant from the last Wonder Woman apron and some ric-rac and embroidery floss from my stash. I love how the red pops on the bright blue and silver fabric! The finished pillow is 11 inches tall and 20 inches wide. To all my U.S. bloggy pals . . . have a safe and fun holiday with your family and friends! ♥

 Yes, after wishing I could win my own Origami Owl giveaway last month, I received one for Mother’s Day from Tiffany, Jeff, Miranda, and Brody! It has a chocolate locket with crystals, an “Inspire” plate, a gold chain, and a crystal dangle. Inside the locket were four charms that Tiffany decided were “so Kathy” . . . a cross, heart, Grandma heart, and laptop. How sweet is that??? And then I got to choose five more charms! It was SO hard to decide, but I finally picked out a sewing machine (no surprise there!), purse (to represent outings and adventures), coffee cup (since I always have one an arms-length away during my work day), piano (since I used to teach lessons and perform), and running shoe (but mine is pink . . . and I’m running my first-ever 5K this fall!). THANK YOU, dear family, for the lovely gift . . . I’ll cherish it forever. And be sure to check out Tiffany’s Origami Owl shop if you’re looking for a one-of-a-kind gift for someone you love. ♥

Happy Memorial Day weekend! We traveled to Dave’s hometown today to pay our respects and visit loved ones. Since I needed a road trip project, I grabbed a bag of the 4 x 4 fleece squares left over from the no-sew fleece pillows my family made last Thanksgiving and some embroidery floss. I simply folded each square in half, hand-stitched the bottom and side, and added a blanket stitch on the top. [UPDATE: Now I only stitch the sides and blanket stitch the top AND bottom. Click HERE to see why! :)] They’re the perfect size to keep little hands comfy while holding and slurping freezer pops at our family get-together this summer! And, since it was a long trip, I have plenty for everyone. ♥


 The main occasion for our big family gathering over Father’s Day weekend is my husband Dave’s *milestone* birthday. Since Dave has been a teacher, principal, and Superintendent of Schools throughout his career, we’re using a school theme for the party.
The Book Page Banner designed by Lauren of The Thinking Closet (one of the sweetest, most talented bloggers I know!) sparked the idea of using bunting shapes and book-page letters for the birthday banner. My version included:
It was easy and fun and will be a perfect complement to our other decorations. And, if you haven’t checked out Lauren’s amazing banner (complete with detailed tips, a C.S. Lewis quote, a free cut file for your Silhouette, and POM-POMS!!!), then click HERE right now! And follow her blog and FB page, too! Thank you for the inspiration, Lauren! ♥
 I’ve had the BEST Mother’s Day weekend! Cute cards! Thoughtful gifts! Phone calls! Dinner! Flowers! A music theater production of my favorite book, Little Women! And most of all, lots of love. As as I think about my mom, mom-in-law, and grandmothers, I fondly remember my sweet aunts, too. You’ve heard about Aunt Vitha, wearer of fun earrings . . . she always had a cookie jar full of Oreos. And my other aunts . . . what a heartfelt visit I had with them this spring. I cherish every moment with my dear nieces and nephews, and my sister Susan and seven daughters-in-law have the most amazing auntie skills I’ve ever seen. So hats off to you, dear aunts . . . thank you for being our “other” moms. ♥

I went out this morning to see if my miniature daffodils were coming up . . . and they ARE! They were a gift from two of my very favorite teacher friends, Carla and Denise, two springs ago. I love it that these beautiful blooms don’t mind that the mulch is weathered, the sun hasn’t been out much lately, and the latest snow just now disappeared from the ground. They just do what they’re meant to do, symbolizing all that is right with the world. And now I’m off to finish a big writing assignment (YAY!), have a rather . . . er . . . unusual date night (dinner out followed by Good Friday Service followed by KU Sweet Sixteen basketball!), finish Ally’s first communion dress tomorrow, and enjoy Easter service, friends, and family on Sunday. I wish all of you a happy, happy weekend too! ♥

 So, ever since my Bag O’ Bunnies post, all my sewing buddies have been making bunnies out of their fabric and ribbon scraps! And some of my blogging friends, too, like Something to Ponder About and Sew Much Choice! I’ve been giving them away in small baskets as hostess gifts and have a big basketful of them by the fireplace, but I decided to gift the rest in handmade bags. I’m sure everyone already has a favorite method for making drawstring bags, but just in case, here’s mine:
(1) Cut out fabric in a square or rectangle of the desired size.
(2) Decorate the half that will be on the front with embroidery, applique, painting, or other crafty skills. I love to embroider and needed a road-trip project last weekend, so here is my design.
(3) Fold the bag in half right sides together.
(4) Stitch the side and bottom EXCEPT (and this is important!) for leaving an opening in the seam two or three inches from the top.
(5) Press open the seam, and press under 1/4 inch on the top of the bag.
(6) Turn the top to the inside and stitch it to the bag all the way around, making sure your stitching is below the opening in the seam.
(7) Turn the bag right-side out and press.
(8) Using a safety pin, thread ribbon or cord through the opening and tie the ends. (Click photo below for close-up.)
(9) Stuff bag with bunnies . . . you’re done! ♥


I love PEEPS . . . even though they make most of the rest of my family go “Ewwwwwwwww . . . !” But who could resist some adorable PEEPS garland? It’s super easy, and as I made it, I realized I had lots of choices. So here’s a chart! Simply pick one thing from each column (which you probably already have around the house!), and soon you’ll have your finished garland hanging among your other spring decor. Here is mine with felt, fabric paint, ric-rac, and machine stitching. (Click on the photo for a close-up.) Oh, and you can find lots of free templates for the bunny shape on Google images. Have fun! ♥
| PEEPS Bunny |
Eyes and Nose | Garland | Attachment Method |
|
|
|
|
When I meet my amazing daughters-in-law or gal pals for coffee or lunch, I love to take them a little handmade gift. My newest craze is these little spring bunnies made from fabric scraps! You can find the pattern and tutorial from Angie on The Little Fabric Blog. Thank you, Angie! P.S. The lovely tulips are a gift from our recent houseguest and friend, Nancy. The table mat is here, and the photo star on the wall is here. ♥

 I haven’t been baking much lately since Dave and I are both working on our New Year’s resolutions for healthier eating.
BUT . . . yesterday was Valentine’s Day, right?
And Valentine’s Day was MADE for chocolate, right???
I still remember sitting in my grandmother’s kitchen copying down this recipe from her file box when I was a new bride.
It’s just as delicious as ever!
Thank you, Grandma! ♥
In a large bowl, blend and set aside:
In a heavy pan, blend and bring to a boil:
Pour the hot liquid over the dry ingredients and beat until smooth. Add:
Beat until smooth. Pour into prepared large cake pan and bake 30 minutes at 325 degrees.
Five minutes before the cake is done, blend and bring to a boil the following:
Pour over 1 lb of powdered sugar. Add 1 tsp vanilla and beat until smooth.
Punch holes in the hot cake with a fork or toothpick and pour the hot frosting on top. Let cool and serve.
 Remember the little hearts I sewed on my recent travels—upcycled from a sleeve of a cozy old red sweater?
I used two of them for little-girl barrettes with pink button a-la-mode and all but four for my heart-to-heart garland.
Then I looked at the sweater again and decided that the body had to become a BIG red Valentine pillow, like this:
It’s the softest pillow ever! ♥
P.S. The drawing in my office is a print of I’m Into Art by Elizabeth “Grandma” Layton of Wellsville, Kansas. You can read a biographical sketch of Mrs. Layton’s life and see close-ups of her drawings here. She’s one AMAZING lady!

 Welcome to the Collectively Creative Lovey-Dovey edition, hosted by Kelly of Cobwebs, Cupcakes & Crayons! My project this month is felt conversation heart mini-pillows. They were so much fun to make! Here’s how:
(1) Buy a bag of candy conversation hearts for . . . um . . . er . . . research. 🙂
(2) Create a pattern with a free-hand drawing or googling a heart template—or do like I did and use a heart-shaped cookie cutter.
(3) Trace around your pattern on two pieces each of white and various pastel felt.
(4) Lightly pencil a candy saying on a heart of each color, then embroider all the sayings in red.
 (5) Put the hearts of the same color back to back and attach the edges with a blanket stitch using a coordinating color of embroidery floss. Stop a couple of inches before you’re done to add a bit of fiberfill stuffing, then close them up.
(6) Use your hearts for valentines, brooches, magnets, hair accessories, sachets, mobiles, or gift-wrap, wreath, or pillow a-la-mode; display them in a pretty bowl or shadow box; or . . . make GARLAND! I added in some of my red-sweater hearts as well for the perfect Valentine mantel decor.
![]() Before you get started on YOUR mini-pillow hearts, be sure to visit all the amazing Lovey-Dovey blog posts below. Enjoy! ♥
Before you get started on YOUR mini-pillow hearts, be sure to visit all the amazing Lovey-Dovey blog posts below. Enjoy! ♥
 We lost my mom-in-law Vida last night. So I’ll be away for awhile, but first I want to share a story. This photo shows a tiny section of the border of a huge, gorgeous tablecloth that Vida embroidered for us, along with a set of eight napkins. I can’t even begin to imagine how long it took to make . . . just look at all the details, including little French knots around the centers of the flowers! One holiday we were all sitting around the table stuffed and unmoving, savoring the memory of the meal and putting off dish-washing as long as possible. “Everything was just perfect,” someone finally said, breaking the silence. Then another family member replied, “Well . . . not quite . . .” We all looked at her expectantly. “I’m not positive, but I THINK the cloth is on the table wrong-side up!” she explained. We all peered intently at the stitches, and honestly we couldn’t even tell because Vida’s embroidery is as perfect on the back as it is on the front! I sheepishly apologized, but Vida just smiled graciously, loving that my mistake was actually the highest form of compliment to her handiwork. Vida and I have laughed about that every holiday since then, and I know I always will . . . but from now on, with a tear. I love you, Vida! ♥

 Remember the beautiful birthday cards I received a week ago today? The fabric postcard is framed (Laura wrote a how-to post about it and I even commented . . . never knowing what she was up to! :)), twenty are on my photo mobile, and the rest are displayed in a beautiful bowl. Thank you again for the wonderful surprise! ♥
 These easy, yummy cookies were a huge hit at our family Christmas celebration. Luckily, I was able to grab a snapshot before they all disappeared! Here’s the recipe:
In a large pan, stir together:
Bring to a boil and continue boiling for one minute. Remove from heat and stir in:
Drop by spoonsful onto waxed paper. Cookies will set up as they cool. P.S. I recommend making a double batch . . . they won’t last long! ♥
I can never take down ALL the Christmas decorations on December 31, can you? Instead, I like to “tweak” some of them for the winter. Here are some of this year’s gentle changes:
(1) Keep the giant winter wreath and snowflake garland, but trade the nativity on the mantel for family photos.
(2) Keep the Christmas cards nearby to enjoy again and again, but add a free New Year’s printable in a frame.
(3) Put a fun snowman on top of the kitchen cabinet by the antique milk bottles.
(4) Change out Santa for a snowman in the fabric forest and add a “Baby It’s Cold Outside” free printable in a frame.
(5) Get out the softest, squishiest, coziest sweater pillow I’ve ever made for winter napping. ♥


 We had our “Walker Family Christmas” yesterday, and when my daughter-in-law Shannon walked in with this cute owl tin, little did I know that a surprise birthday party was inside! A few weeks ago, Shannon secretly emailed as many of my blogging friends as she could and invited them to join in a card shower for my birthday today, and W-O-W, was I ever showered! I stayed up until all hours last night reading and shedding some tears over the beautiful cards and sweet messages from all over the world. I can’t thank Shannon enough for this incredibly thoughtful gesture, and I can’t thank YOU enough for being my wonderful friends and encouragers. As this card that Shannon made for me says, “One kind word can warm three winter months.” New Year blessings to all of you, with love from Pillows A-La-Mode. ♥


Garland:
Crocheted snowflakes: My Grandma Leona
Music Christmas Trees: TheHighNoteDotNet
Inspiration: Winter Owls

I have the sweetest friends! One of them gave me a stack of Christmas remnants this fall. I used them for my mini-pillow ornaments and decided to make a “fabric forest” from some of the other bits. I was inspired by the cute design I saw on the cover of my Fa la la la Felt book by Kathy Sheldon, but I wanted to use cotton fabric instead of felt and make all different sizes, so I came up with my own tutorial. It would also be pretty to use solid color fabrics and make them look like decorated Christmas trees with buttons, sequins, rick-rack, and other a-la-mode. I think I’ll leave my forest up through the winter, switching out their Santa companion for a snowman. Each tree takes about 15 minutes. Ready? Let’s go! ♥
 |
For the tree, find a corner of the fabric. Measure and mark the same length straight down, straight across, and at several points in the curve between, then cut along your marks. For the base, divide the length you used by .25. This measurement will be the radius of the circle. Mark a dot on the fabric. Measure and mark the radius all the way around, then cut along your marks. Example: This tree measurement is 9 inches, so the base radius measurement is 2.25 inches. |
 |
Fold the tree piece right sides together and pin along the straight edge . . . |
 |
and then sew the edge with a ¼ or 3/8 inch seam. |
 |
Turn the tree right side out. |
 |
Open the seam at the bottom and pin on the base, right sides together. Only use one pin . . . your fingers will do the rest! |
 |
Sew the tree and base together from the tree side using a 3/8 inch seam. Feed the fabric through a bit at a time, using your fingers to make tiny gathers in the tree to help it fit the curve of the base. It sounds hard, but it’s really not! |
 |
Keep going . . . |
 |
until you’re a couple of inches away from where you started. |
 |
Turn the base right side out. |
 |
Put stuffing through the opening. If needed, use a chopstick to poke the stuffing to the top. NOTE: Don’t overstuff, as that will give the tree a rounded base and it won’t stand up straight. |
 |
Pin the opening and hand-stitch it shut. |
 |
You’re done with that one! To make a little forest, simply repeat with different fabrics and sizes. Enjoy! |
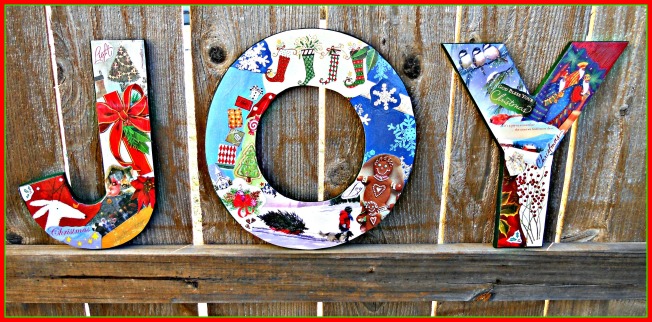
Welcome to the “JOYFUL” edition of Collectively Creative, hosted by Kelly of Cobwebs, Cupcakes & Crayons! My project is easy and fun . . . similar to the Instagram collage letters I made this summer. . . . and I love how it turned out!
(1) Purchase some wooden letters at a craft store. Mine are 12 inches tall and were on sale for around $2 each.
(2) Optional: Paint the letters and let them thoroughly dry. I spray painted these with the green paint left over from my antique milk bottle project.
(3) Get out Christmas cards you received and saved from last year and cut out pictures and words to fit the shapes of the letters, overlapping them as in a collage. Attach these bits with Mod Podge. Or, if you don’t have cards available, use images and words from holiday magazines.
(4) When each surface is covered to your satisfaction, coat the entire letter with Mod Podge and let it thoroughly dry.
(5) Display your letters on a shelf or drill small holes or attach hanging hardware to the backs and hang them on the wall. Mine are now over the stairs along with my peppermint wreath where they’ll greet our Christmas Day guests at the front door. ♥
P.S. Before I link to our other Collectively Creative posts, I’d like to give a shout out to some other amazing bloggers who have shared their J-O-Y this season. Thank you to ALL of you for your inspiration!
Made in a Day (and here!)
![]() COLLECTIVELY CREATIVE:
COLLECTIVELY CREATIVE:
 I started writing this post a couple of days ago to show you my new Christmas decoration. When I began having children of my own, my mother gave me the cookie cutters we used to make Christmas cookies when I was a little girl. Oh, the hours of fun I’ve had with them! This December I wanted a little something extra in the kitchen, so I strung them on ribbons, tied them together at the top, and hung them in my window.
Today, I think of my cookie cutters in a completely different way. I weep with joy that I got to grow up baking Christmas cookies with my mom and that my sons got to grow up baking Christmas cookies with me. And I weep with sadness for those children and parents who won’t have that opportunity this Christmas.
To Kris and Mike, who lost their 14-year-old daughter Bekah to cancer this week . . . to the parents of the children who were killed at their elementary school yesterday . . . to all parents everywhere who mourn the loss of a child . . . may you find comfort in the love and prayers of all of us. ♥
 Last week I put out my first “Shop Love!” post.
I wanted to start promoting our blogging friends’ small businesses.
I’ve done a little more shopping . . .
and I won a giveaway . . .
so today I’d like to highlight four more bloggers and stores.
Once again, each one impressed me with both their BEAUTIFUL products . . .
and their QUALITY customer service.
Here are their contact links!
You can also check them out ANYtime on my new “Shop Love” page above. ♥
(1) The Original Thread: I fell in LOVE with this inspirational 2013 calendar, which is designed by Melanie of The Original Thread blog and sold as a fabric panel in her Spoonflower shop at Madex Designs. She has many other gorgeous fabrics as well!
 (2) Terri’s Notebook: I recently won a lovely giveaway from Terri’s Notebook—two pdf patterns. I was going to wait until I made the items to share them . . . but that hasn’t happened yet, so I’ll share what they WILL look like. 🙂 The first pattern is for Stuff Baskets and the second is for a Checkerboard Set, and both are for sale at her Patchwork Trails Etsy Shop. You can also visit Terri’s portfolio here and her paper goods shops here. Terri’s motto is “Explore. Dream. Create.” Don’t you love that? ♥
 (3) A Kitschy Kitchen: I’m just starting to make aprons myself, but I know someone on my gift list who will LOVE this one! It’s from Megan of A Kitschy Kitchen: The Life and Studio of an Apronista who sells her creations at her Etsy shop. Notice, too, the adorable fabric gift card holder! Stressing quality as well as beauty, Megan’s motto is “Buy Well, Buy Once.” She also has some other lovely items in her shop, such as embroidery, cocktail napkins, and coasters.
 (4) TheHighNoteDotNet: I’ve followed Darilyn’s lovely blog thehighnotedotnet for a long time now and was so excited to receive my first purchase from her Etsy shop, which specializes in vintage music projects. Darilyn even included a little gift . . . a copy of my favorite quote, which I embroidered on a pillow and she offers to all of us for free to make an iron-on transfer. She graciously provides tutorials for her projects as well. And check out her craft room . . . it’s amazing!
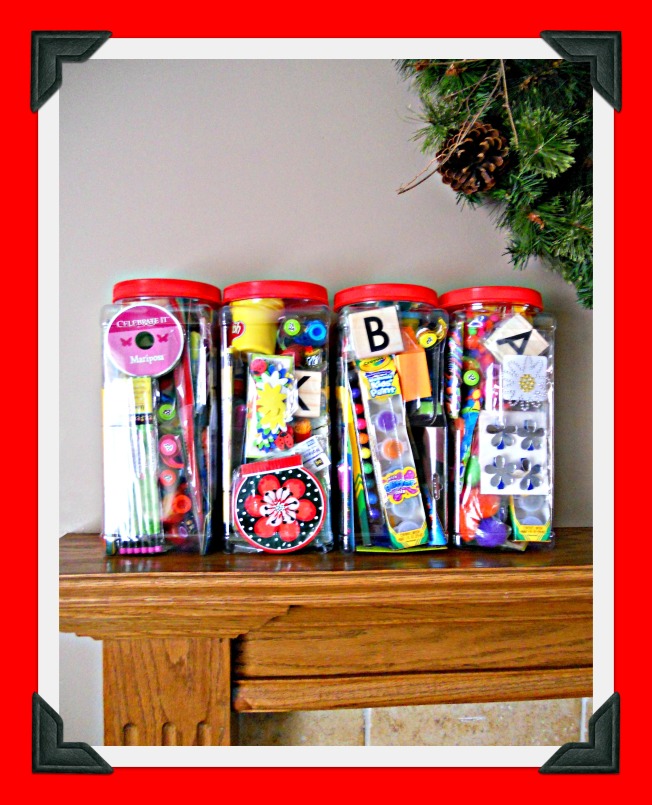
A couple of years ago I saw a kids’ art jar online and thought it would be the perfect gift for a special little girl’s birthday. It was so colorful and intriguing . . . but when we dumped everything out, I found LOTS of pretty raffia filling and WAY too few actual art supplies. Live and learn, right? So, when my dad was preparing for a recent move and asked if I’d like to have some empty plastic snack containers, I immediately thought, “ART JARS!” I began collecting artsy/crafty items from the dollar bins at Michaels and Target, plus hitting the dollar stores, and soon had a huge bag of fun things to include. These will be under some Christmas trees soon! ♥
 A special little girl in our family celebrated her sixth birthday on December 1st. As you know, a December birthday gift must NOT be Christmasy! 🙂 So, since she absolutely loves to bake with her mom, I decided on a cupcake gift. First I made an apron using a remnant from the nursery pillows I sewed last summer that looks like sprinkles. I didn’t have a child-size pattern, so I just cut a rectangle for the front, a long, skinny piece for the waistband and tie, found some rick-rack trim, and stitched it up. Then I folded a piece of paper, sketched half of a cupcake paper and top, cut them out, unfolded the paper, and used these as patterns for some cupcake a-la-mode (two yellow fabrics and sequins for sprinkles) and a scrapbook paper gift tag. Then I bought some cake mix, frosting (with sprinkles!), cupcake papers, and cupcake flags to go with the apron. I was going to make a little totebag to gift it in, but then I spotted this adorable tin for $2.99 in my grocery store’s clearance aisle . . . how lucky is that! Happy birthday, dear Kira! ♥ P.S. Please check out this fun post on Peg’s Gotta Do for more cupcake inspiration!

 After making a peppermint wreath and peppermint Christmas tree skirt, I had three little felt peppermints left, so I wrapped a headband in red bias tape and stitched the candies on top to make a festive accessory for a special little girl. This was another free-to-me activity since I already had all the supplies on hand . . . don’t you love it when that happens? There’ll be no more peppermint projects for me this Christmas since I used up all my red felt remnants and have vowed to use up my stash before buying more fabrics (we’ll see how THAT goes!). But several of you have said you’re on it now, so I can’t wait to see what you make! Now . . . on to some Christmas gifts . . . and Christmas pillows . . . and . . . ♥

 I fell in love with this Christmas garland, adapted from an idea in Fa la la la Felt by Kathy Sheldon. Here are the steps:
(1) Cut red and white felt into strips. Mine are 1/2 inch x 8 inches.
(2) Lay a white strip over a red strip, then pull the white strip down about an inch. Begin rolling upward at the end you pulled down. This will give the “candy” a solid white center and a red outer layer.
(3) After the piece is rolled, put a pin through it to hold everything in place until you string the candies.
(4) Using a sturdy needle and extra-strength thread, poke the needle through the loose end of a candy, go through the middle of the candy and out the middle of the opposite side, and remove the pin. Pull the candies close together to keep the rolls tight.
(5) Hang your garland on the mantel, in a doorway or window, or on a Christmas tree or wreath! ♥

 Here is a photo of my new favorite pillow that I finished last night! It just sort of evolved . . . here’s how.
(1) When I recently organized my crafty corner, these two fabrics ended up side by side on a shelf and made me think of Christmas. The red cotton is from a thrifted tablecloth, and the lime green felt is from the citrus coasters I made last summer. Then I saw an argyle sweater in an ad, and a lightbulb went on!
(2) I used a shape pattern from Google images to cut these diamonds from the felt. Then I pinned them in rows and pondered how to attach them. I decided that having the corners loose would give the pillow a more interesting texture, so I embroidered an “X” across the middle of each diamond . . . sort of a “free-form argyle.” 🙂
(3) When I stitched the pillow front and back together (the back is another piece of the red tablecloth, unadorned), I stitched through the middle of each outer diamond, which gave the edges a sort of rick-rack pattern. Finally, I stuffed the pillow and hand-stitched the opening. I may never make another one, but it sure makes me smile! ♥
 I want to thank my blogging friend Sharon of Crafts ‘n Coffee for the WONDERFUL blog giveaway gifts she sent to me—THREE Christmas craft magazines, three mini-magazines with even more crafting ideas, and a STAK tree kit . . . plus she added a button, Starbucks coffee packet, and full-length pocketed apron from Styrofoamflorals.com! THANK YOU, Sharon . . . I can’t wait to try all these ideas! ♥
Facebook: http://www.facebook.com/StyrofoamCrafts
Pinterest: http://pinterest.com/craftsncoffee/
Twittter: https://twitter.com/craftsncoffee
In late summer I started on my Christmas mini-pillow ornaments, and I finally decided to stop . . . for this year! (They’re addictive!) All they take are little bits of fabric and ribbon, plus buttons, bells, lace, and embroidery . . . oh, and your imagination! P.S. Please check out these links for some more ornaments to try! ♥


 After the big Thanksgiving dinner at our house, the kids and grown-ups visit, snack, watch football, snack, nap, snack, and . . . make things! (Check out these Play-Doh sculptures from Thanksgivings past! :)) This year I’ll still have the usual supplies, but I thought it would also be fun to have a project that the kids can take home and/or guests can make to donate to a local nonprofit for Christmas gifts for children in need. The minute I decided on no-sew fleece pillows, I got an email from Hancock Fabrics with all their fleece for half price PLUS free shipping, so I knew it had to be! To keep it simple, I went ahead and did all the cutting, rolled and tied each matching pillow top and bottom together, and put the right amount of stuffing in individual bags so everyone can just choose a fabric, grab a bag, and find a comfy spot to craft and chat. I’ll try to post a photo of all the kids with the pillows we make after the holiday! ♥
P.S. Since the instructions call for cutting out the corners from each piece, I now I have about a bazillion colorful 4 x 4 inch fleece squares to use for other projects. Any ideas???
 P.P.S. Click here for a kids’ Thanksgiving story and lots of wonderful last-minute holiday recipes and crafts from Collectively Creative. Blessings to all!


Welcome to the “THANKFUL” edition of Collectively Creative! Today I have a giveaway for all of our blogging friends . . . one of my children’s stories from Pockets magazine for you to read, share, and/or use to introduce a creative writing activity about holidays. Simply click the first link for a printable word document or the second link for a printable pdf.
Mrs. Hetherington’s Thanksgiving Pageant (word document)
Mrs. Hetherington’s Thanksgiving Pageant (pdf)
I hope some special kids in your life will enjoy meeting Mrs. Hetherington and her Portland Elementary School Drama Club this holiday season! But first, please pour a cup of tea and take a few minutes to savor the rest of this month’s Collectively Creative posts. Each one has something special to enrich our lives. Happy Thanksgiving! ♥
P.S. If you’re a parent, grandparent, children’s book reviewer, librarian, or teacher, please check out the new kids’ Thanksgiving book called Sarah Gives Thanks by one of our fellow WordPressers, Mike Allegra at heylookawriterfellow. I bought a copy, and it’s a keeper!
![]() COLLECTIVELY CREATIVE:
COLLECTIVELY CREATIVE:

I met my super-crafty, super-sweet, and super-pretty daughter-in-law Shannon for coffee, and look what she made for me! Tiny easels with paint and ribbon a-la-mode and tiny art canvases with paint and paper decoupage (and tiny spools for Frankenstein!) for my Halloween decor! I LOVE them! THANK YOU, Shannon! ♥ P.S. Click here to see an example of Shannon’s mixed media “She Art.”


Welcome to the Pillows A-La-Mode contribution to Collectively Creative! For my project, I made two pillows (what a surprise, right? 🙂 ) for some Halloween-lovin’ sweeties I know. ♥
(1) The large pillow has a jack-o-lantern print on the “Trick . . .” side (a gift from a friend!) and *sparkly* cupcake and candy print from Jo-Ann on the “or treat!” side. The letters are orange felt handstitched with black embroidery floss.
(2) The small pillow has the cupcake/candy print on the front and “BOO” fabric (also a gift from a friend) on the back. For a-la-mode, I marked the center of the front and back (after stitching and stuffing), double-threaded a L-O-N-G needle with orange floss, stacked three buttons, went down through the left buttonholes to the back and up through the right buttonholes, pulled the floss tight to create a valley, and tied. (Click on photo for a larger view).
Oh, and before I go on . . . you MUST click here and here for two more fab Halloween pillows from Punky Purls and here for a fun burlap version from House of 34. I love them all!
![]() NOW . . . DRUM ROLL . . . here are EIGHT . . . yes EIGHT!!! . . . more Collectively Creative posts with amazing Halloween tricks n’ treats for you to try. Please take a moment to visit each one . . . you’ll be glad you did! ♥
NOW . . . DRUM ROLL . . . here are EIGHT . . . yes EIGHT!!! . . . more Collectively Creative posts with amazing Halloween tricks n’ treats for you to try. Please take a moment to visit each one . . . you’ll be glad you did! ♥


