Category Archives: AYearofHomemadeGifts

Sincerely Liz Boutique

Standard

DressOne of my VERY favorite bloggers is Liz from a A Ponytail Kind of Day. Every time I saw one of her unique creations, I’d think, “I sure wish she had a shop!” Well, now she does! It’s the Sincerely Liz Boutique, where you’ll find all kinds of beautiful handmade items for your home. Since I was looking for gifts for specific people, I ordered these fabric hangers, a set of rag coasters, and this way-cool bowl made from a Christmas record album. Then, friend that she is, Liz also put in this “Keep Calm and Sew On” framed art AND an AMAZING vintage dress and lace overlay that she bought for one dollar because she knew how much I’d have fun using it for a “What Can You Make With A . . .” project! What a sweetie! Please check out Liz’s boutique from this post or from my Shop Love! page above, and THANK YOU, Liz! ♥

Collage

More Shop Love!

Standard

1-CalendarLast week I put out my first “Shop Love!” post.

I wanted to start promoting our blogging friends’ small businesses.

I’ve done a little more shopping . . .

and I won a giveaway . . .

so today I’d like to highlight four more bloggers and stores.

Once again, each one impressed me with both their BEAUTIFUL products . . .

and their QUALITY customer service.

Here are their contact links!

You can also check them out ANYtime on my new “Shop Love” page above. ♥

(1) The Original Thread: I fell in LOVE with this inspirational 2013 calendar, which is designed by Melanie of The Original Thread blog and sold as a fabric panel in her Spoonflower shop at Madex Designs. She has many other gorgeous fabrics as well!

2-pdf Patterns(2) Terri’s Notebook: I recently won a lovely giveaway from Terri’s Notebook—two pdf patterns. I was going to wait until I made the items to share them . . . but that hasn’t happened yet, so I’ll share what they WILL look like. 🙂 The first pattern is for Stuff Baskets and the second is for a Checkerboard Set, and both are for sale at her Patchwork Trails Etsy Shop. You can also visit Terri’s portfolio here and her paper goods shops here. Terri’s motto is “Explore. Dream. Create.” Don’t you love that? ♥

3-Apron
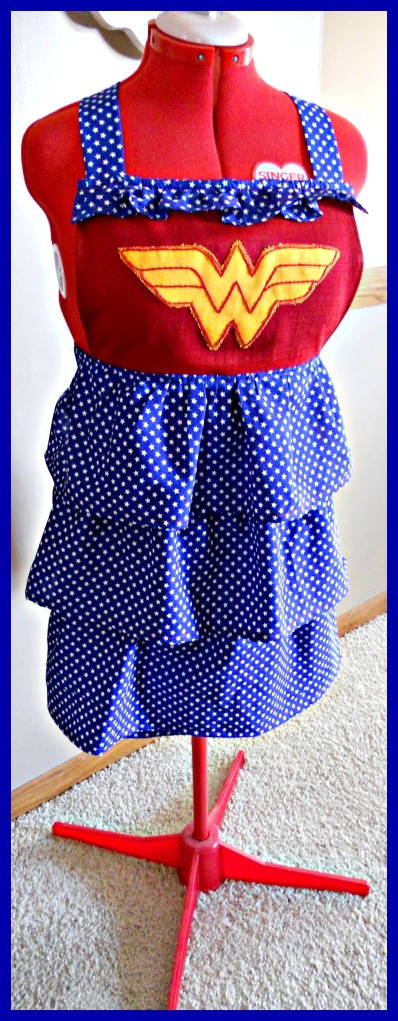
(3) A Kitschy Kitchen: I’m just starting to make aprons myself, but I know someone on my gift list who will LOVE this one! It’s from Megan of A Kitschy Kitchen: The Life and Studio of an Apronista who sells her creations at her Etsy shop. Notice, too, the adorable fabric gift card holder! Stressing quality as well as beauty, Megan’s motto is “Buy Well, Buy Once.” She also has some other lovely items in her shop, such as embroidery, cocktail napkins, and coasters.

4-Tags(4) TheHighNoteDotNet: I’ve followed Darilyn’s lovely blog thehighnotedotnet for a long time now and was so excited to receive my first purchase from her Etsy shop, which specializes in vintage music projects. Darilyn even included a little gift . . . a copy of my favorite quote, which I embroidered on a pillow and she offers to all of us for free to make an iron-on transfer. She graciously provides tutorials for her projects as well. And check out her craft room . . . it’s amazing!


Art Jars

Standard

A couple of years ago I saw a kids’ art jar online and thought it would be the perfect gift for a special little girl’s birthday.  It was so colorful and intriguing . . . but when we dumped everything out, I found LOTS of pretty raffia filling and WAY too few actual art supplies.  Live and learn, right? So, when my dad was preparing for a recent move and asked if I’d like to have some empty plastic snack containers, I immediately thought, “ART JARS!”  I began collecting artsy/crafty items from the dollar bins at Michaels and Target, plus hitting the dollar stores, and soon had a huge bag of fun things to include.  These will be under some Christmas trees soon! ♥

Art Jars

Wonder Woman Retro Apron

Standard

Apron

I saw a set of superhero aprons on Pinterest and was so excited to try them, only to find that the post didn’t lead anywhere, even to a photo credit! But thank you to someone out there for inspiring me to figure out my own design, which—since I decided on Wonder Woman + ruffles—I’m calling “Wonder Woman Retro.”  Here are some links and tips if you’d like to make your own!

  • I got the white-star-on-blue-background fabric here at the Hancock Fabrics web site. (I used remnants for the red and yellow.) It washed beautifully and came out wrinkle-free.
  • I found the Wonder Woman logo here on Google Images. Go to print preview, click landscape, resize to 175%, and print. I traced around the pattern on the yellow fabric, cut it out leaving a 1/2 inch edge, and pinned it to the apron bib. Then I embroidered through all the layers in red, trimmed close to the outer border, and zig-zagged the edge.
  • I used the Ruffle Aprons Tutorial at the Jo-Ann Fabric and Crafts web site for the rest of the apron except that I  (1) made the neck straps the old-fashioned way from two folded/stitched/turned lengths of fabric, (2) shortened the bib ruffle so it won’t cover the logo, (3) used the bib ruffle as the top seam and tucked the neck straps in before stitching instead of sewing everything on separately,  (4) stitched the skirt, top skirt ruffle, and bib together at the same time, (5) added one more ruffle on the skirt, and (6) top-stitched all the ruffles down and tucked in the side ties before topstitching the top skirt ruffle. However, I’m sure it would turn out just as cute if you stick with the original directions . . . I’m just not very good at that. 🙂

Happy sewing! ♥

Cupcake Girl

Standard

PatternA special little girl in our family celebrated her sixth birthday on December 1st. As you know, a December birthday gift must NOT be Christmasy! 🙂 So, since she absolutely loves to bake with her mom, I decided on a cupcake gift. First I made an apron using a remnant from the nursery pillows I sewed last summer that looks like sprinkles. I didn’t have a child-size pattern, so I just cut a rectangle for the front, a long, skinny piece for the waistband and tie, found some rick-rack trim, and stitched it up. Then I folded a piece of paper, sketched half of a cupcake paper and top, cut them out, unfolded the paper, and used these as patterns for some cupcake a-la-mode (two yellow fabrics and sequins for sprinkles) and a scrapbook paper gift tag. Then I bought some cake mix, frosting (with sprinkles!), cupcake papers, and cupcake flags to go with the apron. I was going to make a little totebag to gift it in, but then I spotted this adorable tin for $2.99 in my grocery store’s clearance aisle . . . how lucky is that! Happy birthday, dear Kira! ♥  P.S. Please check out this fun post on Peg’s Gotta Do for more cupcake inspiration!

Collage

Peppermint Headband

Standard

HeadbandAfter making a peppermint wreath and peppermint Christmas tree skirt, I had three little felt peppermints left, so I wrapped a headband in red bias tape and stitched the candies on top to make a festive accessory for a special little girl. This was another free-to-me activity since I already had all the supplies on hand . . . don’t you love it when that happens? There’ll be no more peppermint projects for me this Christmas since I used up all my red felt remnants and have vowed to use up my stash before buying more fabrics (we’ll see how THAT goes!). But several of you have said you’re on it now, so I can’t wait to see what you make! Now . . . on to some Christmas gifts . . . and Christmas pillows . . . and . . . ♥

Pillowcase Dolls

Standard

Doll Sisters

Knowing that I had lots of my grandmother’s embroidered pillowcases, one of my crafty friends offered to lend me her pattern for pillowcase dolls! She explained that, historically,  the dresses have matching bonnets and are worn by very simple, faceless muslin dolls so I’d actually have three items to cut out and sew—a doll, a dress, and a bonnet. Although I couldn’t locate a link for a free pattern like mine online, you can find several inexpensive (under ten dollars) patterns for dolls identical to these by Googling “pillowcase doll kits,” and you can also find free patterns for different types of rag dolls and doll dresses that could be adapted to this style. Making pillowcase dolls IS detailed and time-consuming, but it’s completely worth every tender stitch you put into it. I know these little ladies will be loved forever! ♥

Warm Heart, Warm Hands

Standard

Here’s a little project I made for someone special to keep her hands warm on the way to work while getting a *hug* from the two loves of her life. Filled with rice, just pop them in the microwave for a minute or so and put them in your pockets. Please visit Trixie’s Blog for a tutorial . . . thank you for the inspiration, Trixie! ♥

Meeting a Blogger For Real!

Standard

I follow the Empty Nest Feathers blog and really fell for this blogger. We have so much in common! All sons . . . check!  Writers and editors . . . check!  Play the piano . . . check!  And on and on and on! Since we live less than an hour apart, I thought it would be fun to meet in person. So I emailed her and we met for coffee (two regular coffees with cream), talked for an hour and a half (it seemed like five minutes), walked to our cars (the same color), and parted ways with a hug. If you ever get a chance to meet one of your blogging friends in real life—go for it! ♥  P.S. Here is the funny blog post my new friend wrote about our meeting. (She’s WAY wittier than I am! But, for the record, my red hair is from Clairol too, I’m NOT mrhmpher narrower, and she’s most definitely not evil!)  Oh, and to see what’s in the package, click here and here and here!

Chanel A-La-Mode

Standard

My mom-in-law LOVES Chanel face powder . . . and I love it when she gives me the little black drawstring bags it comes in! Of course you can leave the famous brand name on the front, but where’s the fun in that? 🙂 Instead, I like to cover the label with a teeny remnant. This bit of green fabric with embroidered flowers was perfect (does it look familiar? ♥), and I added some colorful “reverse blanket stitch” on the edge for extra a-la-mode. Now it’s ready for its new life as a pretty jewelry pouch . . . or even a wristlet. ♥

Instagram Collage Letters

Standard

I was so intrigued when I saw some wooden letters decoupaged with maps on House of 34 and decided to make a set for a gift. However, the birthday guy is an amazing photographer who creatively explores the city of Philadelphia with all of its amazing architecture, landmarks, murals, and street art. So . . . I printed off some of my favorite Instagram photos he’s shared on FB and cut out different bits to create a “Mod Podge collage” on each letter instead. I love that I can show him how proud I am of him . . . and it was fun, too! ♥  P.S. You can follow on Instagram at mr_fisher. And Ashley Bollinger has some other fun Instagram art projects here.

Felt Baby Mobile

Standard

The minute I saw an adorable mobile on Eco Felt Crafts (who got the idea from It’s the Life, who got the idea from The Handmade Home . . . don’t you love how bloggers share???) I  knew I had to make one for a special baby girl. I love the combination of felt, fabric, buttons, and ribbons in greens, pinks, blues, and whites to match her nursery. It was so much fun to make!  P.S. Click here and here and here and here and here for five more cute mobiles. And if you’ve made one, please send me a link in a comment and I’ll add it to this post. I’d love to try them all! ♥

Other baby gift posts on Pillows A-la-mode:

Nursery Pillows

Crib Skirt

Diaper Clutch

Burpies and more burpies and even more burpies (plus a receiving blanket!)

Necktie Onesie

Locket Onesie

Purple Polka-Dotted Pillow

Standard

The bit of fabric left over from my latest memo board is now a pillow (surprise! surprise!). I also had a little bag of heart buttons in coordinating colors in my stash, so I stitched them over some of the polka-dots on the front for a-la-mode. I think it will be a nice gift for a little girl whose favorite color keeps changing! ♥

Mint Tin Tic-Tac-Toe

Standard

I’m at it again . . . trying to figure out fun ways to repurpose empty mint tins! I’ve already had a chance to try out my mint tin sewing kit, so this time I decided to make one into a game.

(1) Decorate the top with a tic-tac-toe symbol using paint, scrapbook paper, tape, ribbon, or fabric with embroidery (my choice!).

(2) Find five each of two different colors of buttons.

(3) Glue magnets on the buttons.

(4) You’re ready to play . . . perfect for home, the car, or restless little ones at a restaurant or waiting room.

Click the photo for a larger view, here for the super-cute version at Art + Baja that gave me the idea,  here for a tic-tac-toe game made of felt, and here for another wonderful mint tin craft by Look What Mommy Made!  ♥

Colorful Fabric Memo Board

Standard

Once one of my teen-age sons accompanied me to a teacher supply store. The next thing I knew, he was sitting on a bench outside. When I asked him why he left, he said, “Mom! It looks like a rainbow threw up in there!” So, if you’ve ever felt the same way, it’s probably best to move on to another blog now. 🙂

Today’s project is a fabric memo board . . . but for holding girly hair things, like:

Click here for a tutorial (starting with a cardboard box!) and here for a photo of the zebra-print version filled with flower hair clips and pins. I can’t wait to give this one to a special little girl for her birthday! ♥

More Mini-Notebooks!

Standard

I’ve gifted my first set of mini-notebooks one by one, so it was time to make more.  If you haven’t tried this craft yet, you must give it a go!  Why?

  • They’re quick and easy, and it’s so much fun to mix and match scrapbook papers for the covers, spines, and labels.
  • A notebook costs less than $1 to make and less than $2 to mail, so by adding a handwritten message on the first page, it makes the perfect economical yet pretty and useful greeting card/gift combination.

You can find a complete tutorial here. I can’t wait to start giving these away, too! ♥

Embroidered Classroom Poster

Standard

One of my teacher friends posted this adorable chart-paper poster from the First Grader At Last! blog on Pinterest. I wanted to make one for a teacher in my family, but instead of recopying it on paper I decided to embroider the whole thing! Crazy, I know! 🙂 But here are the steps:

  • Find some fabric that looks like notebook paper, cut out a rectangle, and embroider the red line and “holes.”
  • Print the sayings lightly in pencil on the lines.
  • Embroider, using a different color of floss for each line.
  • Cut out a piece of quilt batting and back fabric, stack and pin (with right sides together), and stitch the sides and bottom.
  • Trim the seams, turn, press, and top stitch the edges.
  • Sew a strip of 2-inch seam facing to the top (right sides together), fold it back to make a dowel rod casing for hanging, and handstitch it down.

Here’s my colorful version, taped (a bit wonkily!) to a wall for a photo shoot before heading to a new kindergarten classroom. Happy school year! ♥


“Notepaper” Coasters

Standard

I’ve loved notebooks ever since I was a little girl . . . maybe that’s why I decided to be an elementary teacher and writer when I grew up! Anyway, awhile back I started on a B-I-G embroidery project (post to come!) and I wanted it to be on fabric that looks like notebook paper. I found a lightweight knit in white with black stripes . . . perfect! The other day I noticed the remnants and decided I should turn them into something, too. So I cut them into twelve squares, embroidered a red stripe on half of them (my other road trip embroidery project), stitched them right sides together with a square of quilt batting added to the stack, trimmed, turned, top-stitched, and had a set of six cute coasters in no time at all. I think they’ll make a perfect gift for a teacher or writer . . . and I know lots of those! ♥

Finally . . . a Guy Gift!

Standard

 Zipper Pull

Have I ever mentioned that we have LOTS of guys in our family? As in a blended family of seven sons and no daughters??? I love to make things for our beautiful daughters-in-law and grandbabies, but I haven’t ventured far into homemade-for-men land. So, when I saw a tutorial for a zippered toiletry bag on The Purl Bee, I decided to give it a try. The first challenge was fabric. I wanted to use oilcloth to make the bag easy to clean, but all I could find was gingham, fruit, vegetables, animal prints, and floral designs. Then I stumbled on this fun plaid online at Mendel’s, and it just happens to be the colors for the University of Kansas, the birthday guy’s favorite college basketball team . . . how lucky was that? The bag was easy and fun to sew, and I have plenty of fabric left (and plenty of KU fans left!), so I’m sure I’ll be making more.   8-7-12 UPDATE: Today I added a little guy a-la-mode . . . a zipper pull made from a Jayhawk keychain. ♥

Another Girl’s T-Shirt Dress

Standard

When I found girls’ T-shirts on an amazing sale (like the one I used for this dress), I also bought a coral and a gray/white striped version to combine into another dress. The gather in the bodice is simply a skinny piece of elastic threaded between the seam attaching the top and bottom and the topstitching that keeps the seam edges facing down.  I love these colors together, and I found some pretty orange buttons in my stash to use on the fabric flower a-la-mode. (Click photo for a larger view.) Plus, since I used the top of one T and the bottom of the other, I have more lovely remnants to use for a future project. I can’t wait to give this to a special little girl! ♥

Diaper Clutch

Standard

Remember the placemat pouches I made earlier this year? Today I turned one of them into a gift for a new mom by:

(1) making a super thin, soft, washable changing pad from a $1.99 child’s paint apron from Michaels (with enough fabric left over for one more pad and some other projects, too!)
(2) adding a small package of wipes and a diaper, and
(3) composing this poem (click to enlarge) to pin to the clutch.

Super fun, super easy . . . and I think she’ll like it! ♥

What can you make with a lace tank?

Standard

A few years ago I found this beautiful lined stretch-lace tank for $5 on a sale rack at JJill! But . . . it turned out that the color made my already-pale skin looked even more washed out . . . and it got several snags from a clothes-eating teacher’s desk . . . so I decided to get out my trusty scissors to rescue it from its lonely existence at the back of the closet. Here’s what I made:

  • A headband
  • A flower pin and hair bow (each with a vintage earring in the center)
  • A mini origami lotus bag (paired with a bit of coral velvet from a robe my mom-in-law made and some thin gold cord)
  • A bracelet purse (paired with a cotton remnant in the same color family for lining)
  • A luggage tag (lace back paired with the same remnant and some burlap ribbon)
  • A contrast-corner pillow (lace back paired with the same remnant and the lace from the tank’s neckline across the corners)

Loved it . . . hated it . . . now love it again! ♥

X’s and O’s . . . er . . . Lemons and Limes

Standard

Do you have little ones in your family who LOVE to play tic-tac-toe? We do! Since I bought plenty of orange, yellow, green, and white felt for my citrus coaster project, I decided to use it to make a birthday gift for one of these sweet little girls with a giant orange slice gameboard and lemon and lime game pieces. And how serendipitous to find an orange slice notepad in the dollar bin at Michaels for keeping score! 🙂 At first, I was going to make a bag out of my citrus fabric to hold everything, but then I figured out that the gameboard itself could be the bag with the addition of ties. It worked! Now I’m imagining all sorts of other themes . . . a basketball gameboard with different colors of “team” T-shirts for the game pieces . . . a Disney fabric gameboard with Mickey and Goofy game pieces . . . the sky is the limit! You could also make them different sizes and even add velcro to the gameboard and pieces to play it in the car. Other ideas are welcome! ♥

Crazy Tree Notecards

Standard

When I put together the Persian Plum kit I received from Books Quilts and Sewing’s giveaway, the first step was to sew a small, neutral-colored square onto a larger colorful solid or floral triangle and then cut the tips off both. This left me with a stack of perfect little triangles, and of course I decided I must do something with them as well! I always keep a stash of blank notecards and some craft glue handy, so here’s what I came up with (adding a tiny strip of one my other remnants for the trunks). I think they’ll become a nice little gift for a friend or family member someday soon! ♥

More Necktie Wristlets

Standard

I just finished six new necktie wristlets . . . so easy and fun! The only thing I changed from the original tutorial was to sew the decorative button on the front flap and use a snap closure rather a button/buttonhole.  Now I can’t wait to give them to some special girls in the family! ♥

Citrus Coasters

Standard

I was browsing the department store ads in the Sunday paper a couple of weeks ago when I was captivated by a lovely display of summery picnic dinnerware. When I saw coasters that looked like slices of oranges, lemons, and limes, my little DIY fairy said, “You should make some of those!” So off I went to the fabric store where, serendipitously, I spotted a lovely orange, lemon, and lime print on my way to purchase the felt I’d need. How fun is that!!! 🙂

Here’s how I made the coasters:

  • Cut out three sizes of circles. The smallest and largest are from colored felt, and the middle is white. (I used the bottom of a yogurt carton, my trusty peanut butter lid, and a random lid from my container drawer for templates.)
  • Handstitch the small circle onto the white circle using matching embroidery floss.
  • With white embroidery floss, stitch three criss-crossing lines across the colored circle.
  • Glue the now-attached pieces to the larger circle to cover up the stitches, and trim all the way around with pinking shears.

For a gift, make four of each and tie them together with a pretty orange, yellow, or green ribbon. Or, if you’re lucky enough to find some fabulous fruity fabric, you can make a simple little drawstring bag to gift them in. They’re so fun, easy, and colorful . . . you’ll love making your own! ♥

Citrus Collage

Button Hairbands

Standard

This project looked SO cute and easy that I just had to try it! Visit Dreampatch for my original inspiration (via Pinterest, of course!). I made all of these in an hour or so . . . but most of that time was spent enjoying sorting through my grandmother’s vintage buttons. We have LOTS of girls in our family now, so it will be fun giving them away! ♥

New Baby Burpies and Blanket

Standard

I’ve been making lots of rag-edge burpies lately . . . it was so much fun to shop for all those cute pink and blue flannel prints! This time, though, the parents-to-be had some very specific color requests: black and yellow burpies and a zebra-striped receiving blanket. What fun! You can check out HomemadebyJill for the burpie tutorial, and the receiving blanket is simply two squares of fabric stitched together with rick-rack in the seam (the way my grandmother often used to make them). Put on your sunglasses! ♥

Necktie Ruffle Pillows

Standard

After using the skinny ends of some ties for necktie onesies and the fat ends for necktie wristlets, I still had the middle parts left . . . so what better way to use them than pillow ruffles!  ♥

Dragonfly Mini Notebook

Standard

One of my teacher/writing group friends just got her first publication acceptance, so I wanted to give her a gift that includes the dragonfly on her business cards. I traced the dragonfly on a small scrap of sheer fabric, triple-folded it for strength, and embroidered over the lines. Then I cut it out and glued the body onto a flower on the cover of one of my mini-notebooks, leaving the wings free. Oh, and I wrote a message for her to discover on the first page. I’m SO happy for Pam! ♥

Flower Pillows

Standard

I’ve missed making pillows, so after church and lunch out with Dave on Sunday I spent a happy afternoon at my sewing machine. And, since my creative blogging friends suggested using some of my road trip flowers as pillow adornment, I did just that . . . adding in one sweater flower as well. All of the fabrics are remnants or upcycled curtains, and all of the pillows are 14 x 14 inches. I can’t wait to start giving them to my family and friends! ♥

Mini Notebooks

Standard

The next best thing to pretty fabric is pretty paper! Although I don’t scrapbook, I love to walk through that department at my favorite craft/sewing stores and couldn’t resist buying this beautiful collection when I saw it marked down from $19.99 to $9.99. (Click on photo for a larger view.) Of course, then I had to come up with a project for it, so here it is! Start by buying some mini composition notebooks. (Target has two-packs for 99 cents.) Then . . .

(1) Use a notebook to make a pattern on a piece of cardboard. Leave a little extra on both sides to fold over the front and back notebook covers, and mark where all the folds should go.

(2) Use the pattern to cut out the scrapbook paper and to draw the fold lines on the back.

Inside Front

Inside Back

(3) Fold on the lines the wrong way and then the right way, making firm creases. Then glue the cover onto the notebook starting with the spine, then the covers, then the flaps.

Following are three additional options you can use to “dress up” your notebook . . . choose one, two, or all three. For me, what I chose depended on the cover design. For example, one has cute little birds on it and a spine cover would have hidden one of them, and another has words on it so I didn’t want to cover them with a label.

OPTION 1: BEFORE gluing on the cover, put a colored brad about ½ inch from the middle of the edge on both the front and back cover. Put a small coated ponytail rubber band  around the back-cover brad and fasten the brad as tightly as possible. Leave the brad on the front cover a bit loose. Then, after you glue the cover onto the notebook, pull the rubber band from the back and loop it over the front brad.

Back

Front

OPTION 2: Choose a contrasting or coordinating strip of paper for a spine cover, prepare the folds, and glue it onto the spine, holding it for a bit until the glue dries.

OPTION 3: Make a small name label out of another scrap. If you like, make “stitches” around the edges with a colored pen.

Your notebook is now ready to toss into your purse or give away . . . perfect for a small hostess or gal-pal gift. Or, turn it into an extra-special greeting card by writing a happy birthday/get well soon/congratulations/thinking of you message on the front page of the notebook for the recipient to discover and putting it in a colorful envelope.  Now, what to make with the rest of this fun paper . . . ♥  UPDATE: Click here for MORE mini-notebook!

Necktie Wristlet

Standard

After using the short end of a tie to a-la-mode a onesie I still had the rest of it left, so my next project was a necktie wristlet. I’ve seen some fun photos of these on Pinterest but didn’t have a tutorial, so I made one up as I went along. It turned out great, and I think it will make a fun girly present . . . perhaps with a gift card tucked inside. ♥

NOTE: The numbers on the directions match the numbers on the pictures in the gallery below. Click on a photo for a larger view.

(1) Cut the necktie 16 inches from the large end.

(2) Unsew the tie a bit in order to cut off about two inches of the lining so it doesn’t get too bulky when you turn the end under.

(3) Make square corners at the end, turn under, and hand stitch in place.

(4) Cut 13 inches from the middle (skinniest) part of the tie. Unsew it and remove the lining.

(5) Fold this piece in half the long way, pin it, and stitch the sides together to form the wristlet’s strap.

(6) Fold up and pin 4 ½ inches of the bottom part of the tie with wrong sides together, tucking the raw edges of the strap into the side. Because of the tie’s shape, the sides won’t line up perfectly, but that’s okay. Simply stitch along the edge of the skinnier part, backstitching at the top and bottom of each seam for extra sturdiness.

(7) After selecting a button, make a buttonhole in the top flap.

(8) Sew on the button, being careful to only go through the top layer of fabric so you don’t close up the pocket. I love this feminine button from my grandmother’s collection.

(9) Gather the items you want to carry.

(10) Tuck them inside the two pockets, and you’re ready to go!

P.S. Awesomesauce later made a variation on this tutorial that I LOVE! Go check it out! ♥


Fabric Memo Board Plus . . .

Standard

Here’s how I actually used the memo board I made . . . to display the fabric flowers I made for my beautiful daughter-in-law Shannon’s birthday! I had fun trying out lots of different kinds, as detailed below. However, I can’t say that I followed ANY of the directions to a T . . . stitching instead of gluing, trimming a bit here and there, that sort of thing . . . and each one has both a pin and a clip stitched to the back so it’ll work as a-la-mode for either clothes or hair.  Also, purchasing the pattern wasn’t a necessity, since tons of free patterns and tutorials are available online, but I found it for $2.99 (marked down from $18.95, which is crazy!) and it got me off to a good start. I’m definitely hooked on making flowers now!  Oh, and here are links to the bloggers who helped me . . . thank you! ♥

How Joyful

Ruffles and Stuff

The Renegade Seamstress

Kimono Reincarnate

Dresses!

Standard

I had so much fun making maternity sundresses as early birthday gifts for our two mothers-to-be-daughters-in-law! I searched Pinterest for a tutorial and found this super-cute design on the Be Sweet blog. The bodice is a new ruffled lady’s tank, the skirt is refashioned from a new men’s T-shirt, and I added a sash made from a scarf for a little a-la-mode. Happy birthday, girls! ♥

Monster Tooth Fairy Pillow

Standard

I needed to make a tooth fairy pillow for a special little boy, so I decided to transform one of my monster pillows. (Yes, it would have been MUCH easier to decide this BEFORE I made the pillow, but oh, well! :)) First, I cut two small pocket shapes out of red felt. Next, I embroidered one for the tooth and one for the money. Finally, I hand-stitched the pockets to the pillow. It worked! ♥

Ring Toss Game

Standard

I was wondering aloud what to make for one of our sweet little grandsons for his birthday. “A ring toss game!” piped up Dave. So we put our heads together. He’d make the wooden part from a round tabletop and dowels, and I’d make the rings from embroidery hoops covered in fabric. We even used fat quarters from Grandma Vida, so it was a true family affair. Then, elementary teacher that I am, I made a pad of scoresheets that utilize the concept of tallies and counting by fives to up the challenge when he’s ready. I hope he has as much fun playing with it as we had making it! ♥

More Placemat Pouches

Standard

I posted my first placemat pouch in January and since made several more. The only holdup was that I decided to use “real” buttonholes this time instead of a snap covered with a button and I hadn’t used my buttonhole attachment in ??? years and wasn’t sure if I remembered how. Yesterday I dug it out and had them all done in 30 minutes! I guess making buttonholes is like playing the piano or riding a bike . . . once you learn how, you never forget. Here are the new pouches, all with buttons from my grandmother’s collection, and all ready to give to people I love. ♥

Roll-Up Pencil Kit

Standard

As you know, I’ve been exploring projects I can make with those beautiful placemats from World Market. The latest idea came from the queen of crafts herself, Martha Stewart. Although I generally view her projects with considerable trepidation, I love this one ! Here’s the link, and here’s the result! ♥

Baby Photo Birthday Cards

Standard

Since kids LOVE to see their baby pictures, I decided to use this idea for a simple homemade birthday card for one of our grandchildren. I printed a photo from my computer, trimmed it, and glued it onto the front of a folded sheet of cardstock, wrote about how cute and sweet and smart and funny he is on the inside, signed it, addressed the envelope, and mailed. Now it’s on its way to Germany . . . Happy Birthday, dear Logan! ♥

P.S. I may try this for other family and friends, too . . . perhaps using a photo of a fun time we’ve shared.

Money Shirt

Standard

A couple of years ago I ran across some “Cash Shirt” kits in a Current catalog  and thought they’d be fun gifts for our many sons. Then I stashed them away and forgot about them! I finally tried one this week, and I think it’s sorta cute.  But . . . I’ve also found a tutorial on How About Orange that  doesn’t involve buying anything. Once I master this technique, I figure that these shirts can be a fallback Year of Homemade Gifts project . . . since, technically, I make my money by working at home, right? 🙂

Homemade Luggage Tags

Standard

I’ve been wanting to try a sewing project I saw on Design Sponge awhile back . . . luggage tags. This crafter has an amazing tutorial that makes the project a snap.  I’ve now made some for gifts, plus a couple for our suitcases. Try it . . . they’re fun! 🙂

Happy Kansas Day!

Standard

Two of my good friends have birthdays today, which is also our state’s birthday.  So, for their Year of Homemade Gifts cards, I trolled the internet for Kansas symbols to cut and paste and came up with this design. While it’s doubtful that any of my readers are in the same situation, perhaps you have friends and family whose birthdays fall on other “obscure” holidays. Click here for ideas! (Today is also National Cornchip Day, so it’s not too late to celebrate, but I’m sorry to report that you’ve already missed National Step in a Puddle and Splash Your Friend Day this year.) 🙂

Homemade Note Cards

Standard

Several months ago I purchased some blank note cards at Michaels hoping to come up with a way to use them someday. While brainstorming ideas, these crayon-colored cards + crayola fabric + quotes about color all collided in my mind at the same time, and I think I actually saw a light bulb go on. 🙂

Here are the steps:

(1) Type up the quotes and print on a piece of cardstock. Cut the quotes apart with pinking shears.

(2) Cut out fabric rectangles the same size as the cards.

(3) Following the directions on a package of iron-on bonding adhesive, attach the fabric rectangles to the front of the cards.

(4) Use a smaller piece of bonding adhesive to attach the quote to the top of the fabric.

(5) Wrap and give to someone you love! ♥

I can imagine all sorts of other themes  . . . horse fabric with horse quotes, kitchen fabric with cooking quotes, alphabet fabric with quotes about names . . . the options are limited only by your fabric finds and imagination.

Placemat Pouch

Standard

I LOVE walking through World Market, especially the aisles loaded with pillows, curtains, and table linens. Such beautiful fabrics! Then, I saw on Pinterest that lots of crafters are turning placemats into purses, pouches, and totes. So, my one and only post-holiday-sale shopping trip was to buy one each of the 30% off placemats at WM to use for projects. (Oh, yes . . . and then conducting a similar mission using a gift card I received for Bed, Bath, and Beyond. Dave loves it when I know exactly what I’m looking for in a store instead of aimlessly wandering! :)) Here is my first try . . . easy, fun, and pretty!

(1) Buy a reversible placemat.

(2) Fold the bottom third up.

(3) Stitch the sides together by hand or use your sewing machine.

(4) Fold the top down. Make a button hole and sew on a button, sew on a buckle, or sew a snap on the inside and put a decorative button or fabric flower on the outside.

(5) Give it to someone you love for a clutch purse, make-up pouch, notecard pouch, or travel jewelry pouch. ♥

“My Family” Felt Letters

Standard

My first Year of Homemade Gifts project was for a very special little boy about to turn three years old. I was pondering what to make for him one morning and, while spraying my hair, this idea came to me. (I MUST buy more of that hairspray!) He already knows his ABCs and can recognize and name letters, so I thought a fun next step would be to learn how to spell the names of all his family members. Here’s how to make a “My Family” felt letter set:

Supplies:

  • Felt squares, a different color for each name, all cut the same size (Mine were 6.5 x 6.5 inches.)
  • Embroidery floss and needle
  • Fiberfill stuffing and a chopstick to push it into the letters’ crooks and crannies
  • Fabric for a tote bag to hold the finished letters
  • Fabric, ribbon, cord, or bias tape for drawstring
  • Pencil, pins, and scissors

Directions:

(1) Draw block letters on the felt squares, two for each letter.  Be sure to use uppercase for the first letter of the name and lowercase for the other letters . . . a kindergarten teacher will thank you someday!

(2) Stitch the front and back of each letter together using a contrasting color of embroidery floss.

(3) Every few stitches, stop and put in a little stuffing until you make it all the way around.

(4) Cut two large rectangles for the tote bag. (Mine is 18 x 16 inches and holds 19 letters.)

(5) Stitch felt letters spelling “My Family” on the front of one piece of the tote bag fabric.

(6) Put the rectangles together, right sides facing, and stitch the sides and bottom.

(7) Turn down the top and stitch around it, leaving a channel and an opening for the drawstring.

(8) Turn the tote bag right side out and press if needed.

(8) Make a drawstring out of the same fabric, or use ribbon, cording, or bias tape folded and stitched. Fasten a safety pin through one end and thread the drawstring through the channel. Tie ends together.

(9) Put the felt letters into the bag, and give it to a little boy or girl you love! ♥

P.S. Besides spelling the family’s names, children can sort the letters by color, letter, or uppercase/lowercase, spell other small words (my letters also work for Mom, Dad, red, mad, lead, dare, name . . . ), and use them to make up fun new names. How about Myler, Dyan, Rommy, and Taddy? 🙂

Organized!

Standard

Like many of you, I started the new year by reorganizing my clothes closet and office/craft room. Everything looked great except that I always left my current sewing project on the chair in the bedroom. Then, I got the perfect birthday gift from my sweet son and daughter-in-law Bradley and Danielle. Here it is, filled with my first “Year of Homemade Gifts” project (post to come!). Don’t you just love the fabric? Now my handiwork sits BESIDE the chair so we can actually sit IN the chair. Thank you, B&D! ♥

New Year’s Resolutions

Standard

As writers, we know all about the “magic of three” . . . beginning, middle, end, The Three Bears, three adjectives, three wishes, three clues.  Three items create a pattern but don’t produce a mundane list. Comedians set up jokes with two scenarios and use the third for the punch line. Decorators use three candles on a mantel, and chefs use three garnishes on a plate. Even military officials use the “Rule of Three.” According to neuroscientist Tina Sellig, “The military has found that people can only track three things at once . . . when they experimented with a ‘Rule of Four,’ effectiveness dropped precipitously.”

Based on this real-life evidence, I decided I should stick to three New Year’s resolutions this year:

(1) Walk 10,000 steps a day. This may be a bit of a challenge since I work at a desk now instead of an elementary classroom, but check out my new pedometer! 

(2) Start a “Year of Homemade Gifts” project, with photos, links, and tutorials posted on PILLOWS A-LA-MODE. (Hopefully those are cheers I hear, not groans! :))

(3) Host a resource-sharing gathering for women sometime this year . . . more on this to come.

These, along with time spent with my family and friends and writing projects fill me with anticipation for 2012. Happy New Year, and may God bless you and yours! ♥