Tag Archives: DIY

Peeps Garland!

Standard

peeps-garland

I recently hung the Peeps garland I made last spring (out of felt, not the candy!). Here are the super-simple directions:

(1) Draw a simple bunny shape or find a free template online.

(2) Make the bunnies from felt, fabric scraps, construction paper, or scrapbook paper.

(3) Add the eye and nose dots with fabric paint, permanent marker, or embroidered French knots.

(4) Attach the bunnies to ric-rac, ribbon, rope, string, or twine using glue or hand or machine stitching.

You’ll soon have a cheery pop of color for your spring décor. Have fun! ♥

A Quote I Love . . .

Standard

When I saw a touching layout designed by Ellie on My Little Bunny Cupcake, I knew I’d found the perfect quote to put on my card when I give a fabric flower to a friend: Just living isn’t enough . . . one must also have freedom, sunshine, and a little flowerThank you, Ellie and Hans Christian Andersen! ♥  P.S. My dress form is wearing my scarf crocheted by our bloggy friend Tamara. Isn’t it just lovely?

Fabric Flowers w Quote

Journals from Vintage Children’s Books

Standard

When I saw this post on Thrift Store Crafter, I suddenly remembered that I, too, have a journal upcycled from a vintage book! I also remembered that I’d promised the person who gave it to me (my BFF/sister Susan) that I would actually USE it and not put it away with my treasures, so I got it off the shelf and began listing all the crafts/sewing projects I want to make and tucking in clippings and patterns. Now, when I find myself with a little block of free time, I’ll be all ready to go. And besides . . . this journal just makes me smile! ♥  P.S. Be sure to check out Sarah’s tutorials on Thrift Store Crafter! DP Journal

Let It Snow!

Standard

In autumn I bought a fun chicken-wire frame at a craft show from Shantilly, and since then I’ve had fun restyling it for different holidays and seasons.  November’s design reminded us to give thanks, December’s spoke of joy, and January’s is all about snow . . . a clip-art mitten illustration mounted on scrapbook paper, letters snipped from alphabet fabric, and tiny clothespins to hold everything in place. ♥

January_letitsnow

Sweater Wreath

Standard

BearHappy 2014! I hope everyone had a lovely Christmas season. I had extra fun with my family celebrating Christmas, New Year’s, AND my birthday! And, with several days off from work, I enjoyed some extra sewing and crafting time, too.

Remember my sweater teddy bear? For my first holiday break project I wanted to use up the leftover sweater parts, and I found the perfect idea in the January, 2014 Woman’s Day magazine, submitted by Anna of Lasso the Moon. For mine, I . . .

  • cut the scraps into two-inch squares,
  • folded them in half,
  • strung them on stiff wire,
  • tied off the wire, and
  • added a ribbon.

It’s always fun to have something new to hang after undecorating for Christmas! ♥

Wreath and Ribbon

I love my all-holiday frame!

Standard

Remember the chicken-wire frame I bought at the craft show from Shantilly? And how I decorated it for Thanksgiving with cut out burlap letters and a fabric flower? My granddaughter Miranda helped me restyle it for Christmas with new letters, then we added the scrapbook paper ornament my friend Debbie taught me how to make. Perfect . . . and I’ve already got ideas for when Valentine’s Day rolls around! ♥

Christmas Wire Frame

Give Thanks

Standard

In my Sleepover! post I told you about Shantilly, a new crafty business launched by my daughter-in-law Shannon and her sweet mom and sister. Their popular handmade items include different sizes and colors of chicken-wire frames to use for memo boards.  (My friend Karen bought one for each of her nieces for Christmas!) With mine, I made a new wall decoration for our upcoming Thanksgiving dinner. The letters are snipped from a remnant of the burlap I used for my mini-screen bag, the teeny wooden clothespins are left over from my t-shirt garland kit, and for a-la-mode I pinned on one of my fabric flower brooches. I just love it, and the best part is that I can update and reuse it for Christmas, Valentine’s Day, and more! Thank you, Shantilly! ♥

Give Thanks

The Green Crafts Lifestyle (and their special promotion starting this Friday . . . and a new call for submissions!)

Standard

Book CoverIn June, I wrote in this post about our crafty upcycling friend Mahe (aka MZ) that included a call for submissions for her new upcycled craft book. The Green Crafts Lifestyle is now out, and it’s amazing! It includes sections on paper, plastic, wood, metal, and fabric and has projects from 20 artists around the world, including four of my bloggy friends:

Along with 35 projects detailed on nearly 200 pages of photographs and step-by-step directions, you’ll find author bios and photos with links to their blogs, websites, and other online contacts.

Now for the promotion! To provide all crafters with a chance to learn from these techniques, Mahe’s Altered Upcycling business will provide unlimited FREE Kindle copies of The Green Crafts Lifestyle this Friday, August 16 through Sunday, August 18! Kindle doesn’t restrict you to its device; you can read the book on any PC machine or tablet with the free Kindle App. Simply click HERE for your free copy.

AND . . . drum roll . . . MZ is looking for MORE submissions from MORE of you! In her words: “We need talented artists, crafters, and upcyclists to provide projects and tutorials based on upcycling and green crafting. Altered Upcycling will take submissions for Part 2 of “The Green Crafts Lifestyle” series, and the project submission deadline is August 31, 2013. Please make sure you send tutorials that upcycle wood, plastic, paper, glass, or fabric. The tutorials must be in MS Word format with the pictures embedded in the doc file. I will also need a photo of you as well as an artist bio and links to your blogs, Etsy shops, etc. Please email tutorials to thecraftycan@gmail.com. Let’s save the world one craft project at a time!”

Thank you, Mahe! ♥  P.S. If you haven’t entered my “Catch-up Giveaway,” please click HERE!  

Amanda’s Apron

Standard

I LOVED my houseful of little boys! But I was also super-excited when my niece Amanda was born. She used to come for an Amanda-Aunt Kathy overnighter every summer where we’d play, sew, craft, embroider, bake, and shop. Now Amanda is grown-up, married, and a high school math teacher several states away (besides being beautiful, she’s also S-M-A-R-T!), but on a recent visit back home she came to sew with me! She loved the blog posts with the ruffly aprons (here and here), so that’s what we made. Amanda picked these lovely, summery fabrics from my stash, which are all from my bloggy friend Laura’s LC’s Cottage Etsy Shop. Isn’t it just perfect on her? ♥

2


Upcycled Porch Side Table

Standard

Collage

PatioWe had a small porch side table whose top recently met its demise. See the little suction cups in the first photo above? They don’t work! So, when the table tipped, the resin top fell out and broke into several unrepairable pieces. But . . . no loss! It wasn’t a family heirloom or cherished purchase, just a handy place to keep a cup of coffee and book while sitting on the porch. And now I like it even better! Last summer I acquired a wire serving tray by disassembling a floor fan whose motor burned out. I’ve used it a few times, but it mostly sits in the pantry WAITING to be used, and the metal was a perfect match for the table stand. So, I:

  • removed those ineffective suction cups,
  • super-glued the tray onto the stand,
  • and tied the tray onto the stand through the suction cup holes with thin leather strips for extra support.

Now, come on over for a visit on my porch ANYtime! ♥

And, in the spirit of upcycling, please read the following call for submissions from our friend Mahe whom you’ve met here and here and here. She has an exciting plan to get your projects and name out to like-minded crafters and artists around the world!

Dear friends of Pillows A-La-Mode,

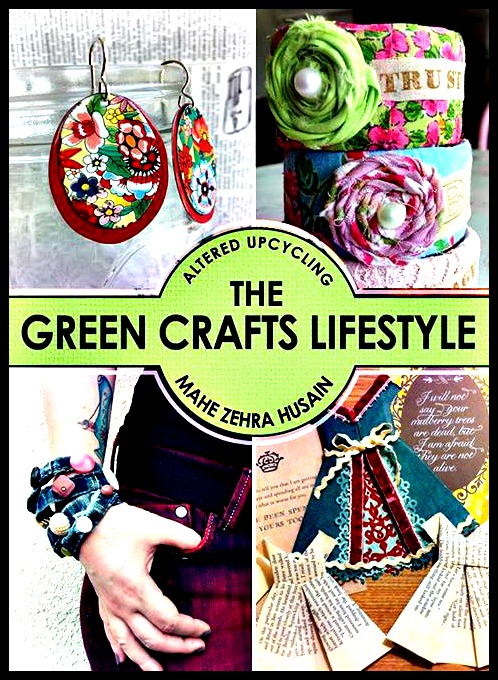
My name is Mahe Zehra, but I mostly go by MZ. I am a mathematician by training but an artist by nature, so in addition to my day job at a software company, I have a small green crafting company of my own called Altered Upcycling.

I chose this name because I think it explains my art style. I apply mixed media and altered art techniques to materials that are recyclable. I make art from paper scraps, soda cans, and plastic packaging. I have written several books and videos available on Amazon.com.

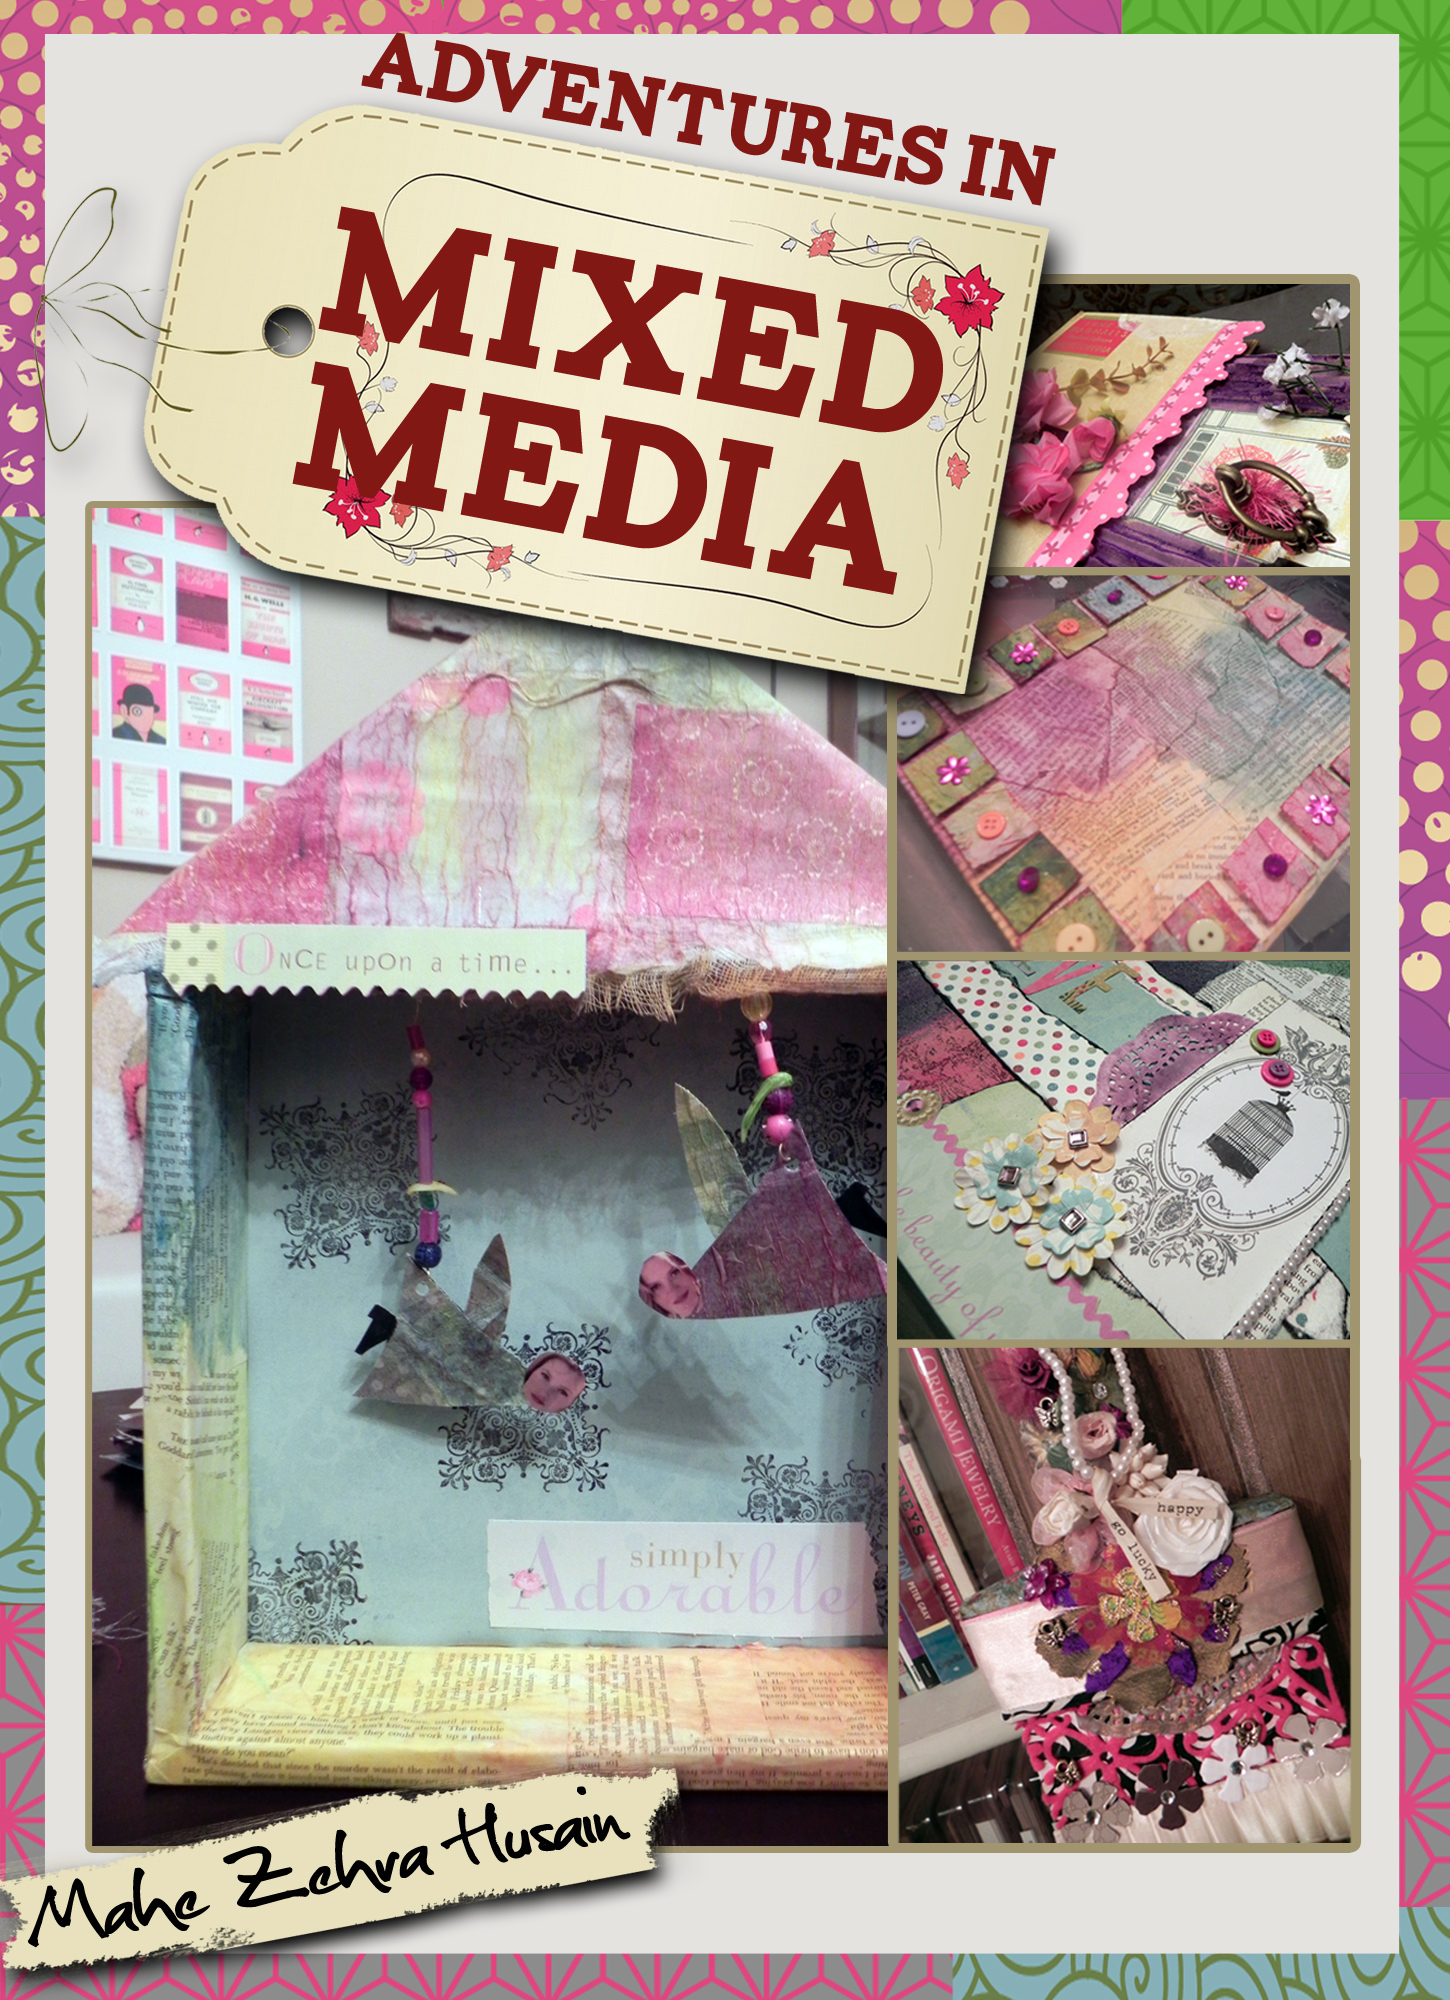
My latest venture involves putting together a book that brings upcycling projects to and from crafters and artists from all over the world! The book will contain 35-50 tutorials, each accompanied by the submitter’s photo, a short bio, and any other links you want to promote.

This book will be a great advertising opportunity, as I will be marketing it to my 5000-strong Facebook audience and my crafting mailing list as well as on my blog. In addition, I will run ad campaigns and offer free downloads on Amazon. Globally, the book will make its way to 10,000-20,000 readers!

I would LOVE for you to be included in this book! All I need is a craft project that focuses on upcycling. The tutorial should have pictures or a video and clear, step-by-step instructions.

Please sent your submission along with your photo, short bio, and links by Monday, July 22 to thecraftycan@gmail.com.

I’m looking forward to hearing from you!

MZ

The Upcyling Queen Returns!

Standard

Adventures.Mixed.Media.CoverIn the past, I’ve shared reviews of two of Mahe Zehra Husain’s fabulous upcycling books, The Ultimate Guide to Upcycling and Make a Card Awesome. So, when she asked if she could send a preview copy of her newest publication, I was more than happy to agree! This one is called Adventures in Mixed Media: A Step-by-Step Guide to Creating Beautiful Pieces of Art. It includes chapters on:

  • Materials (Paper, Coloring Mediums, Found Items, and Art Stores)
  • Techniques (Making Mixed Media Art Paper and Making Mixed Media Collage Paper)
  • Projects (A House Journal, Altered Art Organizer, Paintbrush Book, Mixed Media Canvas, The Earth Without Art, Idea Journal, Mixed Media Memories, Art Around your Neck, . . . And Now ‘Round your Wrist, Birds, My Imaginary Flight, and Believe)

I love the way Mahe describes how she organizes her craft room to store “found” items, and the sections on “7 Unusual Sources of Paper” and “Let’s Go On a Treasure Hunt” had my creative juices flowing! Mahe includes YouTube videos for each of her techniques, as well as complete written directions and photographs of all papers and projects. You’ll love Mahe’s friendly, conversational writing style, too! You can get your copy by clicking here at Amazon.com or any time from my Shop Love! page above.

Oh, and remember that Mahe’s first book is ALWAYS available for FREE at her web site, Altered Upcycling. Thank you for all you do to care for Earth as you create, Mahe! ♥

Embroidered Eyeglass Case

Standard

CaseWhen I went through my mom-in-law’s fabric box, I found a burlap square stamped on the right half with this lovely floral design.

I couldn’t wait to embroider it!

Then I paired it with one of the fun fabrics from my Make & Mingle kit and stitched them together into a lined eyeglass case.

I’ll really love carrying this summery, sentimental handiwork! ♥

Glasses

“Two Bits!”

Standard

Music

SignDo you recognize this little riff? These famous seven beats have been used for over a century to end a song or joke or as a call-and-response . . . the first person sings, hums, or taps out the first five beats (“Shave and a hair cut . . .”) and the other person supplies the ending (” . . . two bits!”).

Since I decided I needed ONE more piece of whimsical (and QUICK! and FREE!) art in my my guest bathroom, I used the words to create a 5 x  7 sign with a fun font and the (clipart!) music notes.

I already had the frame, which fits perfectly in the room’s black/white/lime green/silver color palette.

Click the link below for a (word document) copy of your own! ♥

Shave and a Haircut

Rubber Ducky Art

Standard

After updating the guest bathroom with a painted and decoupaged kids’ stepstool and a few other decorative touches, I decided to finish it off with a piece of fabric art.  First I “shopped my house” and came up with a 17 x 21 black poster frame and a remnant of black/white/lime green fabric (from this crib skirt) that perfectly matches the colors of the room. Then I . . .

  • cut the fabric,
  • sketched and embroidered a rubber ducky in the middle,
  • stretched and taped the fabric over a piece of cardboard cut to size,
  • and popped it behind the glass in the frame.

Perfect! Now . . . bring on those guests!  P.S. I laid the picture on one of my mother-in-law’s quilts to take this photo . . . such beautiful handiwork! ♥

5

Freezer Pop Holders

Standard

Happy Memorial Day weekend! We traveled to Dave’s hometown today to pay our respects and visit loved ones. Since I needed a road trip project, I grabbed a bag of the 4 x 4 fleece squares left over from the no-sew fleece pillows my family made last Thanksgiving and some embroidery floss. I simply folded each square in half, hand-stitched the bottom and side, and added a blanket stitch on the top. [UPDATE: Now I only stitch the sides and blanket stitch the top AND bottom. Click HERE to see why! :)] They’re the perfect size to keep little hands comfy while holding and slurping freezer pops at our family get-together this summer! And, since it was a long trip, I have plenty for everyone. ♥

Collage

DIY Poppy Sugar Bowl and Creamer

Standard

After

Do you ever squeal with delight when you see a blog post? Of course you do! 🙂 That’s what happened when I saw the DIY Poppy Teapot from the lovely Natalie of La gang à Nat. Seriously, go look at it now right HERE. Isn’t it gorgeous??? And all I could think of was that I had a plain white sugar bowl and creamer that I’ve used for YEARS, and wouldn’t they look LOVELY with Natalie’s poppy a-la-mode? So I emailed her to make sure I could copy her design and post it here, and she said YES! (She’s VERY nice!) The only difference is that I used Sharpies since I already had them on hand and then baked the items in the oven at 350 degrees for 30 minutes to set the color. I just LOVE them . . . thank you, dear Natalie! ♥

Collage

Monogram Father’s Day Cards

Standard

9-hole buttonsHave you ever heard of 9-hole buttons? And did you know you can use them for words and monograms??? I didn’t until I read this fun post by Nicole on Diary of a Mad Crafter! And Nicole is so clever that she even made her OWN buttons!!!

I found mine at the yehuting Etsy Shop . . . only $4.98 plus shipping for forty. This lovely shop owner has TONS of other amazing notions, too. Do pay her a visit!

We’re having a big family reunion in June that falls on Father’s Day weekend. I wanted to make cards for all the dads who’ll be visiting, and the wooden buttons on plain kraft cardstock worked perfectly for a masculine monogram. I have quite a few left over, too . . . so more projects to come! ♥

1

Get a Clue with Nancy Drew!

Standard

Nancy DrewStackWhen Linny J Creations posted last fall about the upcoming Nancy Drew fabric at The Fat Quarter Shop, I was in! I bought my first ever charm pack just so I could see a tiny sample of everything.  Thanks to inspiration from  Feathered Nest Studio, these fun little designs are now a set of 24 coasters. It was so easy . . . just stitch two squares right sides together along with a square of quilt batting (leaving a small opening for turning), trim the corners, turn, and topstitch. We’re having a B-I-G family get-together at our house in June (more on that to come!), so I’m all ready in the coaster department!  P.S. The beautiful basket is from 1840 Farm Mercantile. ♥

Basket

DIY Play Tent

Standard

Folded

Dave and I collaborated on an indoor/outdoor and foldable/take-apartable/storable play tent for a special birthday boy using a tutorial from Gemma of Gembobs Crafts. Check out her beautiful crocheted version here! The fabric for ours is “Red River II Stripe Blue” from Fabric.com, and two and one-half yards of 45-inch wide fabric was a PERFECT fit. It was easy and fun and we’re ready to make more! Thank you, Gemma! ♥

Collage

Easy-Peasy PEEPS Garland!

Standard

PEEPS Garland

I love PEEPS . . . even though they make most of the rest of my family go “Ewwwwwwwww . . . !”  But who could resist some adorable PEEPS garland? It’s super easy, and as I made it, I realized I had lots of choices.  So here’s a chart!  Simply pick one thing from each column (which you probably already have around the house!), and soon you’ll have your finished garland hanging among your other spring decor. Here is mine with felt, fabric paint, ric-rac, and machine stitching. (Click on the photo for a close-up.)  Oh, and you can find lots of free templates for the bunny shape on Google images. Have fun! ♥

PEEPS Bunny
Eyes and Nose Garland Attachment Method
  • felt
  • fabric scraps
  • construction paper
  • scrapbook paper
  • brown fabric paint
  • brown permanent marker
  • brown embroidered French knots
  • ric-rac
  • ribbon
  • rope
  • string
  • twine
  • machine stitch
  • hand stitch
  • glue

FREEBIE ALERT: The Upcycling Queen Strikes Again!

Standard

Book CoverIn my “Meet an Upcycling Queen” post last month, I introduced Mahe of Altered Upcycling. Many of you picked up the free ebook she offers from her blog and loved it! Now Mahe has another free offer starting TOMORROW, February 23 and running through Wednesday, February 27—a card-making ebook available here on Amazon.com.  (If you don’t have a Kindle, you can download “Kindle for PC” from Amazon.com here, also for free.)  Mahe was kind enough to send me a preview copy, and I found:

  • cards featuring paint chips along with items many of us already have around the house,
  • cards for lots of different holidays, seasons, and occasions,
  • step-by-step directions and photographs,
  • links to youtube video demonstrations,
  • and much, much more!

Please take a moment to help yourself to this lovely gift which is regularly $2.99 but ours for free for the next five days. Thank you, Mahe! ♥

DIY Conductive Gloves

Standard

CollageA few days ago my tote bag handle triggered a sensor on a sink faucet in a ladies room, causing water to pour into the side pocket where I kept my cell phone! The bad news is that the phone was ruined, but the good news is that I got to trade it in for a much more up-to-date touch screen version. (Even the uber-polite sales assistant at the Verizon store laughed at my dinosaur phone! But I didn’t mind. 🙂 ) Since the temperature was ten degrees, I soon learned first-hand what I’d always heard about gloves and touch screens. Luckily, I’ve also heard about DIY-ing your own conductive gloves, so I decided to give it a try. I found conductive thread on Amazon.com (I’m sure it’s available lots of other places, too), cut a 6-inch length, stitched a small asterisk design on the index finger of my glove (making sure that the thread went all the way through so the inside will touch the skin of my finger), and tied it off. It works! It took five minutes, and I have enough left to do all the gloves in the house. Yay for new phones and successful DIYs! ♥

1840 Farm

Standard

Basket and noteWhen my blogging friend Judy of Grandparents Plus 2  emailed me about her daughter Jennifer’s small business, I couldn’t wait to check it out!  I purchased this beautiful handmade coiled fabric berry basket from the 1840 Farm Mercantile, and I just LOVE it.  Plus, I found out that Judy and Jennifer use to live in my state (Kansas)!  What a small world!  Besides baskets, Jennifer creates and sells lovely knitted and fabric items.  Please check out her links from this post or anytime from my Shop Love! page above. ♥

Basket

Photo Star

Standard

Photo StarYes, I’m about to share ANOTHER amazing daughter-in-law craft! We were so excited to get this beautiful star with photos of our dear little ones for Christmas.  Jen was kind enough to send me a tutorial this week . . . and she must have known I’d ask, because she’d even taken a photo of her materials!  Thank you, Jen! ♥

(1) Get a wooden or metal star from a craft store, some scrapbook paper, Mod Podge, a paint brush, scissors, and photos.  Tip: Photos that are further away from the subject work better than close-ups.

Jen's Craft Materials(2) Use a piece of plain paper to cut templates for each side of the star points. Then look at the pictures and decide which ones to put on the star and where they will go based on their sizes and vertical/horizontal positions.

(3) Use your template to cut out the pictures, making sure they are facing the same way as their position will be on the star.

(4) Paint the backs of the photos with Mod Podge and stick them to the star.

(5) Cut scrapbook paper to fit any extra space on each point of the star and Mod Podge it on.

(6) Paint the whole star with Mod Podge and let it dry overnight.

(7) TA-DAH!!!

No-Sew Spaghetti T-Shirt Scarf

Standard

Blue ScarfCollageMy sweet daughter-in-law Christin is getting SO crafty! She made this beautiful blue no-sew spaghetti T-shirt scarf for me after seeing a how-to video on TV. I LOVE it! And, of course, I HAD to figure out how to make one myself! I found a tutorial on Margo Is Crafty that matched it perfectly, and believe it or not I finished it in TEN . . . yes TEN minutes! If you have old or extra T-shirts lying around, try this! And if you’ve already posted a tutorial for a T-shirt scarf, will you please comment with a link so I can add it below? I know there are lots of styles and techniques out there that will be fun to try. Thank you!  P.S. Christin used pinking shears to cut her strips to add extra texture, and I used my regular sewing shears. I love it both ways! ♥

Other T-Shirt Scarf Links:

Meet An Upcycling Queen!

Standard

Free BookDo your New Year’s resolutions include using more of what you already have in your crafting, gift-making, and home decor?  Then you’ll want to meet Mahe at The Altered Upcycling Blog and Altered Upcycling. Mahe explains that she has a Master’s degree in Operations Research, works at a software house, and is an avid altered artist who is constantly looking for ways to make the world greener one small craft project at a time.  And, if you sign up on her blog or web site, you’ll receive her FREE pdf book called The Ultimate Guide to Upcycling  for one-of-a-kind jewelry, cards, gift bags, wall art, and more.  Mahe sends out free ideas and how-to videos in her email newsletter as well, such as how to make a beautiful card from a dinner napkin, old dictionary page, leftover ribbon, and glue!  Mahe writes in a friendly, conversational style as if she’s sitting right beside you, includes what worked and DIDN’T work for her, and supports her ideas with step-by-step directions, photographs, and alternatives.  You can get your copy by clicking on the link in this post or any time from my Shop Love! page above.  Thank you, Mahe! ♥

Sincerely Liz Boutique

Standard

DressOne of my VERY favorite bloggers is Liz from a A Ponytail Kind of Day. Every time I saw one of her unique creations, I’d think, “I sure wish she had a shop!” Well, now she does! It’s the Sincerely Liz Boutique, where you’ll find all kinds of beautiful handmade items for your home. Since I was looking for gifts for specific people, I ordered these fabric hangers, a set of rag coasters, and this way-cool bowl made from a Christmas record album. Then, friend that she is, Liz also put in this “Keep Calm and Sew On” framed art AND an AMAZING vintage dress and lace overlay that she bought for one dollar because she knew how much I’d have fun using it for a “What Can You Make With A . . .” project! What a sweetie! Please check out Liz’s boutique from this post or from my Shop Love! page above, and THANK YOU, Liz! ♥

Collage

Earring Frame

Standard

The beautiful vintage sewing machine earrings I won in the Hugs & Kisses blog giveaway inspired me to take all the danglies out of my overcrowded jewelry box and hang them on the wall.  Since I already had all the materials on hand, it was free, too!  Simply wrap an old frame in fabric strips (I used a faux suede remnant), staple strips of lace across the back, and poke the earring wires through the holes in the lace.  It’s easy-peasy, pretty, and makes choosing just the right pair of earrings a breeze.  P.S. One of my Thanksgiving guests exclaimed, “That’s just what I need!” so now I’m making one as a gift for her, too!  P.P. S. (1-3-13) I was just going through some bookmarked websites and found THIS! I couldn’t remember before where I got my inspiration, but now I know! Thank you, This Italian Family! ♥

Earring Frame

Shop Love . . . a Post and a Page!

Standard

Today I’d like to highlight four amazing WordPress bloggers’ stores where I did my Cyber-Monday gift shopping this year. Each one has BEAUTIFUL products and EXCEPTIONAL customer service! Here are their contact links along with a little photo shoot of my lovely purchases (plus a few freebies they added!). I hope you’ll get a chance to check them out yourself soon!  P.S. I now have  “Shop Love!” page in my header to promote my blogging friends’ small businesses. I’d love to add more, so please leave a comment or send me an email if I may feature YOUR store! ♥

(1) Lili and Mum’s: Click here for her blog, here for her FB page, and here for her store.

(2) Neecy’s Neccessities: Click here for her blog, here for her FB page, and here for her store.

(3) P.S. I Love Soap Company: Click here for her blog, here for her FB page, and here for her store.

(4) Drama Queen Seams: Click here for her blog, here for her FB page, and here for her store. ♥

Collage Numbered

Peppermint Headband

Standard

HeadbandAfter making a peppermint wreath and peppermint Christmas tree skirt, I had three little felt peppermints left, so I wrapped a headband in red bias tape and stitched the candies on top to make a festive accessory for a special little girl. This was another free-to-me activity since I already had all the supplies on hand . . . don’t you love it when that happens? There’ll be no more peppermint projects for me this Christmas since I used up all my red felt remnants and have vowed to use up my stash before buying more fabrics (we’ll see how THAT goes!). But several of you have said you’re on it now, so I can’t wait to see what you make! Now . . . on to some Christmas gifts . . . and Christmas pillows . . . and . . . ♥

Peppermint Mini-Skirt

Standard

Mini-SkirtNo, not for me . . . for a mini-Christmas tree! 🙂 I used this small tree in my classroom when I was an elementary teacher and decided to put it on a side table this year to showcase some of our homemade-by-family-and-friends ornaments. To make the skirt, I:

  • Tree
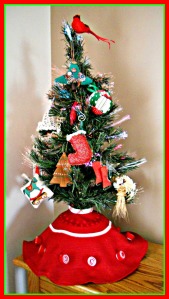
cut a 24-inch diameter circle from the thrifted red tablecloth I used for my argyle pillow and opened one side,
  • cut a 3-inch diameter circle in the center,
  • used a remnant from my snowman pillow to make a bias edging for the top,
  • sewed on some fancy red and white rick-rack from my stash,
  • machine-hemmed the sides and bottom, and added my no-sew felt peppermints.

It was a “free” project for me since I already had all the materials and adds a festive touch to a favorite little spot in our living room. ♥  P.S. Three peppermints to go . . . one more project!

Peppermint Wreath

Standard

Yesterday I posted a tutorial for “Easy No-Sew Felt Peppermint Garland.” Here’s what I made with mine! We’ve had the grapevine wreath forever, and it was definitely due for refreshing, so I pulled off all the tired greenery and replaced it with my new garland. Other than tying the ends together at the top, I didn’t even have to stitch or glue anything as the branches themselves hold the garland in place. Now the wreath is hanging in my kitchen window topped with a little raffia. I love it! ♥  P.S. I have ten “peppermints” left over, so watch for one more post on them!

Wreath

Easy No-Sew Felt Peppermint Garland

Standard

I fell in love with this Christmas garland, adapted from an idea in Fa la la la Felt by Kathy Sheldon. Here are the steps:

(1) Cut red and white felt into strips. Mine are 1/2 inch x 8 inches.

(2) Lay a white strip over a red strip, then pull the white strip down about an inch. Begin rolling upward at the end you pulled down. This will give the “candy” a solid white center and a red outer layer.

(3) After the piece is rolled, put a pin through it to hold everything in place until you string the candies.

(4) Using a sturdy needle and extra-strength thread, poke the needle through the loose end of a candy, go through the middle of the candy and out the middle of the opposite side, and remove the pin. Pull the candies close together to keep the rolls tight.

(5) Hang your garland on the mantel, in a doorway or window, or on a Christmas tree or wreath! ♥

Mrs. Hetherington’s Thanksgiving Pageant

Standard

Welcome to the “THANKFUL” edition of Collectively Creative! Today I have a giveaway for all of our blogging friends . . . one of my children’s stories from Pockets magazine for you to read, share, and/or use to introduce a creative writing activity about holidays.  Simply click the first link for a printable word document or the second link for a printable pdf.

Mrs. Hetherington’s Thanksgiving Pageant (word document)

Mrs. Hetherington’s Thanksgiving Pageant (pdf)

I hope some special kids in your life will enjoy meeting Mrs. Hetherington and her Portland Elementary School Drama Club this holiday season! But first, please pour a cup of tea and take a few minutes to savor the rest of this month’s Collectively Creative posts. Each one has something special to enrich our lives. Happy Thanksgiving! ♥

P.S. If you’re a parent, grandparent, children’s book reviewer, librarian, or teacher, please check out the new kids’ Thanksgiving book called Sarah Gives Thanks by one of our fellow WordPressers, Mike Allegra at heylookawriterfellow. I bought a copy, and it’s a keeper!

COLLECTIVELY CREATIVE:

Arts and Crafts Mission Market

Standard

Here are the tags for this year’s donations to the silent auction at the Arts and Crafts Mission Market at my church. It’s such a worthy cause . . . all the money goes to a local daycare center for families in need. Click here to see how to make the Christmas wreath pillow and here to see the Americana pillows.   P.S. Below are my gift baskets from markets past, each based on . . . you guessed it . . . a pillow! ♥

Warm Heart, Warm Hands

Standard

Here’s a little project I made for someone special to keep her hands warm on the way to work while getting a *hug* from the two loves of her life. Filled with rice, just pop them in the microwave for a minute or so and put them in your pockets. Please visit Trixie’s Blog for a tutorial . . . thank you for the inspiration, Trixie! ♥

How Cute Are These???

Standard

I met my super-crafty, super-sweet, and super-pretty daughter-in-law Shannon for coffee, and look what she made for me!  Tiny easels with paint and ribbon a-la-mode and tiny art canvases with paint and paper decoupage (and tiny spools for Frankenstein!) for my Halloween decor!  I LOVE them!  THANK YOU, Shannon! ♥  P.S. Click here to see an example of Shannon’s mixed media “She Art.”

Craft Schmaft!

Standard

I am SOOOOOOOO lucky . . . I won the recent balloon mobile kit giveaway by craftschmaft! (Here is her Facebook page, and here is her store.)

I can’t WAIT to start on it!

BUT . . . I have a ton of writing and editing deadlines right now, so it will have to remain on my to-do list until the perfect time arrives.

So, thank you, Claire, and I’ll look forward to writing a fun post about my project as soon as I finish it!♥

Owl Treat Bags

Standard

My crafty friend Debbie gave me a fun gift. . . a sample of her new Halloween treat bag! Isn’t he cute??? Mine is filled with paper to use as a decoration, and he looks right at home beside my bowl of giant fabric candy corn! I’m going to try my best to make some for our trick-or-treaters this year. Thank you, Debbie! ♥  P.S. If you love owls, remember that you can get a free David Bromstad owl art print by following the link you’ll find here!

Instagram Collage Letters

Standard

I was so intrigued when I saw some wooden letters decoupaged with maps on House of 34 and decided to make a set for a gift. However, the birthday guy is an amazing photographer who creatively explores the city of Philadelphia with all of its amazing architecture, landmarks, murals, and street art. So . . . I printed off some of my favorite Instagram photos he’s shared on FB and cut out different bits to create a “Mod Podge collage” on each letter instead. I love that I can show him how proud I am of him . . . and it was fun, too! ♥  P.S. You can follow on Instagram at mr_fisher. And Ashley Bollinger has some other fun Instagram art projects here.

Fork Easel

Standard

I was rummaging for a frame yesterday and found my long-lost fork easel! I didn’t make it . . . I bought it at a craft show. But I think I could make one now that I know A Ponytail Kind of Day! She has a post here about her fork easels. Plus, if you go to her Category Cloud and click on “silverplate,” you’ll see knives, forks, and spoons made into candleholders, bracelets, necklace pendants, money clips, vases, key chains, and napkin rings! I’ll try it if you will! ♥

P.S. Click here for a tutorial for a rock and wire photo display option . . . another fun upcycle! P.P.S. And now I just discovered this AMAZING silverware starburst mirror! You must check it out! P. P. P. S UPDATE: Spoon rings now on A Ponytail Kind of Day! 🙂

Valences Galore

Standard

One of my sweet daughters-in-law just moved AND got a new classroom (see Embroidered Classroom Poster), so I had fun sewing valences for both places. For the kindergarten room, I found a crayon print on the sale table at my local Hancock Fabrics and bought a yard of alphabet/number print for a contrast border. For the dining nook, Jen and Greg chose a green/blue plaid from Fabric.com and I found a matching blue trim at Jo-Ann. They’re in the mail to their new homes!  ♥

Felt Baby Mobile

Standard

The minute I saw an adorable mobile on Eco Felt Crafts (who got the idea from It’s the Life, who got the idea from The Handmade Home . . . don’t you love how bloggers share???) I  knew I had to make one for a special baby girl. I love the combination of felt, fabric, buttons, and ribbons in greens, pinks, blues, and whites to match her nursery. It was so much fun to make!  P.S. Click here and here and here and here and here for five more cute mobiles. And if you’ve made one, please send me a link in a comment and I’ll add it to this post. I’d love to try them all! ♥

Other baby gift posts on Pillows A-la-mode:

Nursery Pillows

Crib Skirt

Diaper Clutch

Burpies and more burpies and even more burpies (plus a receiving blanket!)

Necktie Onesie

Locket Onesie

Rock and Wire Photo Holder

Standard

When I was digging through my treasure box and found these pretty rocks that some sweet kiddos gave me, I immediately thought of a super-creative craft I’d bookmarked on What Katie Made.  Thank you, Katie, for such an easy-to-follow tutorial! Now I have treasures holding treasures. ♥

Vintage Earring Magnets

Standard

Have you checked out the crafting ideas on the Country Living web site? I want to try them ALL! But I started with an easy one . . . frig magnets made from vintage jewels. I don’t have the brooches they suggest, but I have LOTS of clip-on earrings. Simply remove the backings and glue on a magnet . . . easy peasy and SO pretty!  P.S. You can also click the blue dot on the CL home page to vote for the Reader’s Choice 2012 Blue Ribbon Blogger Award. It was really fun to check out all the finalists! ♥

Thimble Necklace

Standard

I recently saw thimble necklaces posted by two creative bloggers on imacraftaholic and Dollar Store Crafts.  Since I have a small collection of thimbles from my grandma, I decided to use one for a necklace charm.

(1) Make a hole in the top of the thimble with a hammer and tiny nail.

(2) Poke a jewelry wire through the hole.

(3) Bend the end of the wire inside the thimble with jewelry pliers so it won’t come back out.

(4) Curve the other end of the wire through the opening on the charm bar and tighten with jewelry pliers. (See lost earring necklace  for another example, and click photo for a larger view.)

(5) Wear the thimble alone or with other charms. I love combining it with my scissors!

I hope you’ll get to use one of these ideas to make your own thimble necklace. Enjoy! ♥

Fall Wreath

Standard

When I was making my class reunion garland, I kept the materials on the kitchen island so I could work on it in spare moments. Plus, I use the tall part of the island, and it’s relaxing to stand and craft since my “real” job involves working at the computer all day. So I’ve decided to keep a project going there all the time . . . well, except for when we’re having a houseful of guests for dinners or holidays. (I DO leave Dave room to eat lunch and read his mail, too! :)) My current “kitchen project” is a fall wreath made with strips of autumn-colored fabrics tied onto a wire clothes hanger bent into a circle. I made one for spring, too, so you can click here for details if you’d like to give it a try.  P.S. I’m including a photo of the vintage bow tie I’m going to use for a-la-mode. Isn’t it cute??? ♥

Thank you!

Standard

Like many Americans, I decided to deck out in casual red, white, and blue before heading out with family and friends for the 4th of July.

  • Denim capris and white peasant top . . . check!
  • Red leather belt and red canvas shoes and tote . . . check!
  • Silver earrings and bracelet with red beads . . . check!
  • Headband (because I LOVE headbands!) . . . UNCHECK!

So, I headed for my remnants and found this pretty red/white stripe left over from a snowman pillow I made last winter and a little strip of elastic and had it ready to wear in about 10 minutes.  But this isn’t a “what I wore” or “headband tutorial” post  . . . it’s a thank you to all of YOU who constantly inspire me with your creativity and resourcefulness so that I didn’t even think twice about figuring out how to make what I needed out of something I already had. You’re the best! ♥

Tablecloth + Napkins = Curtains

Standard

I was in the mood for some new curtains for two skinny bedroom windows, and I had some fabric that would work perfectly . . . a tablecloth and napkins!

  • Cut the tablecloth in half to make two curtains.
  • Cut a strip off the bottom of each piece.
  • Cut two of the napkins into fourths and sew the strips together to make long, narrow borders.
  • Sew the napkin borders to the tablecloth fabrics.
  • Hem all the unfinished edges.
  • Turn the tops under and stitch to make casings for the curtain rods.
  • Hem all the way around the two extra strips and use them for tie-backs.
  • Make a matching pillow with the other two napkins.

I love the new look! ♥

Button Necklace

Standard

Since my “lost earring necklace” worked out, I got brave enough to try one of the cute button necklaces I’ve been seeing everywhere! I decided to go with black buttons, so first I went through my stash and put these in a pile. Next, I made a new pile with the ones that were ½ to ¾ inches in diameter. Finally, I sorted out the ones that had the most interesting designs, and I was ready to go.

Here’s the tutorial for my version of this fun craft:

  • Cut three strands of cord 48 inches long. I used hemp cord from Michaels, where I also purchased a package of bracelet closures and crimp beads.
  • Thread the strands through a bracelet bar closure and pull it to the middle. (Click on the red collage for a larger view.) Clamp the cords 4 inches from the bar closure. This is where you will start adding buttons.
  • Separate the first of the six strands of cording. Slide on the first button and tie it at the back with a simple slip knot. Keep adding buttons, evenly spaced, until you get to within five inches of the end. Repeat with the other five strands.
  • Stretch the strands back out and knot the ends. Then add a crimp bead at each end and attach these to the circle closure.
  • You’re done . . . enjoy!  Oh, and please check out this adorable button necklace (with earrings!) at The Bead Den. I discovered it right after I made mine, and I LOVE it! ♥

Crazy Tree Notecards

Standard

When I put together the Persian Plum kit I received from Books Quilts and Sewing’s giveaway, the first step was to sew a small, neutral-colored square onto a larger colorful solid or floral triangle and then cut the tips off both. This left me with a stack of perfect little triangles, and of course I decided I must do something with them as well! I always keep a stash of blank notecards and some craft glue handy, so here’s what I came up with (adding a tiny strip of one my other remnants for the trunks). I think they’ll become a nice little gift for a friend or family member someday soon! ♥

Lost Earring Necklace

Standard

Have you ever lost one earring from a favorite pair? That’s happened to me several times lately. I’ve been wanting to incorporate the saved mates into a different piece of jewelry, and I finally figured out how!

At a craft show last fall a lady had the ingenious idea of attaching the round part of a bracelet closure to a necklace latch that could clip onto any necklace chain or cord and then attaching charms to the bar part of the closure that slips into the circle. I bought the latch and one charm (with some miniature scissors, a flower, and two crystal beads), and I love it! So, to make my “lost earring necklace,” I removed the earring findings, bought another bracelet closure the same size, attached the pretty parts of the earrings to the bar with a little wire circle, and closed it up with my needle-nose pliers. Now I can exchange it out with my other charm whenever I like . . . YAY!

P.S. I’ve never made jewelry so I’m probably using all the wrong terms in this post, but hopefully the photos will help. ♥

Stars and Hearts Button Pillow

Standard

I got these sweet stars and hearts wooden buttons for my birthday and was waiting for just the right project for them. When I found this remnant at JoAnn with stars the same size and color as my buttons, I knew just what to do. Here is my finished 18 x 18 inch pillow, all ready for the 4th of July! ♥

DIY Ironing Board Cover

Standard

I have such a fun job (writing books and classroom resources for K-5 students and teachers!) and I’m lucky to have a small but cozy home office to work in. It has a large black desk, a black rolling chair, and black metal shelves filled with my curriculum and reference books. It also has a matching black metal shelf for my fabric and sewing/craft supplies and a very small black desk for my sewing machine. My favorite piece of furniture is a dressing table bench that belonged to my Aunt Vitha. We painted it black and recovered the seat in zebra print, using a bedsheet I found at Target. I also made a black and white alphabet print cover for my sewing machine (from a fun book called Simply Irresistible Bags, but I’ve since seen lots of tutorials on sewing blogs and Pinterest) and black and white floral curtains (basic hemmed sides and bottom and casing on top) for the window.  So, when I needed to leave my ironing board set up for my after-hours sewing projects, its stained, worn, pink and green cover looked badly out of place. This weekend I remedied the problem by making a new cover from the zebra bedsheet! I simply used the old cover for a pattern, leaving a little extra around the edges to stitch a casing for elastic. Oh yes, and the old cover had two velcro straps that fastened under the ironing board to help keep it in place, so I snipped those off to reuse, too. It fits, and I love it! ♥

More Necktie Wristlets

Standard

I just finished six new necktie wristlets . . . so easy and fun! The only thing I changed from the original tutorial was to sew the decorative button on the front flap and use a snap closure rather a button/buttonhole.  Now I can’t wait to give them to some special girls in the family! ♥

Citrus Coasters

Standard

I was browsing the department store ads in the Sunday paper a couple of weeks ago when I was captivated by a lovely display of summery picnic dinnerware. When I saw coasters that looked like slices of oranges, lemons, and limes, my little DIY fairy said, “You should make some of those!” So off I went to the fabric store where, serendipitously, I spotted a lovely orange, lemon, and lime print on my way to purchase the felt I’d need. How fun is that!!! 🙂

Here’s how I made the coasters:

  • Cut out three sizes of circles. The smallest and largest are from colored felt, and the middle is white. (I used the bottom of a yogurt carton, my trusty peanut butter lid, and a random lid from my container drawer for templates.)
  • Handstitch the small circle onto the white circle using matching embroidery floss.
  • With white embroidery floss, stitch three criss-crossing lines across the colored circle.
  • Glue the now-attached pieces to the larger circle to cover up the stitches, and trim all the way around with pinking shears.

For a gift, make four of each and tie them together with a pretty orange, yellow, or green ribbon. Or, if you’re lucky enough to find some fabulous fruity fabric, you can make a simple little drawstring bag to gift them in. They’re so fun, easy, and colorful . . . you’ll love making your own! ♥

Citrus Collage

Button Hairbands

Standard

This project looked SO cute and easy that I just had to try it! Visit Dreampatch for my original inspiration (via Pinterest, of course!). I made all of these in an hour or so . . . but most of that time was spent enjoying sorting through my grandmother’s vintage buttons. We have LOTS of girls in our family now, so it will be fun giving them away! ♥