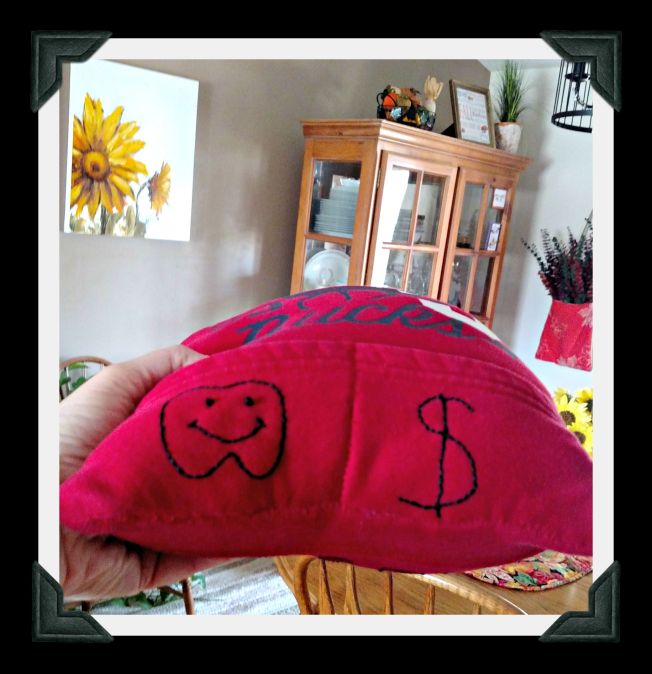
Our sweet little Mason is turning five, so it’s time for a tooth fairy pillow! I love making them from beloved outgrown garments, and Mason’s mom picked a hoodie. I design as I go along, trying to keep as many of the structural elements and as much as of the text as possible. Click here and here for two more hoodie versions. Happy birthday, Mason! ♥
Tag Archives: Gifts for Kids
Back to School Pencil Pouches
My niece Amanda got to stop by for a few hours on her vacation to Kansas. We love to make projects together when she visits, like last summer’s ruffle apron. This time we made pencil pouches for HER nieces who are getting ready to begin first and second grade. Amanda looked through my stash and found a crayon print for the outside, alphabet print for the inside, felt for interfacing, and zippers in the girls’ favorite colors. We used the sunnies cases tutorial, only in a different size and shape. We also typed up the instructions so Amanda can make more when she gets home. Click Pencil Pouch to download all the steps. Happy Back-to-School! ♥
Nancy Drew Tote Bags
 Remember my “Get a Clue with Nancy Drew” coasters? When I bought the charm pack, I also bought a yard each of two different Nancy Drew fabrics to make lined tote bags for a couple of cutie-patootie girls in my family . . . and fill with their first sets of Nancy Drew books!
I used a tutorial from Quick Stuff to Sew (Volume IV), a publication of Craftstylish.com, for the totes (like this one, minus the stripes). I hope there will soon be two new Nancy Drew fans in the world! ♥
- Book 1: The Secret of the Old Clock
- Book 2: The Hidden Staircase
- Book 3: The Bungalow Mystery
- Book 4: The Mystery at Lilac Inn
- Book 5: The Secret of Shadow Ranch
- Book 6: The Secret of Red Gate Farm
DIY Play Tent
Dave and I collaborated on an indoor/outdoor and foldable/take-apartable/storable play tent for a special birthday boy using a tutorial from Gemma of Gembobs Crafts. Check out her beautiful crocheted version here! The fabric for ours is “Red River II Stripe Blue” from Fabric.com, and two and one-half yards of 45-inch wide fabric was a PERFECT fit. It was easy and fun and we’re ready to make more! Thank you, Gemma! ♥
“My Family” Felt Letters
My first Year of Homemade Gifts project was for a very special little boy about to turn three years old. I was pondering what to make for him one morning and, while spraying my hair, this idea came to me. (I MUST buy more of that hairspray!) He already knows his ABCs and can recognize and name letters, so I thought a fun next step would be to learn how to spell the names of all his family members. Here’s how to make a “My Family” felt letter set:
Supplies:
- Felt squares, a different color for each name, all cut the same size (Mine were 6.5 x 6.5 inches.)
- Embroidery floss and needle
- Fiberfill stuffing and a chopstick to push it into the letters’ crooks and crannies
- Fabric for a tote bag to hold the finished letters
- Fabric, ribbon, cord, or bias tape for drawstring
- Pencil, pins, and scissors
Directions:
(1) Draw block letters on the felt squares, two for each letter. Be sure to use uppercase for the first letter of the name and lowercase for the other letters . . . a kindergarten teacher will thank you someday!
(2) Stitch the front and back of each letter together using a contrasting color of embroidery floss.
(3) Every few stitches, stop and put in a little stuffing until you make it all the way around.
(4) Cut two large rectangles for the tote bag. (Mine is 18 x 16 inches and holds 19 letters.)
(5) Stitch felt letters spelling “My Family” on the front of one piece of the tote bag fabric.
(6) Put the rectangles together, right sides facing, and stitch the sides and bottom.
(7) Turn down the top and stitch around it, leaving a channel and an opening for the drawstring.
(8) Turn the tote bag right side out and press if needed.
(8) Make a drawstring out of the same fabric, or use ribbon, cording, or bias tape folded and stitched. Fasten a safety pin through one end and thread the drawstring through the channel. Tie ends together.
(9) Put the felt letters into the bag, and give it to a little boy or girl you love! ♥
P.S. Besides spelling the family’s names, children can sort the letters by color, letter, or uppercase/lowercase, spell other small words (my letters also work for Mom, Dad, red, mad, lead, dare, name . . . ), and use them to make up fun new names. How about Myler, Dyan, Rommy, and Taddy? 🙂


