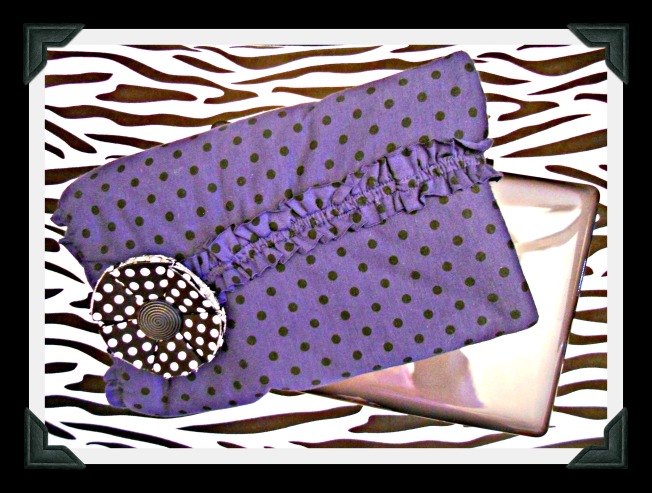
I have a cool new mini-laptop/tablet that’s super-easy to tote around, but I wanted to give it a little protection before adding it to my backpack on my way to the airport last week. I have a dress that I just turned into a skirt, so I decided to use the dress’s top for this project. I started with the elastic-ruffled sleeves, padded them with quilt batting, and folded and stitched them to size. Then I stitched the elastic ruffle from the neckline diagonally along the front, leaving it loose at the sides and back so I can pull it around the case to hold the laptop inside. A fabric flower from my stash made the perfect a-la-mode for traveling in style. ♥
Category Archives: Travel
Birthday Party!
It’s birthday party time again in our family! Five-year-old Tyler chose Disney Planes for the theme. I had fun searching out a yard of DP fabric (found it on ebay and got it in two days!) to use for bunting and then sewing a big pile of red goodie bags for Tyler to fill with treasures and send home with his friends. Now for some cake and ice cream! ♥
Stitching Hearts in Planes, Trains, and Automobiles
 Last week I had a work-related training meeting in NYC. By the time I came home to Kansas I’d been in four planes, one train, and numerous cars and cabs, including a four-hour airport layover. Luckily, I’d brought along a project that hardly took up any space in my bag . . . hand-stitching little hearts made from the sleeve of an old red sweater. (If you predict a What Can You Make With A . . .? post coming up, you’re right!) I cut the shapes at home using a small cookie cutter for a template, then joined each pair together with a blanket stitch on my travels, leaving a small opening for stuffing and closing when I returned. What will I do with them? So far I’ve thought of:
- adding a pin to the back for a Valentine brooch,
- tying them onto baker’s twine for gift-wrapping,
- displaying them in a pink heart-shaped bowl,
- sewing or tying them onto a small wreath,
- sewing them onto a pillow, and
- stringing them together for garland.
Your ideas are welcome! ♥
Road Trip Projects
We spent fifteen hours in the car this weekend for a fun trip to see family. In my project bag I brought along . . .
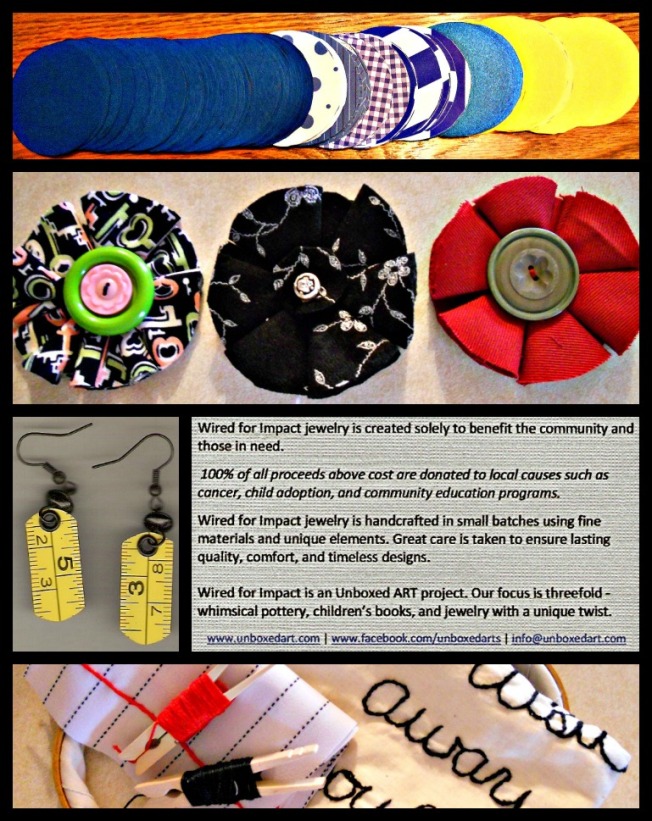
(1) blue and gold scrapbook paper to cut into circles for garland for my class reunion next weekend,
(2) fabric and buttons to make flowers, and
(3) two embroidery projects to finish (posts to come!).
I also received these adorable earrings as a surprise gift from our hostess! They’re created by a nonprofit called Unboxed Art . . . please check out their website when you get a chance, and have a lovely week! ♥
X’s and O’s . . . er . . . Lemons and Limes
 Do you have little ones in your family who LOVE to play tic-tac-toe? We do! Since I bought plenty of orange, yellow, green, and white felt for my citrus coaster project, I decided to use it to make a birthday gift for one of these sweet little girls with a giant orange slice gameboard and lemon and lime game pieces. And how serendipitous to find an orange slice notepad in the dollar bin at Michaels for keeping score! 🙂 At first, I was going to make a bag out of my citrus fabric to hold everything, but then I figured out that the gameboard itself could be the bag with the addition of ties. It worked! Now I’m imagining all sorts of other themes . . . a basketball gameboard with different colors of “team” T-shirts for the game pieces . . . a Disney fabric gameboard with Mickey and Goofy game pieces . . . the sky is the limit! You could also make them different sizes and even add velcro to the gameboard and pieces to play it in the car. Other ideas are welcome! ♥
Road Trip Project!
I’m going to be in the car for 7-8 hours tomorrow and wanted to take something to work on. I’ll share what I came up with in case you have a road trip coming up, too. 🙂
- First, go to The Renegade Seamstress and check out Beth’s fabric flower tutorial . . . super-easy! (I stitch instead of glue, but either way turns out great.)
- Go through your remnants and cut out circles–seven of each fabric. I use a peanut butter jar lid as a template (mmm . . . peanut butter . . . ) and all types of fabrics–solids, prints, wovens, and knits.
- Put the seven circles in a baggie along with a button, beads, or earring for the flower center and a spool of matching thread.
- Throw the baggies into your project bag along with a needle and some scissors, and you’re good to go!
I’ll put the pins and/or clips on the back when I get home, and hopefully I’ll have LOTS of pretty flowers to show you! ♥
Homemade Luggage Tags

 I’ve been wanting to try a sewing project I saw on Design Sponge awhile back . . . luggage tags. This crafter has an amazing tutorial that makes the project a snap. I’ve now made some for gifts, plus a couple for our suitcases. Try it . . . they’re fun! 🙂


