Category Archives: Pillows

Goodby my friends

Standard

My name is David Scraper, Katherine’s husband.  It is with great sadness that I write this blog post for all of you out there who came to know and admire Katherine.  I know her last post told of her initiation into the “breast cancer club”. In typical Katherine fashion.what she didn’t say was that she had a rare aggressive form of breast cancer that was already in stage IV when it was diagnosed.  She fought long and hard in the brief time available to her but in the end the cancer won.  Katherine passed away on Wednesday, December 21st at 3:30 PM.  As one of our daughters-in-law said “The world is a sadder place without her.”

Elephants!

Standard

My niece and her husband have a little one coming soon! I saw lots of cute elephant-themed items on their registry, so I purchased a couple and then bought some flannel to make some burp cloths. I had one little strip left over so dreamed up a pillow for the rocking chair, too. Can’t wait to meet the newest member of the family! ♥

OhBaby

Happy Spring!

Standard

pillow[1]It’s always fun to switch out the winter decorations for spring things! Here’s my favorite pillow (and the story behind it!) and links to some other handmade goodies. Enjoy! ♥

Peeps Garland

Fabric Carrots

Fabric Bunnies

Bag O’ Bunnies

Spring Frame

Flower Pillows

Citrus Coasters

Kids’ Scarves and Hats

Standard

ScarfPatternWe’ve had another cold snap since Valentine’s Day, and I’m still working on using the immense amount of fleece I bought for a family service project a couple of years ago, so it was the perfect time to try out the kids’ hat and scarf pattern I found in a $1 bin at Jo-Ann.

I changed the scarf up a bit and made it two layers instead of one, but I followed the hat pattern as is . . . super easy.

Now they’re ready to donate to a local preschool for some little ones who might need a soft, warm, wearable hug. ♥

Other fleece projects:

Tie pillows

Freezer pop holders

Earbud pouches

1

Valentine’s Day . . .

Standard

1. . . is only one week away! The only new things I’ve made for the occasion this year are some infinity scarves from red-on-white and white-on-red dotted chiffon that I had in my stash. They’re super-easy to sew (check out Pinterest for tons of tutorials!) and perfect for gifting. But it’s also fun to put out some treasures from previous projects, such as:

Heart to Heart Garland

Valentine Hearts Card Garland

Red Sweater Heart Pillow

and my February Shantilly Frame.

Have a happy week sharing *a little extra* love with your family and friends. ♥

PicMonkey Collage

“I Sleep On It!”

Standard

PickYourPlumWhen I saw this fun fabric on Pick Your Plum, I HAD to get one each for grandchildren Allyson, Kira, Miranda, Brody, Tyler, Ryan, Joshua, and Kaitlyn. It’s exactly the right amount for a “sweet dreams” pillowcase, but it would also make a perfect cape, tote bag, or other personalized item. The photo below is Joshua, who immediately snuggled in and told his mom, “I sleep on it!”

If you sign up at Pick Your Plum, you’ll get daily emails with fun crafty items and accessories at amazing discounted prices. With a little luck, this fabric treasure will come up again soon! ♥

Joshie


Merry Christmas!

Standard

SpoonWhat do you get when you combine a Saturday morning, 8- and 10-year-old granddaughters, a roll of twine, red and white Tempera paint, and a package of dollar store wooden spoons? Sixteen Santas for teachers and friends on the girlies’ gift lists! You’ll find directions on Real Simple, and here are some other crafty ideas from Christmases past:

My blog has been on the back burner since summer, but I think of you often . . . sending love and best wishes for a joyous Christmas season to you and yours!

Vintage Linen Pillow

Standard

Since I have lots of hand-me-down vintage linens and doilies, I’ve been collecting ideas for using them in new ways. One idea I’ve seen several times is to use the piece as a-la-mode on a pillow. When I saw this pink polka-dot brown flannel next to this pastel pink table scarf, it was love at first sight! I simply centered the scarf on the cut out fabric, stitched it on, and completed the pillow as usual. Mmmm . . . brown and pink! ♥

VintageLinenPillow

Red, White, and Blue

Standard

In the U.S.A., Memorial Day is today, June 14 is Flag Day, and July 4 is Independence Day, so you can’t go wrong with a bit of patriotic decor this time of year. Here is my restyled Shantilly frame, a free art print on a hand-quilted table runner my daughter-in-law Tiffany gave me for my birthday, the 1776 pillow I made last summer, and a pinwheel bouquet (also a free printable!). Happy summer! ♥

Collage

Crazy Quilt Pillow

Standard

My sister took a crazy quilt class and made this fun block. I love the fabrics she chose and all the dashing embroidery stitches she added for a-la-mode. Then she gave it to me to make a pillow! I used a square of black and white striped fabric from my stash for the back. Thank you, Susan! ♥

CrazyQuiltPillow

Veggies!

Standard

Our lovely daughter-in-law Mary Ann is a registered dietician turned physician’s assistant and sports a fun “Periodic Table of the Vegetables” poster in her kitchen. On a trip to Jo-Ann to buy a foam cushion for the toy box bench, I spotted this “Farmer’s Market” fabric—perfect for a decorative cushion for the kitchen window seat. The cat promptly nestled beside it for a nap . . . and Mary Ann loves it, too! ♥ Veggie Pillow

New Home Pillows

Standard

Our Georgia family recently moved and needed some new pillow décor. First, we made a bench seat cushion for baby Josh’s toy box (handmade by his Uncle Jeff!). Josh’s room is morphing into a travel theme—don’t you just LOVE this map fabric his mommy picked out? We had enough for a square pillow to pose on the rocking chair, too. Then we made some floral and solid-with-button-a-la-mode pillows for the purple sofa in the living room. Mary Ann purchased the fabrics at Curtain Call in Augusta, Georgia. ♥  P.S. Now I want a purple sofa!

BenchPurple


Tyler’s Tooth Fairy Pillow

Standard

I love to make tooth fairy pillows from well-loved baby or toddler clothes! To transform the Disney World hoodie that Tyler chose, I simply cut it into a square, embroidered a tooth on one pocket and a dollar sign on the other, and stitched and stuffed. So easy! Now he’s eagerly waiting for that first loose tooth! ♥  P.S. Click here for another hoodie tooth fairy pillow and here and here for two more designs.

Tyler'sToothFairyPillow

What Can You Make With a (comfybutunflattering) Dress?

Standard

Blue DressIt’s been a LONG time since I’ve posted a What Can You Make With A . . .? project, but I have one today! The inspiration was this blue dress. It was soft, swingy, and SO comfortable, with pockets in the side skirt seams, perfect with a black cardigan for chilly days . . . and what’s not to love about polka dots? But my mirror (and an “honest” family member) told me that this was not my best look and added more than a few pounds to my curves. So, out came the scissors.

  • The skirt is PERFECT as . . . a skirt! And I still get to enjoy the lovely color, fabric, and pockets. I simply cut it off a little above the empire waist, nipped and tucked here and there, and used the top of the cut-off piece to make a waistband. I love wearing it with my black pullover sweater, tights, and boots.
  • You’ve already seen the laptop case I made with the sleeves and neck elastic. I LOVE it and use it every day. It’s especially fun when someone asks where I got it!
  • That left just some bits and pieces, so I cut them into strips, twisted and stitched them into a flower, and used it for a-la-mode on a fun spring pillow I stitched up with some bird fabric from my stash. (Spring WILL come, right???)

Ahhhhh . . . much better! ♥

Skirt

Bird Pillow

Tiny Christmas Pillows for Pillows A-La-Mode!

Standard

Look what I got in the mail this week! My sweet bloggy friend Sharon of Gentlestitches sent these lovely, handmade pillow ornaments for my Christmas tree all the way from Victoria, Australia to Kansas, USA! I just love them! If you haven’t had a chance to visit Sharon’s blog yet, please go take a look . . . she even has a page full of free patterns! Thank you, dear Sharon! ♥

Gentlestitches

Mr. Men and Little Miss Books

Standard

When my boys were little, they loved Mr. Men books. My first-graders loved them, too. Now my grandchildren love them! The stories are odd and quaint and preachy, but the characters are totally loveable . . . and we can all relate to their funny foibles. After Mr. Men Books became so popular, the author/illustrator Roger Hargreaves also started writing Little Miss books. Imagine how excited I was to find Mr. Men fabric at Fabric.com! I ordered a yard to make a drawstring gift bag for a set of Little Miss books for an upcoming birthday girl (there’s even a birthday book in the set!) and had enough for a pillow, too. Oh, and this drawstring bag was so much fun! I’ve made dozens of these bags in my life, but never with this super-cool design by Jona of Stop Staring & Start Sewing. Thank you, Jona! ♥

BooksBag and Pillow

Music Lover’s Gift Basket

Standard

I love making a gift basket for the silent auction at the Arts and Crafts Mission Market at my church every November, which this year will benefit the Downtown Daycare Center here in Wichita, KS. This time I decided on a music theme.

  • First, I made an embroidered pillow and a music-note-fabric half apron with fabric flower a-la-mode. (Click here for the apron tutorial from Jona of Stop Staring & Start Sewing).
  • Next, I added a framed music saying (which you can get here for FREE from the lovelyn Darilyn of TheHighNotedotNet) and a package of vintage music Christmas tree confetti from Darilyn’s Etsy shop.
  • I finished if off with a blank journal and coffee cup cozy for idea-gathering and a small vintage hymnal.

Click here for gift baskets from the past few years. It’s my secret ambition to go into the gift basket business someday! (Dave, you didn’t see that, right???)  ♥

BasketCollage

Chevron Halloween Pillow

Standard

Even though I named my blog for pillows, I haven’t made many lately, have I? But here is my latest cushiony creation concocted from scraps of last year’s Halloween pillows, a fun black and white remnant for the back, and some of my grandma’s mismatched black buttons. I knew I wanted to do a chevron design, and I found a perfect tutorial from Nicole at Modern Handcraft. Thank you, Nicole . . . and have a fun Halloween, everyone! ♥  P.S. The other one is a sweater pillow from my earliest blogging days . . . it’s the softest, coziest cushion in my  house, and I love getting it out when autumn arrives!

Collage

Thomas the Train Birthday Party

Standard

PillowWe got to fly to Florida for our grandson’s second birthday this weekend. What fun!

His mommy asked me to make some Thomas the Train bunting for the party, and of course I said yes!

The fabrics I chose (all from Fabric.Com) were:

  • Who’s That Train panel
  • Who’s That Train Word Blender in grey
  • Who’s That Train Symbol in red

I had enough left to make a tablecloth for the gift table and . . . no surprise here . . . a pillow for Ryan’s room. ♥

BuntingTablecloth

What can you make with a sentimental dress?

Standard

DRESSFor my two year blog anniversary,  I invited you to nominate people you’ve met through the blogging world who you would like to have as next-door neighbors. It was SO heartwarming to read the lovely comments that came from around the world! The blogger with the most nominations was then invited to send me a once-loved garment to remake into some new treasures and return. This year’s winner was Staci of Crafty Staci, who decided to send her going-away dress from her wedding 22 years ago! She said, “It’s been stored under my bed ever since.  I’d love to have it made into some things I could actually have out to enjoy, and red is still my favorite color, so that’s what I’ll be shipping to you.” I was so excited, and when this exquisite handmade dress arrived, my mind started spinning! So . . .today is the reveal! Here we go!

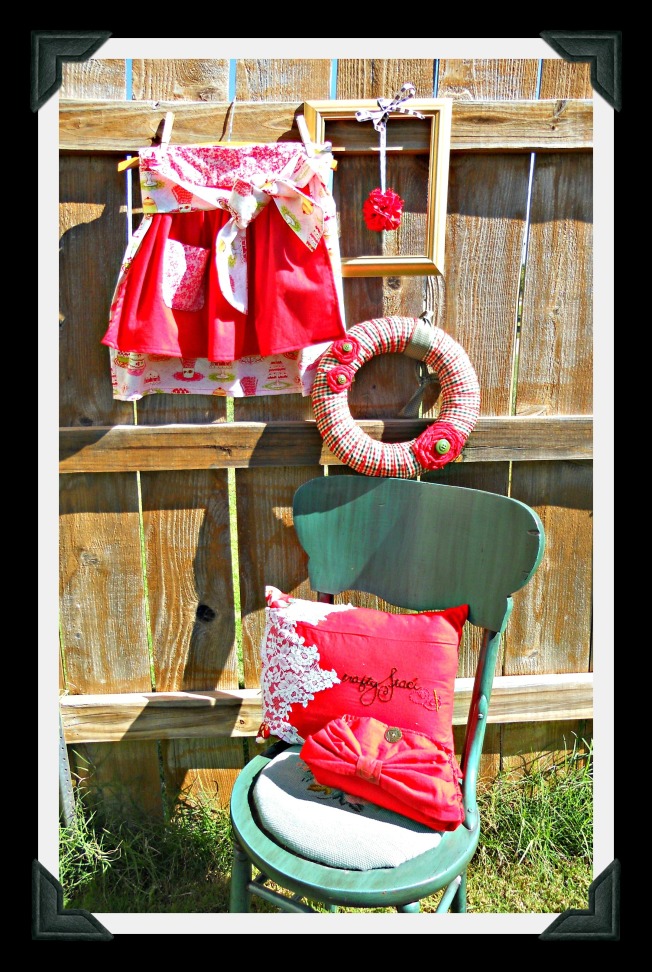
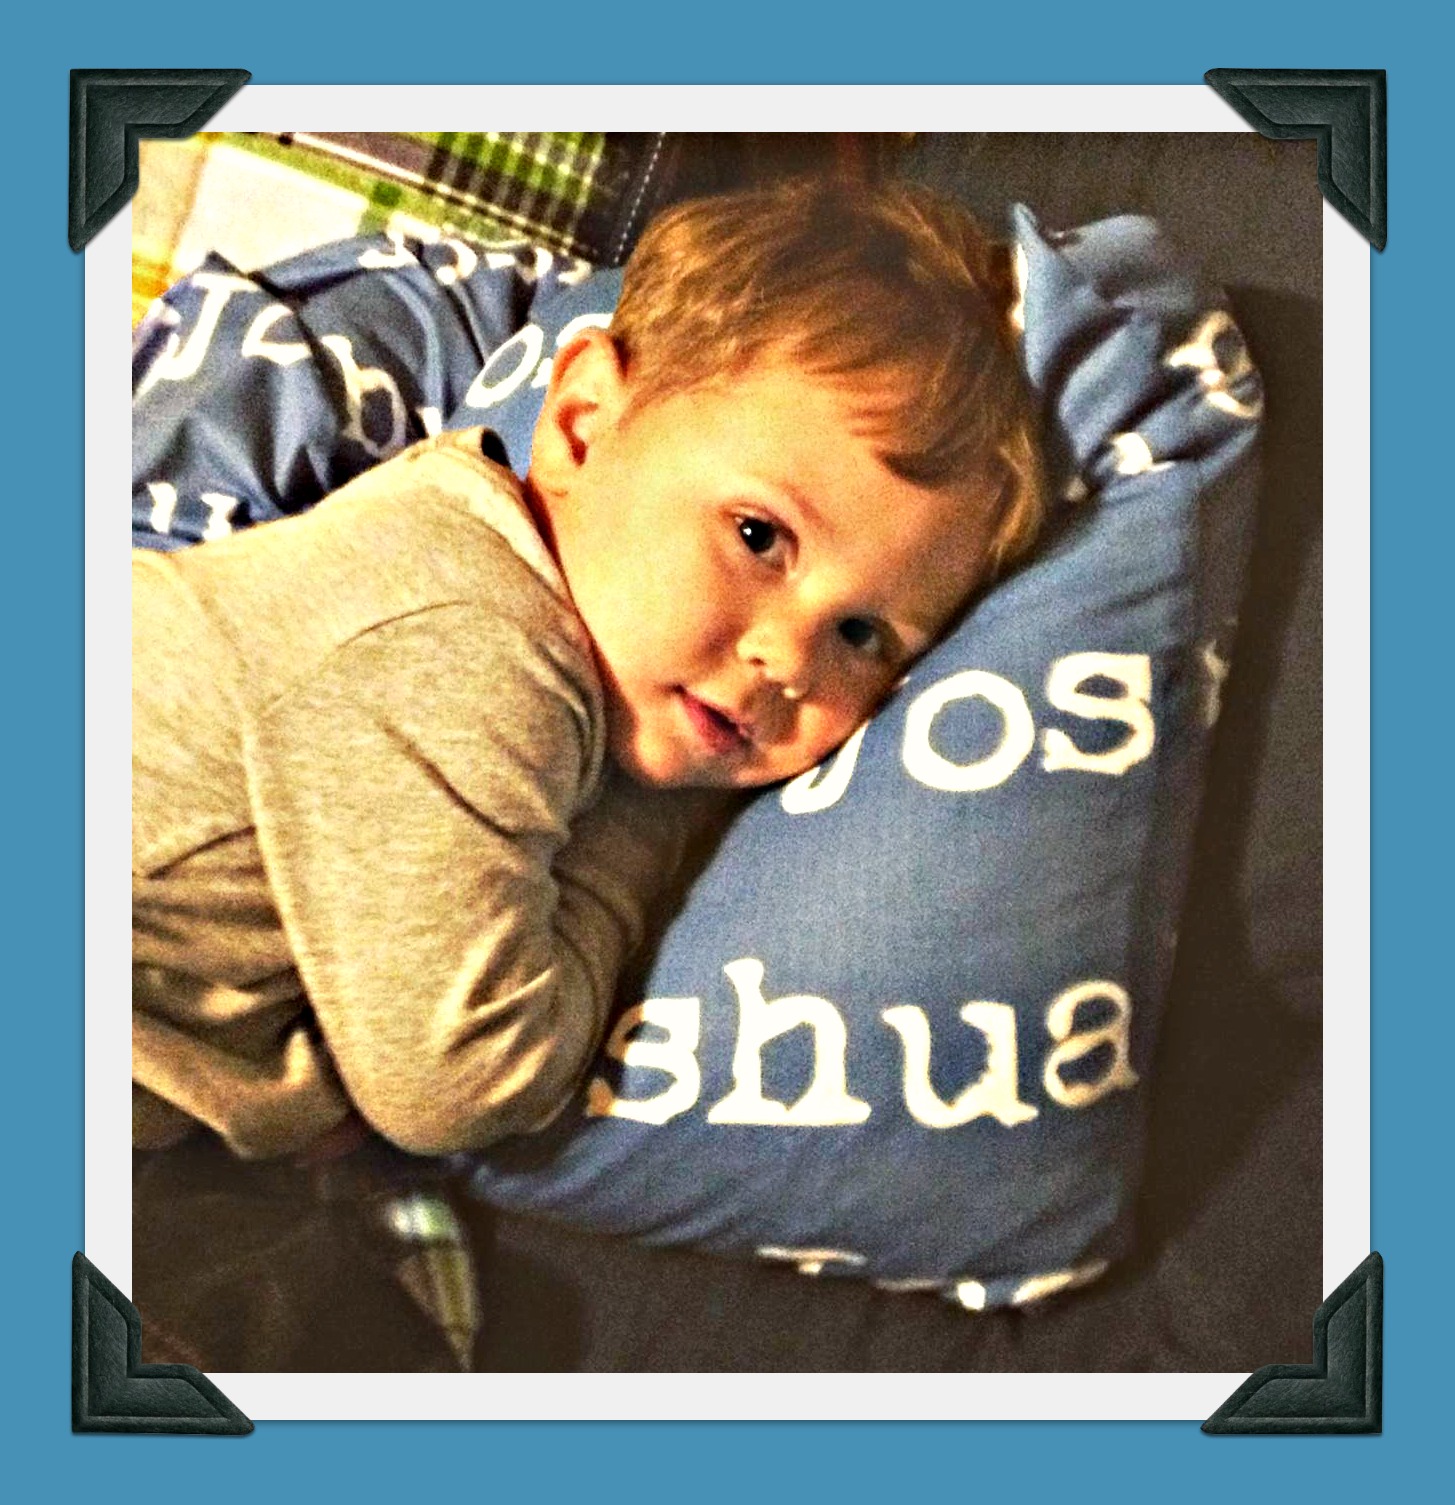
(1) I always like to start with a pillow, and the bodice of this dress was the perfect size to make a pillow cover for a 12 x 16 cushion. After detaching it from the skirt and shoulder straps and removing the boning, I traced and embroidered the logo from Staci’s blog and Etsy shop. Next, I put the pillow inside and nipped and tucked and pinned until I had a perfect fit, then took in the seams and stitched across the bottom. (The zipper is still in the back, just shortened a bit.) To fill in the armholes at the top, I made a lining with a coordinating floral fabric that could peek out at the corners, checked the fit again, pinned, then stitched the top closed. Then all I had to do was trim the seams, turn, press, and zip the pillow inside.  I love that I got to showcase the lovely lace on both the front and back of the pillow!

PILLOW

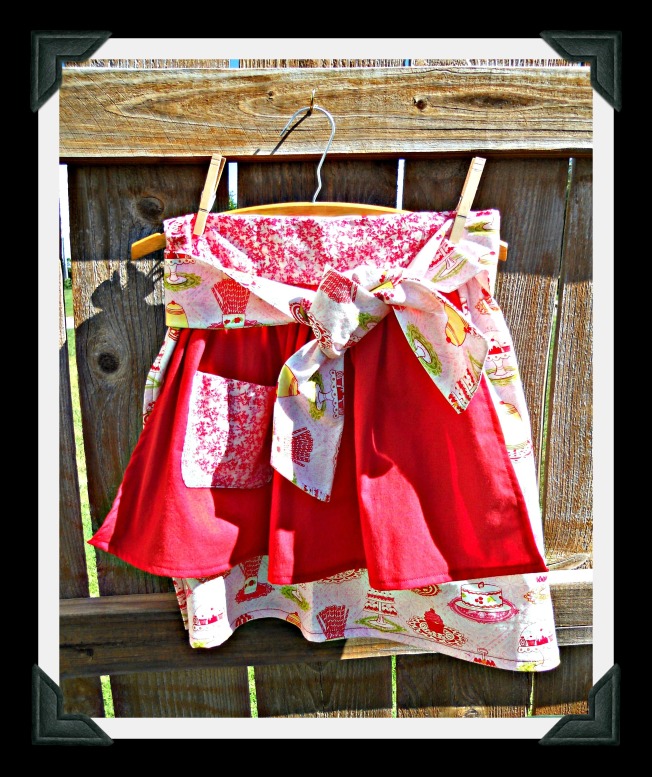
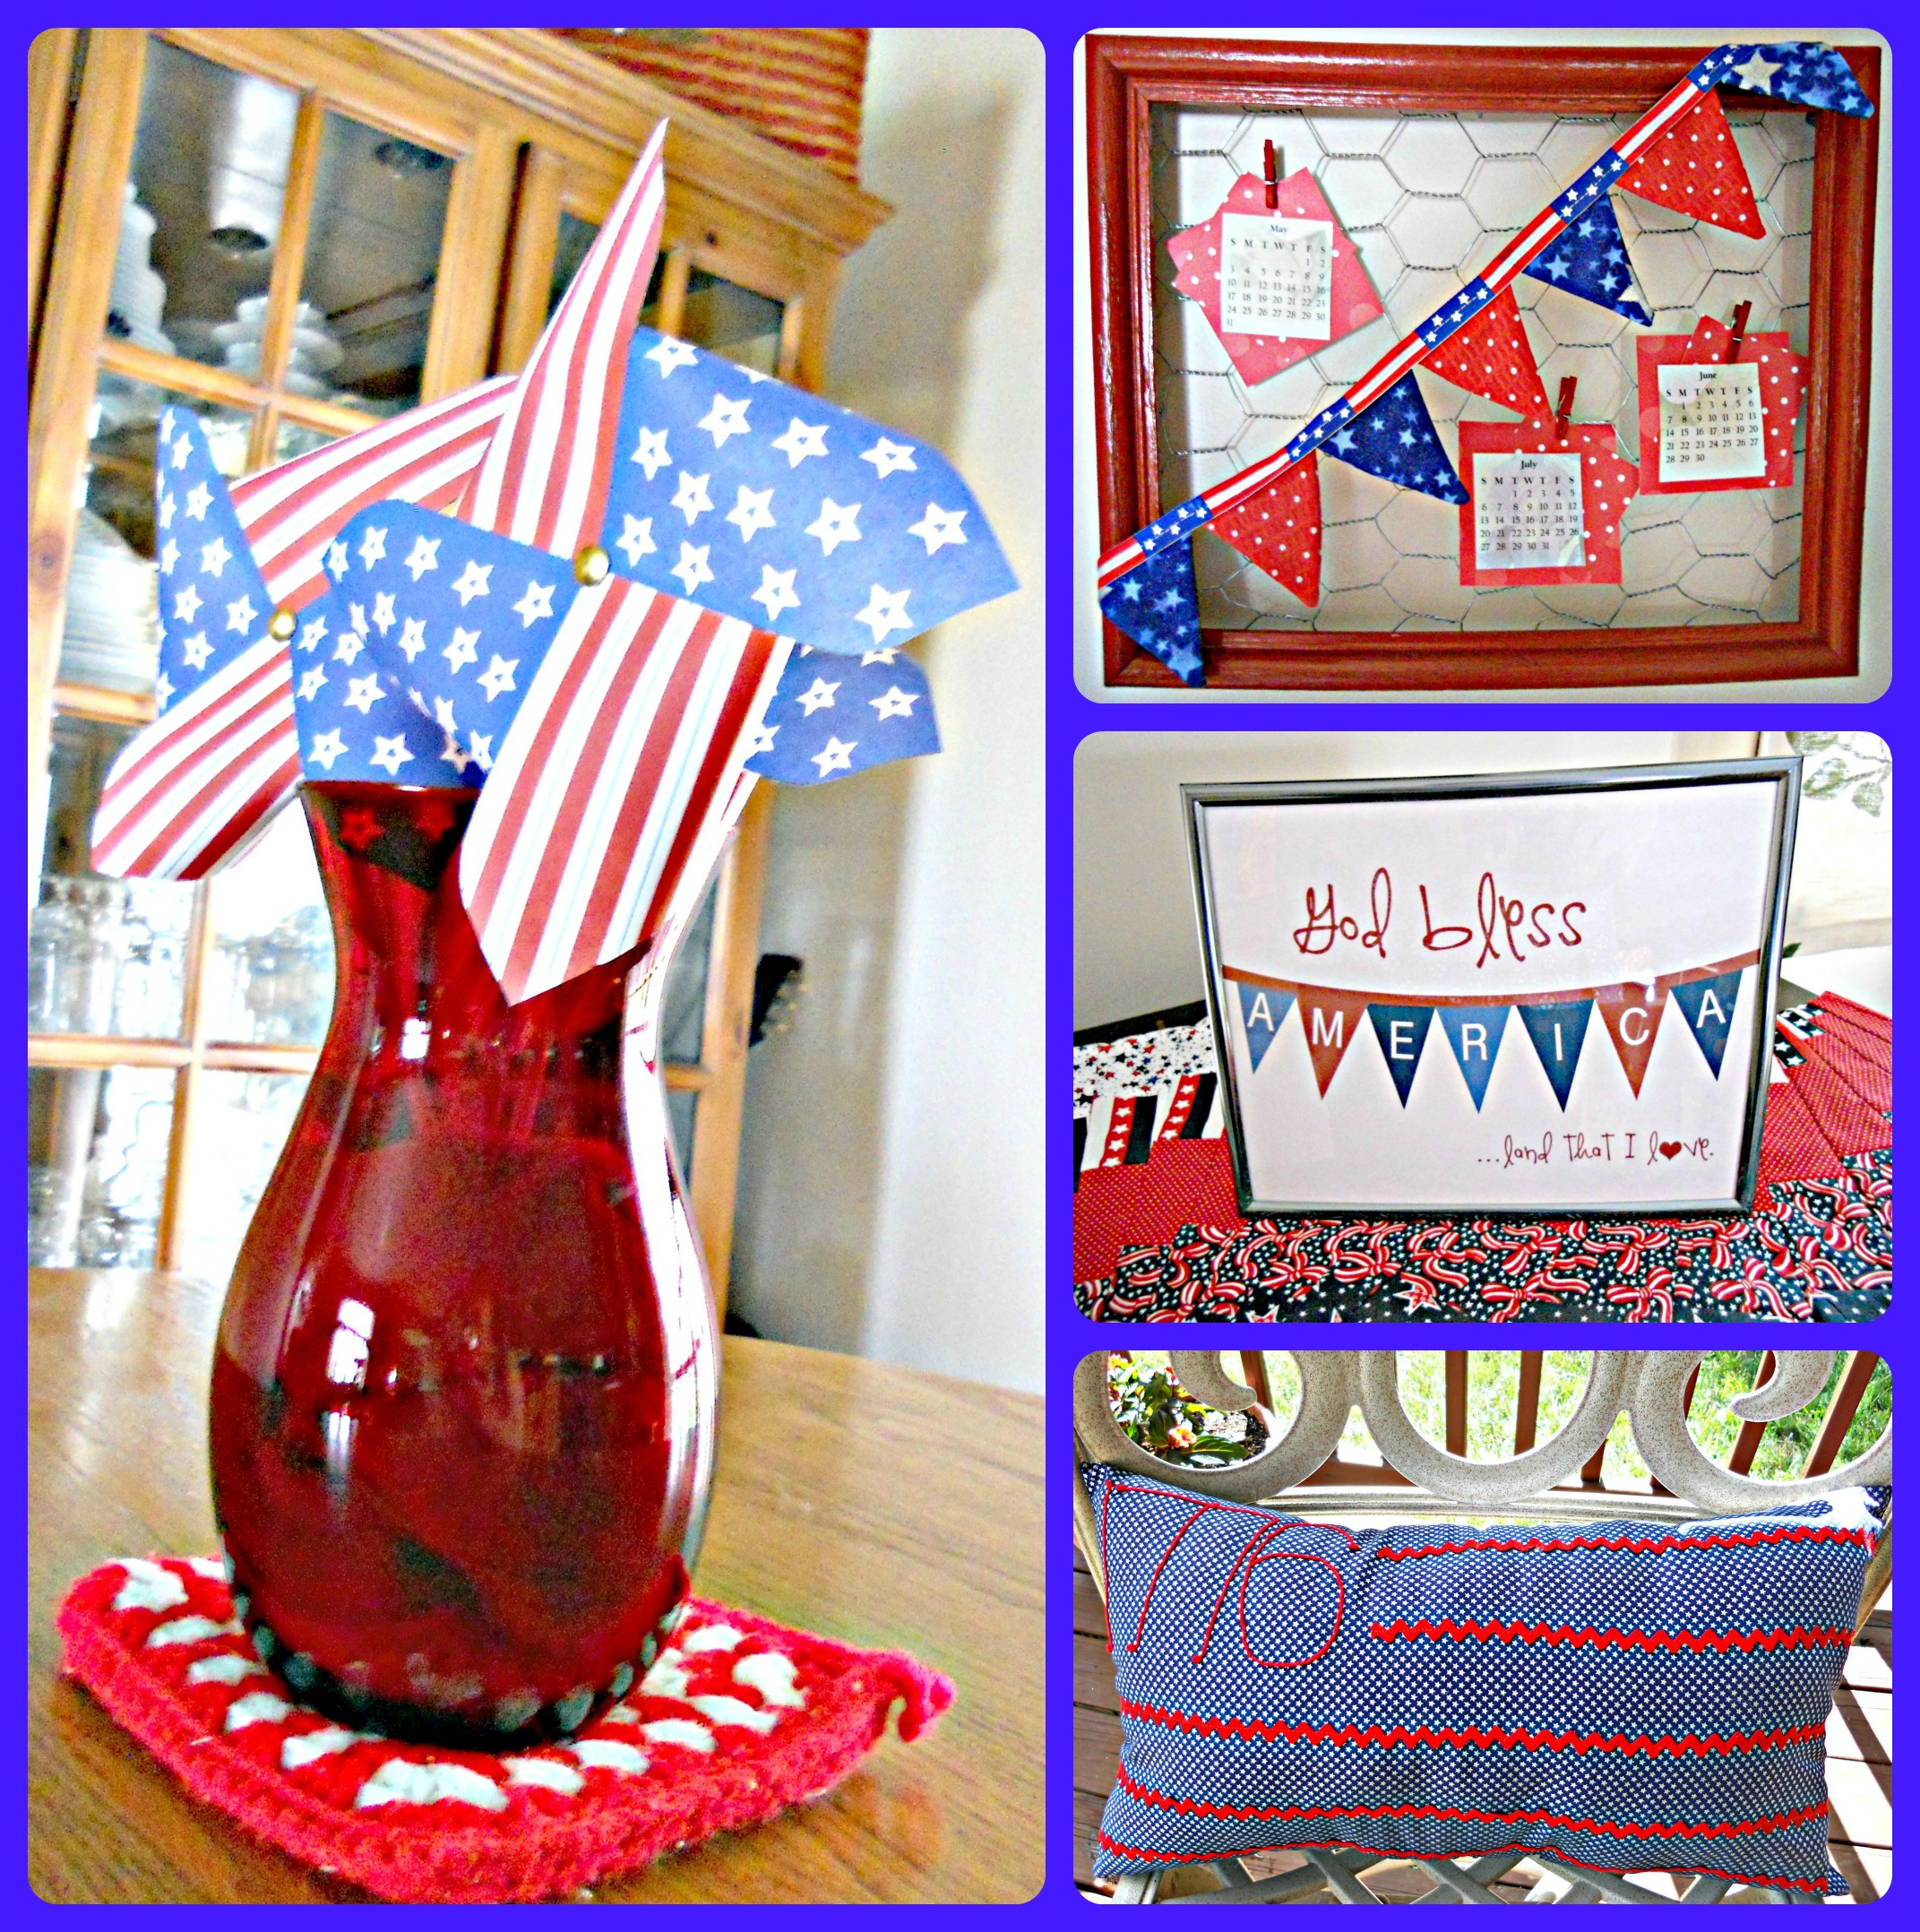
(2) Next, I wanted to use part of the still-gathered skirt to make something to wear and decided on an apron! I found my inspiration on page 40 of my A is for Apron book by Nathalie Mornu which had a short skirt over a longer one. I used pieces from several different apron patterns along with some of my own ideas and two fun fabrics from my stash, and it came together perfectly.  Here it is blowing in the wind on photo shoot day!

APRON

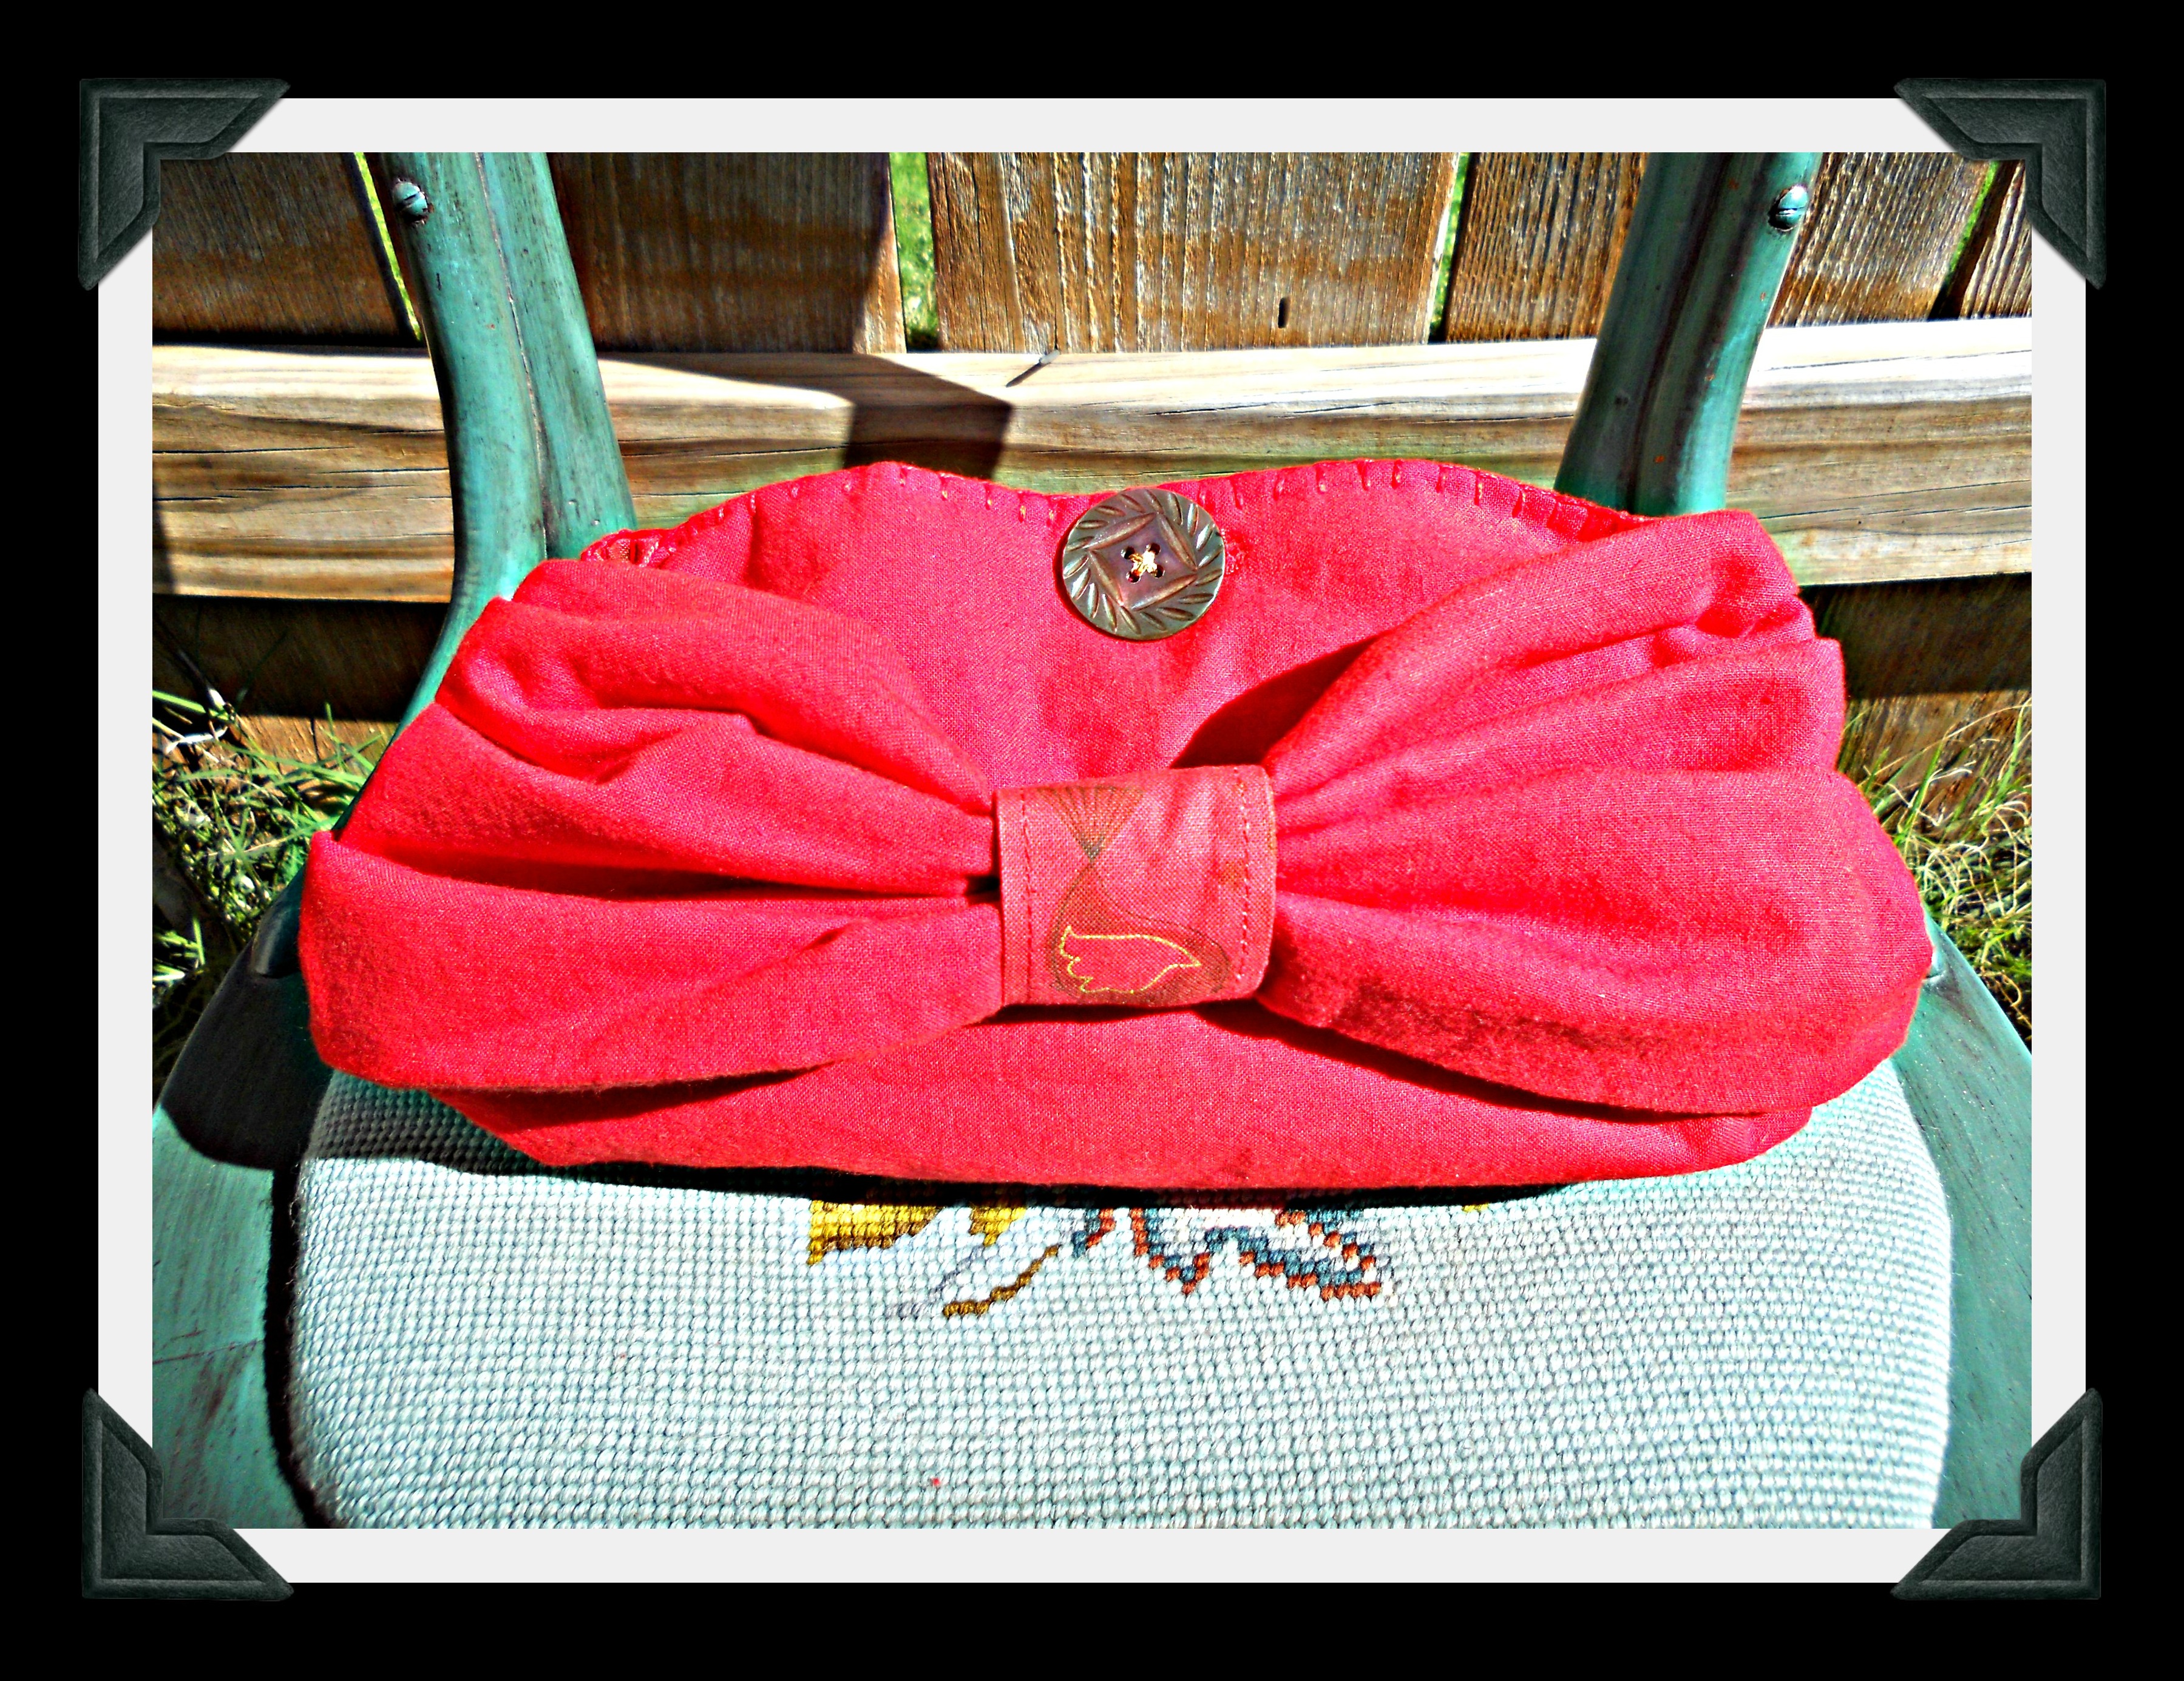
(3) When I saw the size and shape of the shoulder straps, I immediately thought of a bow clutch–one strap for the bag and one for the bow. However, this project turned out to be a little more challenging! I opened up one of the straps for the bag, made a lining from a coordinating fabric in my stash, and attempted to put in a zipper. Since the bottom was already closed up, that was a total fail! So I carefully removed the crooked zipper and simply blanket stitched the top and lining together, then added a button hole and vintage button for the closure. Next, I opened up the side seams and handstitched the other shoulder strap in on both sides, being careful not to catch the lining since I probably should have done this step first! (Since both pieces are padded, the seam was too thick for my machine.) Finally, I used another strip of the lining fabric to cinch the middle of the outer piece to form the bow. So . . . it’s not as perfect as I had envisioned . . . but maybe it will be cute for an evening event where the lights are low??? ♥

BAG

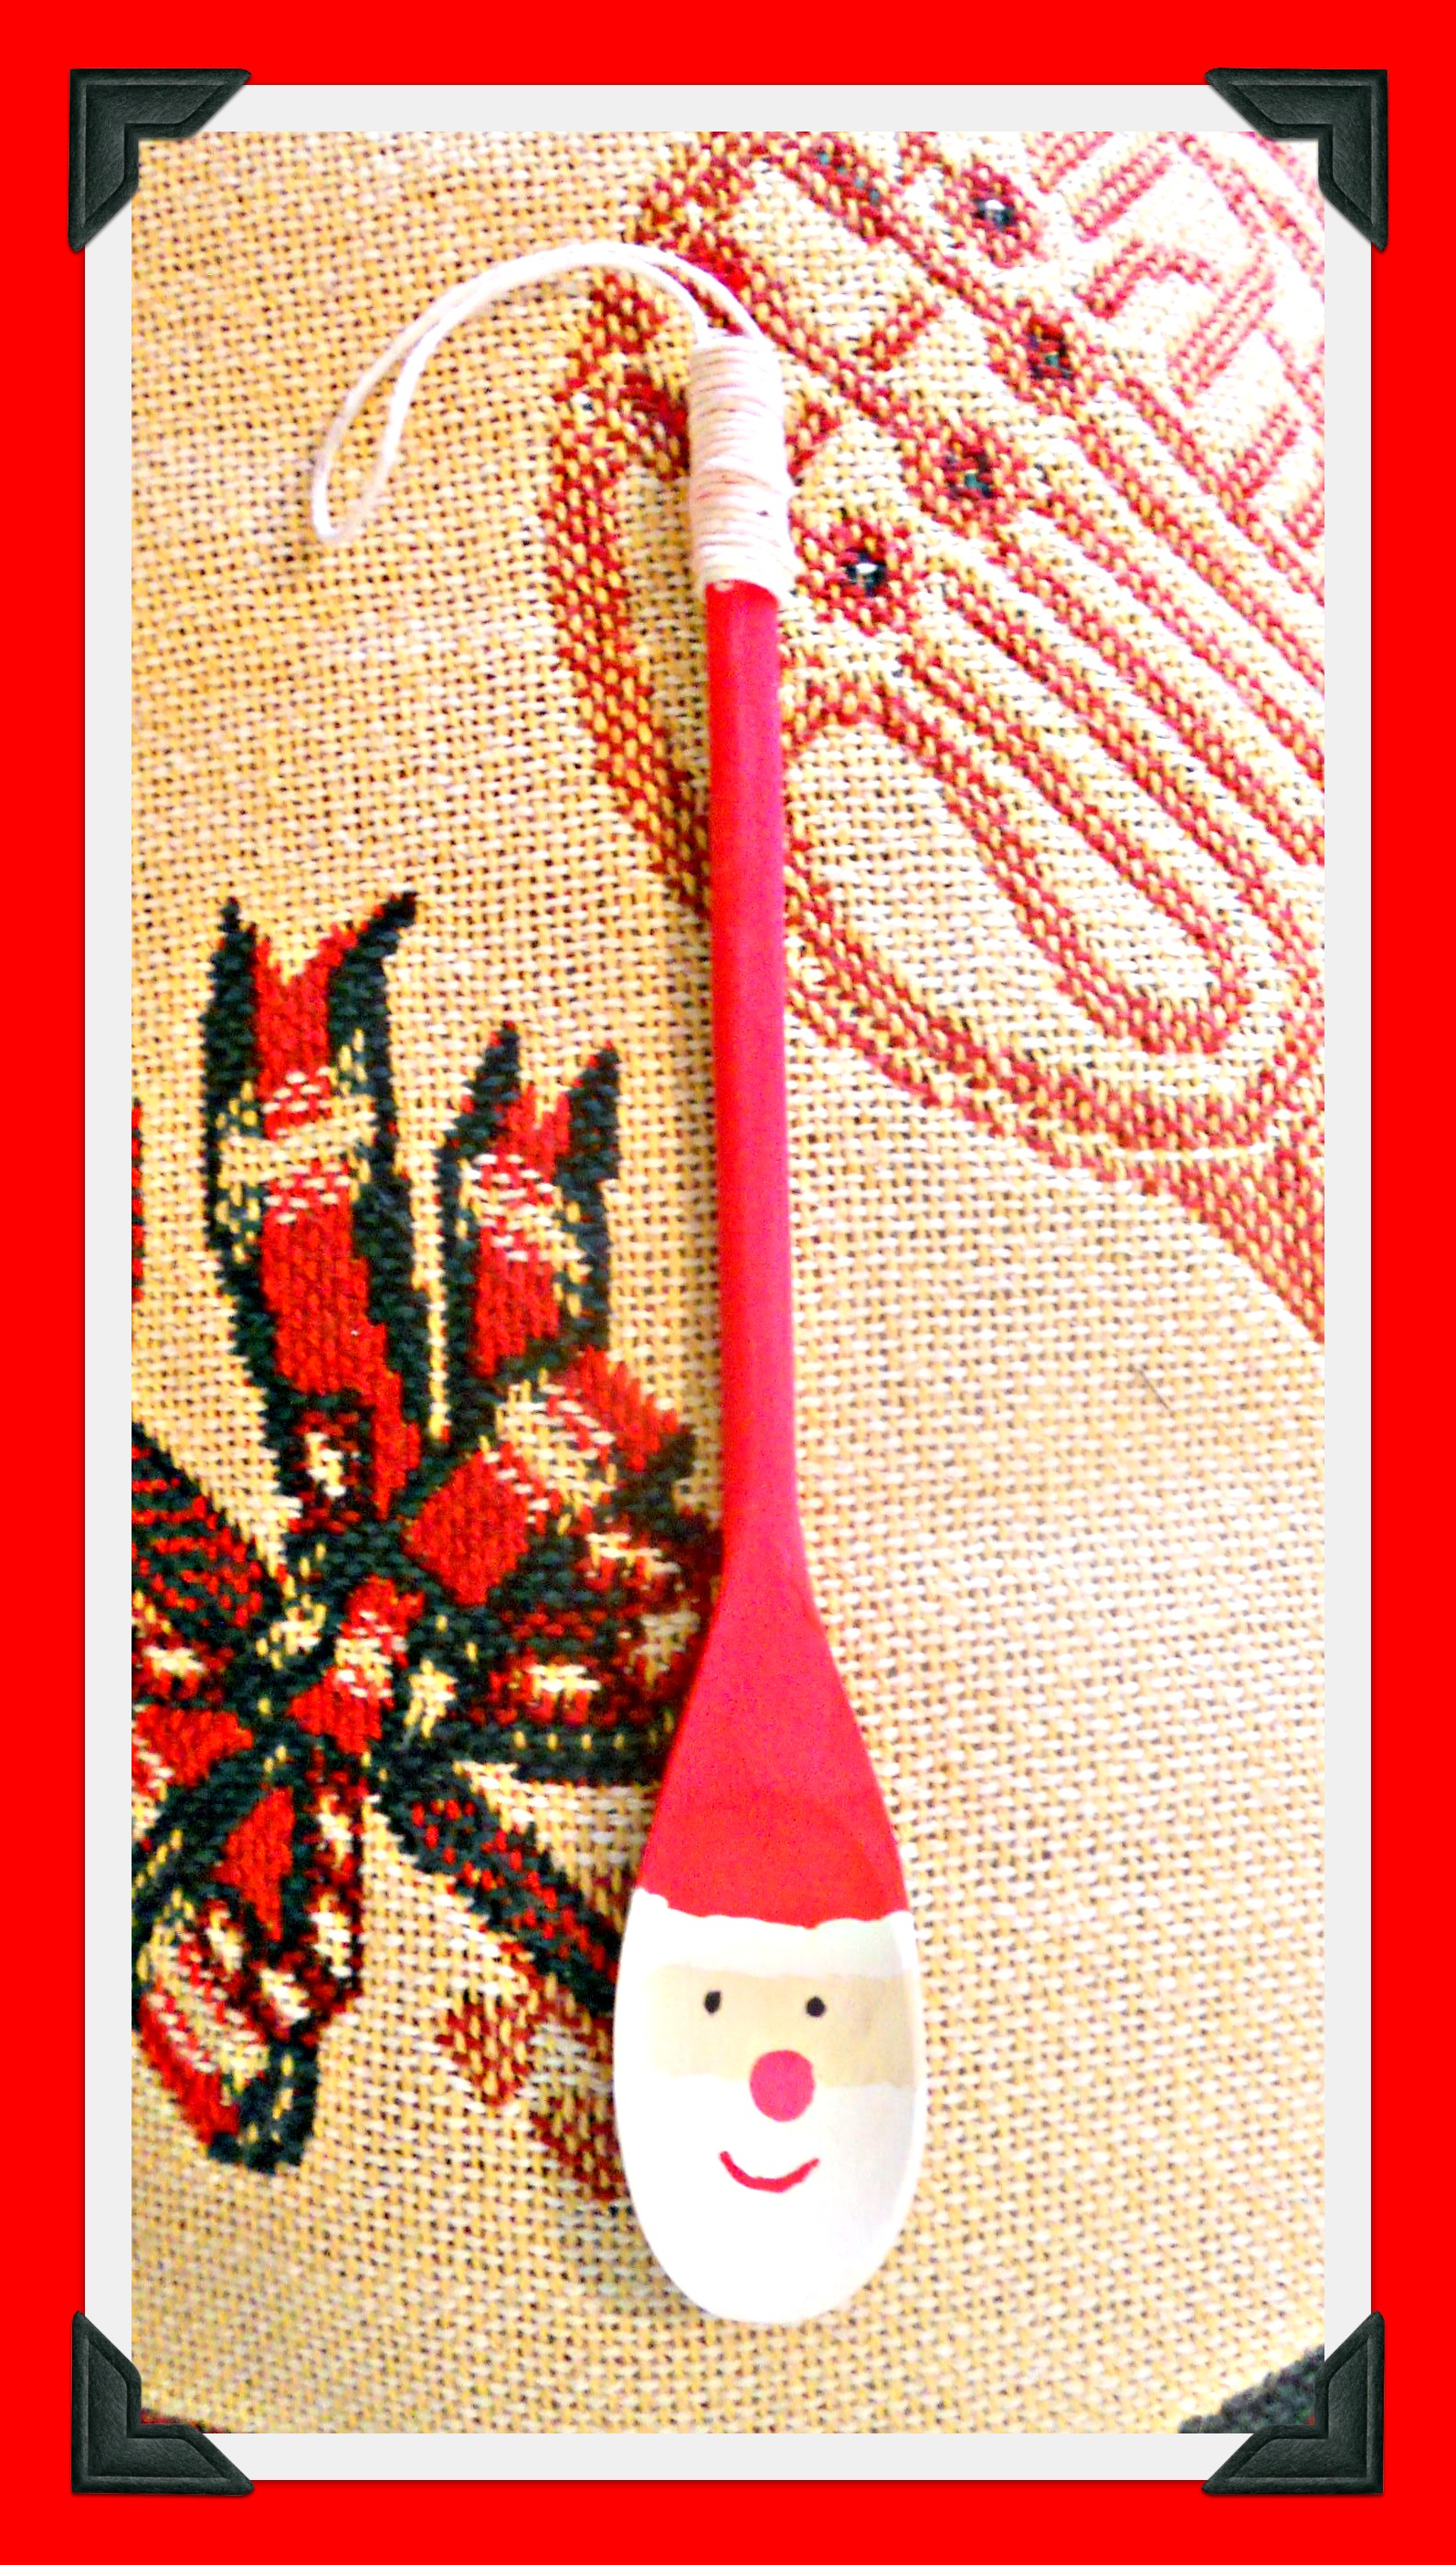
(4) The next step was to trim the hem from the skirt. With it, I made three of those fun  “twist, coil, and stitch” flowers. I had a straw wreath and some red and green ribbon in my craft stash, so I wrapped the wreath, added green vintage buttons to the flowers, stitched the flowers onto the wreath, and added a coordinating green ribbon for hanging.

WREATH

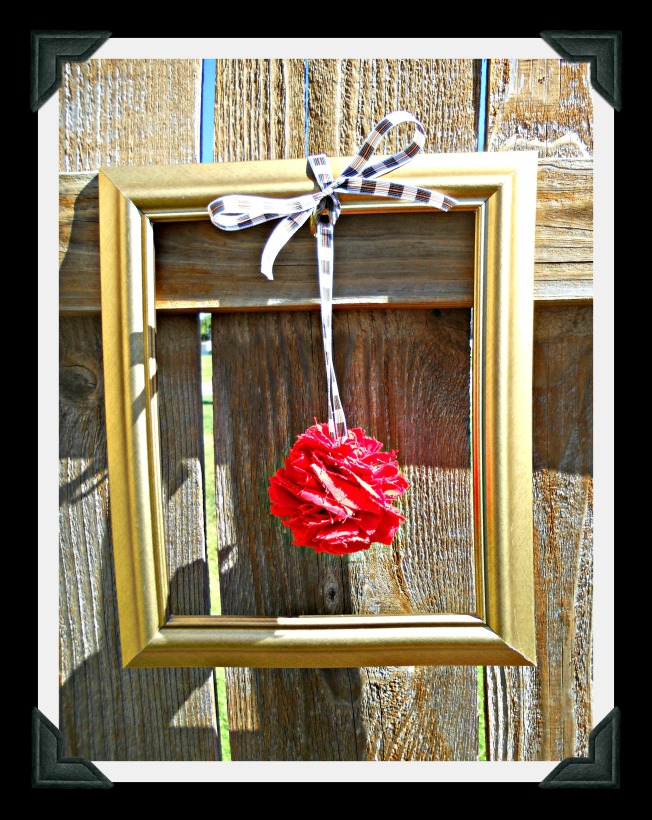
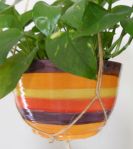
(5) Last but not least, I decided to make something kind of artsy and festive with a remaining piece of skirt fabric. I cut it into one-inch strips and made a pom-pom, then I hung it from ribbon on a gold wooden frame from my stash. I hope it will inspire the idea of “celebrating the everyday” as Staci lives her very creative life with her loved family and friends.

FRAME

Thank you for being our good neighbor, dear Staci . . . and your package is in the mail! ♥

ALL

“Runs With . . . Scissors”

Standard

I found a cute brown and pink “saying” t-shirt for $1 at the crafter’s sale and just had to buy it to make into a pillow for a fun-loving scrapbooker I know! One of my handmade flowers covers up a small bleach spot on the fabric and adds a bit of a-la-mode. Easy peasy! ♥

Scrapbooking Pillow

I Won Some Patterns!

Standard

When the lovely Simona of Sewing Adventures in the Attick decided to downsize her pattern collection, she hosted a giveaway . . . and I won two! I can’t wait to try them out!  If you haven’t met Simona yet, please click below to read about:

Thank you, Simona!  ♥

SundressCoat

Craft Camp!

Standard

CollageOur granddaughters Ally and Kira requested an overnighter before going back to school last week, so we decided to call it “Craft Camp.” We sewed pillowcase nightgowns and made painted fabric pillows. Ally made a mini-pillow with embroidery, and Kira made a button headband. We also enjoyed our usual play-dough, Bendaroos, Tinker toys, and fingerprint art projects, played outside, read books, cooked, and had lunch with the girls’ great-grandparents. I think we may have started a new tradition! ♥

NightgownsPainted Pillows

Giveaway Winners!

Standard

Winners!Thank you SO much for all the fun links you sent me for your giveaway entries! I had tons of fun reading your favorites . . . and browsing around at some of your other posts, too!  After putting all the names in a hat, I drew Tamika, Laura, and Jen’s names for the three gifts from my “What can you make with a vintage dress?” refashion. Please contact me at k_scraper@hotmail.com with your mailing addresses, lovely ladies! And have a wonderful weekend, one and all! ♥

PillowApronBag

Sewing World Magazine

Standard

SAMSUNG CSCI’ve always wanted to read a Sewing World magazine, so I was on cloud nine when offered the opportunity to do a review!  Editor Julie mailed the July edition all the way to Kansas from the UK, and after devouring every page, I give it a 10 out of 10!  And I was so excited to see this amazing bag designed by one of my favorite bloggers, Susan of Susie D Designs (with a pattern you can also get at Susan’s Etsy shop . . . and she’ll have a bag in the September issue, too!)  Since a picture is worth a thousand words, please browse the photos and my comments below and then click HERE to go to the Sewing World website for subscription information and lots of fun projects, patterns, and other goodies.  Thank you, Julie! ♥

COVER1Bicycle Buttons2July Makes3Multi-Size Pattern4Summer Top5Plackets6Pattern7By Hand London9Blog10Pattern Shopping11New Contributors

Catch-up Giveaway!

Standard

Hi! I’m back from my Pillows A-La-Mode month off!  I spent it working 12-hour days on several huge writing assignments for work (some that aren’t quite finished yet!) and going on a lovely trip. I’ve missed reading your blogs, so I came up with a way to catch up that I think will be fun for us all.  Will you post a comment with a link to your favorite article you’ve posted on  your blog in the past month?  I promise to read them all!  Plus, I have PRIZES! Three commenters will receive either my vintage shabby chic pillow, apron, or clutch!  (Please add a note to your comment if you have a preference . . . otherwise you’ll be in the drawing for all three!)  I’ll announce the winners in one week—on Friday, August 16. Have a happy weekend . . . I can’t wait to hear from you! ♥

PillowApronBag and Bow

What can you make with a vintage dress?

Standard

Collage_DressI’m taking a month off from blogging to finish a big writing assignment and go on a little trip. (Will I have the willpower not to click on my WordPress reader with my morning coffee??? We’ll see . . .)  But first, I want to share my latest “What Can You Make With A . . . “ project. I got this dress from my friend Liz who bought it at a rummage sale for ONE DOLLAR! (Click here to meet her.) The color and fabric were perfect for some shabby chic projects, like . . .

  • a pillow with fabric rosettes,
  • a lace hair bow with a fabric rosette,
  • an evening bag with zipper flower a-la-mode,
  • a half apron (with a bit of toile from my stash),
  • and a lace-decoupaged flower pot.

Here are the creative bloggers and authors who inspired me. See you in August! ♥

Fabric Rosettes: Sweet C’s Designs  and Diary of a MadMama (except I stitched instead of glued)

Zipper Flowers: A Creative Princess and Awesomesauce and Asshattery

Apron: Page 51 of One-Yard Wonders by Rebecca Yaker and Patricia Hoskins (“Granny’s Clothespin Apron” designed by Elorie Bechtel)

Lace-Decoupaged Pot: Urban Comfort

Collage_All

Happy 4th of July!

Standard

Since I donated last year’s 4th of July pillows (here and here and here) to a charity auction, I whipped up a new one over the weekend using a remnant from the last Wonder Woman apron and some ric-rac and embroidery floss from my stash. I love how the red pops on the bright blue and silver fabric! The finished pillow is 11 inches tall and 20 inches wide. To all my U.S. bloggy pals . . . have a safe and fun holiday with your family and friends! ♥

1776 Pillow Photo

Make & Mingle

Standard

Kit Collage

Felt FlowersMake & Mingle has these fun “emporium of craft” boxes in their Etsy shop now!  Even though I’m loving spring and looking forward to summer, I decided to go with the box of autumn colors.  It will be so much fun to come up with projects for all these fabulous materials!  I also ordered a little packet of “felt bon bon roses,” which will go on some accessories I have planned.

You can check out Make and Mingle’s blog here, Etsy shop here, and FB page here . . . or find them anytime from my Shop Love! page above. ♥

Owl Pillow . . . Thank You, Jill!

Standard

Pillow HeartHow cute is this pillow??? I won it in Jill’s giveaway at Nice Piece of Work and it *flew* all the way from South Africa to Kansas, USA! I just love the colors and the touches of crochet, and I even found this beautiful crocheted heart tucked in its wing!  Jill has more owl cushion covers (including one just like mine!) in her Jam Tarts SA Etsy shop, as well as several other cushions, crocheted slippers, a gorgeous needlepoint vest (aka waistcoat),  and some fun embroidery kits. Please give her store a visit from this post or anytime from my Shop Love! page above. Thank you, Jill!

P.S.  My owl cushion will look PERFECT in the guest room with my David Bromstad Owl Print! I just checked, and the free printable version is still available here. (Scroll down to the bottom of the page to the word “click” to get the pdf.)

A Lucky Save!

Standard

Flowers

PillowNot long ago, I had a brave moment and decided to try crocheting. I got pictures to look at and lots of tips from family and friends. I already had some beautiful reddish yarn and a crochet hook. I made the chain and then dug in. I did it! Yay! I got to the end of the first row and added another row . . . and another . . . and another. “This isn’t so hard,” I congratulated myself.

Then I spread it all out and looked at what I’d made so far. Instead of a rectangle, it was an arch! Oops! I guess I added a stitch or two on every new row! But since it was my first try, AND I love the yarn, AND it looked pretty even in its wonkiness, AND it reminded me of the red soil on the farm where I grew up, I decided to make something out of it.

The picture slowly grew in my mind: a red hill covered in grass and wildflowers with a bright blue sky and bright yellow sun. So I dug through my remnants and . . .

  • found some blue canvas duck for the pillow squares
  • handstitched my piece of crochet at the bottom of the pillow front,
  • found some yellow canvas duck and appliqued/embroidered the sun,
  • embroidered some lime-green grass on top of the hill,
  • chose some vintage buttons that complemented the colors I’d already used and stitched them at the top of green embroidered stems for flowers,
  • sewed a zipper in the center of the pillow back and opened it,
  • stitched the front and back right sides together,
  • trimmed the seams,
  • turned the pillow right-side out through the zipper opening, and
  • inserted a 12-inch pillow form.

That’s my lucky save, all ready to jump-start my spring decor! And today is your lucky day, too, because you get to read some amazing posts on the “Lucky” theme from eleven other bloggers (including one on how to REALLY crochet!) in this month’s Collectively Creative. Enjoy! ♥

DIY Craft: ‘Stained Glass’ Shamrock – (Time With Thea)
The many meanings of “lucky” – (The Thing About Joan)
This Party Calls For A Theme:  It’s All Rainbows and Unicorns – (Green Door Hospitality)
Keep Calm and Pinch On – (A Ponytail Kind Of Day)
Honorary Irish and my favorite Irish Soda Bread – (My Healthy ‘Ohana)
Hello, 6 – (Joy, Lovely Joy)
Luck o’the Irish for Easter!  – (Minerva’s Hand)
Lucky Gold Elephant – (Now at Home Mom)
Asian Cucumber Salad – (Inspire and Indulge)
Jell-O Shamrocks: A Kid’s Lucky Snack – (Cobwebs, Cupcakes & Crayons)

What can you make with a Dr. Seuss T-shirt?

Standard

ShirtMarch 2 is Dr. Seuss’s birthday! When I taught first grade, we always celebrated by wearing Dr. Seuss T-shirts, cooking green eggs and ham in the classroom, and reading all the kids’ favorite DS books. But now that I’ve moved on to a different career, I decided to use this well-loved T-shirt for my next “What can you make with a . . .” refashion.

  • First, I used the bottom of the shirt for the no-sew spaghetti t-shirt scarf that I shared last month.
  • Next, I used the “Sam’s Ham” graphic and back for a pillow (which is now on its way to some sweet little guys in Florida along with a copy of the matching book). I love that the T-shirt had a Dr. Seuss label that I could stitch into the side seam of the pillow!
  • The fabric from the shoulders became a travel neck pillow with “Ahh . . .” embroidered for a-la-mode. (You’ll find a fabulous tutorial at The Cottage Home!)
  • The rest of the scraps were stitched together into a rectangle and paired with a colorful remnant to make a little mat to put under a centerpiece or plant.
  • Oh, and did you know that a t-shirt neckband makes a perfect no-sew headband for around the house or working out???  Happy birthday, Dr. Seuss! ♥

Stuff

Red Animal Print Sweater Pillow

Standard

I recently received a bag of vintage sweaters for pillow making, and I just fell in love with this fun print. I used everything from the armholes down, leaving the zipper in the middle for a-la-mode, stitched, and stuffed. It still has the side-seam pockets, too! I think I’ll give it as a birthday or Christmas present and tuck a gift card in the pocket. Then the recipient can use the pockets for . . . hmmm . . . the TV remote? Earphones? Tissues for a sad movie? Or . . . M&M’s??? (OK, I’m still thinking about chocolate after that last post!) ♥

Red Animal Print Pillow

Red Sweater Heart Pillow

Standard

Scene FramedRemember the little hearts I sewed on my recent travels—upcycled from a sleeve of a cozy old red sweater?

I used two of them for little-girl barrettes with pink button a-la-mode and all but four for my heart-to-heart garland.

Then I looked at the sweater again and decided that the body had to become a BIG red Valentine pillow, like this:

  • Fold the sweater in half lengthwise and, starting at the fold, cut a large half-valentine from the front and back. Unfold.
  • Pin and stitch strips of the sweater’s hem and sleeve binding across the pillow front for a-la-mode.
  • Pin and stitch the pillow front to the pillow back, right sides together, leaving about three inches unsewn.
  • Trim the seam, then turn the pillow rightside-out, stuff, and handstitch the opening.

It’s the softest pillow ever! ♥

P.S. The drawing in my office is a print of I’m Into Art by Elizabeth “Grandma” Layton of Wellsville, Kansas.  You can read a biographical sketch of Mrs. Layton’s life and see close-ups of her drawings here.  She’s one AMAZING lady!

Heart to Heart

Standard

Garland from side framed

Bowl FramedWelcome to the Collectively Creative Lovey-Dovey edition, hosted by Kelly of Cobwebs, Cupcakes & Crayons! My project this month is felt conversation heart mini-pillows. They were so much fun to make! Here’s how:

(1) Buy a bag of candy conversation hearts for . . . um . . . er . . . research. 🙂

(2) Create a pattern with a free-hand drawing or googling a heart template—or do like I did and use a heart-shaped cookie cutter.

(3) Trace around your pattern on two pieces each of white and various pastel felt.

(4) Lightly pencil a candy saying on a heart of each color, then embroider all the sayings in red.

Garland Short framed(5) Put the hearts of the same color back to back and attach the edges with a blanket stitch using a coordinating color of embroidery floss. Stop a couple of inches before you’re done to add a bit of fiberfill stuffing, then close them up.

(6) Use your hearts for valentines, brooches, magnets, hair accessories, sachets, mobiles,  or gift-wrap, wreath, or pillow a-la-mode; display them in a pretty bowl or shadow box; or . . . make GARLAND! I added in some of my red-sweater hearts as well for the perfect Valentine mantel decor.

The Lovey-Dovey Edition LogoBefore you get started on YOUR mini-pillow hearts, be sure to visit all the amazing Lovey-Dovey blog posts below. Enjoy! ♥

More Art Card Love!

Standard

Ooohhh . . . MORE cards with reproductions of original art!  And they’ll be PERFECT for invitations for a big birthday party I’m throwing this summer for the head cowboy in our family, thanks to my blogging friend Beverly of Beverly Dyer Fine Art and Stationery, who also sells her beautiful creations in many stores in the Chapel Hill, North Carolina area.  She even added this beautiful memo pad to my order!  Click here for Beverly’s web site, here for her blog, and here for her Etsy shop featuring painted art prints, cards, pendants, and pillows, or find her links anytime in my Shop Love! page above.  Thank you, Beverly! ♥

Collage

Gentle Changes: Christmas to Winter

Standard

I can never take down ALL the Christmas decorations on December 31, can you? Instead, I like to “tweak” some of them for the winter. Here are some of this year’s gentle changes:

(1) Keep the giant winter wreath and snowflake garland, but trade the nativity on the mantel for family photos.

(2) Keep the Christmas cards nearby to enjoy again and again, but add a free New Year’s printable in a frame.

(3) Put a fun snowman on top of the kitchen cabinet by the antique milk bottles.

(4) Change out Santa for a snowman in the fabric forest and add a “Baby It’s Cold Outside” free printable in a frame.

(5) Get out the softest, squishiest, coziest sweater pillow I’ve ever made for winter napping. ♥

Numbered Collage

Christmas Argyle Pillow

Standard

Here is a photo of my new favorite pillow that I finished last night! It just sort of evolved . . . here’s how.

(1) When I recently organized my crafty corner, these two fabrics ended up side by side on a shelf and made me think of Christmas. The red cotton is from a thrifted tablecloth, and the lime green felt is from the citrus coasters I made last summer. Then I saw an argyle sweater in an ad, and a lightbulb went on!

(2) I used a shape pattern from Google images to cut these diamonds from the felt. Then I pinned them in rows and pondered how to attach them. I decided that having the corners loose would give the pillow a more interesting texture, so I embroidered an “X” across the middle of each diamond . . . sort of a “free-form argyle.” 🙂

(3) When I stitched the pillow front and back together (the back is another piece of the red tablecloth, unadorned), I stitched through the middle of each outer diamond, which gave the edges a sort of rick-rack pattern. Finally, I stuffed the pillow and hand-stitched the opening. I may never make another one, but it sure makes me smile! ♥

Mini-Pillow Ornaments

Standard

In late summer I started on my Christmas mini-pillow ornaments, and I finally decided to stop . . . for this  year! (They’re addictive!) All they take are little bits of fabric and ribbon, plus buttons, bells, lace, and embroidery . . . oh, and your imagination!  P.S. Please check out these links for some more ornaments to try! ♥

Thanksgiving (well, really Christmas!) Pillow Project

Standard

After the big Thanksgiving dinner at our house, the kids and grown-ups visit, snack, watch football, snack, nap, snack, and . . . make things! (Check out these Play-Doh sculptures from Thanksgivings past! :)) This year I’ll still have the usual supplies, but I thought it would also be fun to have a project that the kids can take home and/or guests can make to donate to a local nonprofit for Christmas gifts for children in need. The minute I decided on no-sew fleece pillows, I got an email from Hancock Fabrics with all their fleece for half price PLUS free shipping, so I knew it had to be! To keep it simple, I went ahead and did all the cutting, rolled and tied each matching pillow top and bottom together, and put the right amount of stuffing in individual bags so everyone can just choose a fabric, grab a bag, and find a comfy spot to craft and chat. I’ll try to post a photo of all the kids with the pillows we make after the holiday! ♥

P.S. Since the instructions call for cutting out the corners from each piece, I now I have about a bazillion colorful 4 x 4 inch fleece squares to use for other projects. Any ideas???

P.P.S. Click here for a kids’ Thanksgiving story and lots of wonderful last-minute holiday recipes and crafts from Collectively Creative. Blessings to all!

What can you make with an embroidered jacket?

Standard

Awhile back I wrote a post about my blogging friend Laura of As Time Goes . . . Buy and how she inspired me to do the Good Neighbor Award project and refashion for my one year blog anniversary. Laura has been traveling, and I’ve been sewing, but she’s home, and I’m finished . . . so today is the reveal! Laura, your coat is now on my “What Can You Make With A . . .” page, and your package is in the mail! I was able to make:

  • A pillow . . . of course! 🙂
  • A fabric flower with beads from a vintage earring in the center
  • A coffee cup cozy
  • A tissue cozy (Thank you, Little Bit Funky!)
  • Two jacket-sleeve notecard pouches
  • A Chanel pouch makeover
  • An embroidery-hoop wall hanging with Laura’s blog name
  • A framed fabric-under-glass for writing notes, menus, or welcome messages for guests
  • A garment dust jacket for one of Laura’s lovely outfits (Thank you, Schlosser Designs!)
  • A tote bag with a jacket pocket on each side and a braided leather belt handle
  • And, last but not least, all the leftover bits made into mini-bunting!  ♥

Arts and Crafts Mission Market

Standard

Here are the tags for this year’s donations to the silent auction at the Arts and Crafts Mission Market at my church. It’s such a worthy cause . . . all the money goes to a local daycare center for families in need. Click here to see how to make the Christmas wreath pillow and here to see the Americana pillows.   P.S. Below are my gift baskets from markets past, each based on . . . you guessed it . . . a pillow! ♥

BOO and Buttons, Tricks and Treats

Standard

Welcome to the Pillows A-La-Mode contribution to Collectively Creative! For my project, I made two pillows (what a surprise, right? 🙂 ) for some Halloween-lovin’ sweeties I know. ♥

(1) The large pillow has a jack-o-lantern print on the “Trick . . .” side (a gift from a friend!) and *sparkly* cupcake and candy print from Jo-Ann on the “or treat!” side. The letters are orange felt handstitched with black embroidery floss.

(2) The small pillow has the cupcake/candy print on the front and “BOO” fabric (also a gift from a friend) on the back. For a-la-mode, I marked the center of the front and back (after stitching and stuffing), double-threaded a L-O-N-G needle with orange floss, stacked three buttons, went down through the left buttonholes to the back and up through the right buttonholes, pulled the floss tight to create a valley, and tied. (Click on photo for a larger view).

Oh, and before I go on . . . you MUST click here and here for two more fab Halloween pillows from Punky Purls and here for a fun burlap version from House of 34. I love them all!

NOW . . . DRUM ROLL . . . here are EIGHT . . . yes EIGHT!!! . . . more Collectively Creative posts with amazing Halloween tricks n’ treats for you to try. Please take a moment to visit each one . . . you’ll be glad you did! ♥

PumpkinFest Pillows!

Standard

Here are the pillows I’m ready to pack up for the silent auction at the PumpkinFest at my church. All the proceeds will go to the youth groups’ summer mission trips, so I hope lots of pillow lovers come! ♥

What can you make with a sundress?

Standard

For my one year blog anniversary, I invited you to nominate people you’ve met through the blogging world whom you would like to have as next-door neighbors . . . and to tell why. It was SO heartwarming to read the lovely comments that came in from all around the world! The blogger with the MOST nominations was then invited to send me a once-loved garment to remake into some fun treasures (a-la “What can you make with a flannel shirt?,” “What can you make with a lace tank?,” and “What can you make with a polo shirt?“) and return. The winner was Kelly of  Cobwebs, Cupcakes & Crayons!  Kelly said, “After the shock wore off I ran to my closet to decide what I was going to send.  I chose a little sundress that has a lot of happy memories attached to it, but now that I’m a mama seems a little, well…SHORT.  I know that I will never wear it again, so I am very excited to send it off!”  So . . .today is the big reveal! In addition, this project will have a permanent home on the “What Can You Make With A . . .” page on my header.

  • I couldn’t resist using the bottom of the sundress with its lacy underskirt for another dress . . . this time for Kelly’s adorable daughter Annabelle! A bright pink T-shirt from Target made the perfect top. (Click here and here for more little girl’s T-shirt dress ideas.)
  • The zippered back of the sundress was perfect for the back of a pillow cover, and I added the pretty label and butterfly that I snipped from the inside neckline. The pillow front is a combination of dress fabric, T-shirt fabric, a vintage hanky, pale pink lace, and lime-green embroidery.
  • The bodice of the sundress is now a jewelry pouch! The ribbons form the casings, and the dress straps are the strings. The lining of the pouch is made from the dress lining for a soft, shiny finish.
  • With seven circles of fabric, three stacked buttons, and a bit more of the lace from the bottom of the sundress, I made a fabric flower to pin onto a jacket, hat, or headband.
  • A small rectangle of dress fabric and T-shirt fabric along with a bit of green dotted fabric and some buttons and ribbon were just the right ingredients for a Christmas mini-pillow ornament.
  • While pondering Kelly’s blog name, I thought of embroidering three C’s onto a bit of fabric and framing it. Suddenly I thought, “Hmm . . . if the Scrabble letter C is worth 3 points, I could use that instead.” I ran to look it up, and . . . it is! I KNOW Kelly didn’t choose “Cobwebs, Cupcakes & Crayons” based on this fact . . . but I was excited! 🙂 After several experiments, I ended up with a collage of dress fabric, T-shirt fabric, lace, scrapbook paper, and a paper Scrabble tile in a hot pink frame. (The back of the frame is also magnetized for a frig or file cabinet.)
  • Finally, I was down to a small pile of random scraps. Not ready to give up quite yet, I decoupaged them onto a plastic bangle bracelet. 🙂

Done! Kelly . . . your package is in the mail!  ♥

Autumn Mantel

Standard

Thank you to all my blogging friends for the lovely mantel inspiration the past few weeks! Besides the bunting from my last post, I especially loved the concept of using books with seasonally-colored covers (Daisey Jayne) and mini pumpkins on candlesticks (Cobwebs, Cupcakes & Crayons). I also added some dried polished gourds, a painted wood “Count Your Blessings” knick-knack I found at a craft show,  and my Scrabble tile pillows to emphasize the idea of snuggling in at home as the weather cools. Now. . . bring on the autumn houseguests! ♥

Autumn Leaf Pillow

Standard

I LOVE this fabric from Jo-Ann! I used some strips for my fabric-tie fall wreath, a small piece for a mat for my upcycled fan cover tray, and a big piece for this autumn pillow.  For a-la-mode, I marked the center of the front and back (after stitching and stuffing), double-threaded a L-O-N-G needle with orange floss, stacked three buttons, went down through the left buttonholes to the back and up through the right buttonholes, pulled the floss tight to create a valley, and tied. I love using this technique on pillows to add an extra bit of visual interest and texture! (Click photo for larger view.) The finished pillow is 18 x 18 inches and will go to the silent auction at the Pumpkinfest at my church later this month. In the meantime, I’ll enjoy seeing it on the wooden rocker in my living room.  ♥

Black Cat Pillows

Standard

When I saw these black cat pillows on the Women’s Day website, I knew someone in my family who would LOVE them! I already had black fabric in my stash, as well as buttons and white embroidery floss. They’re quick and easy and cute, too! Have fun! ♥

Good Neighbor Award Winners!

Standard

It’s not QUITE September 22, but I couldn’t wait! First of all, THANK YOU for the amazing outpouring of emails following my previous post! The bloggers listed below were nominated as friends their faithful readers would like to have as next-door neighbors in real life. Can you think of a nicer compliment??? Here are the comments that came with the nominations, in no particular order:

  • She would be the perfect neighbor because she is so generous.  In addition to taking wonderful care of her family, she is there for her real-world and blogger-world friends. The recipes she shares are so helpful.  I especially enjoyed the post about her housewarming basket with the reasons given for why to include each gift.
  • She gardens to provide food for her family.  She overgrows some foods and gladly gives her surplus away.
  • She inspires me to work on my goal of downsizing and to be happy with what I have.
  • I think her blog is lovely and cool . . . and we’re both mothers to sweet little redheads.
  • I love the voice she writes in.  It’s smart and funny with just a touch of self-deprecation.  I think she’d be fun to sit down and chat with.
  • We’re both organizing-loving-mamas.  She has a lot of creative ideas and I think we would have fun cleaning out somebody’s closet together!
  • I would like to look at her doily collection, paint with her, and I think we could laugh a lot together, too!
  • She’s devoted to her family, health, and passions. I think she would be a great inspiration to me, and our kids could play together!
  • I love her blog, her ideas are cute, her themes are interesting and her writing style is great. As a fellow organizer, I think she and I would have a lot in common.
  • My home looks so much prettier because of the things I read in her blog. Imagine how it would look if she lived next door!
  • I would pick her as a neighbor because I know we could have some really good discussions about life and what it really means to live and be happy. She is upbeat, looks for the best in herself and others, and just makes you feel all warm and fuzzy inside. I wait for her blog every day. It brings a smile to my face without fail.
  • She can do it all! Maybe if she lived next door, she would rub off on me!
  • She shares her life with us on a regular basis. She is a loving mother and talented cook who takes pride in gardening and making it last until next growing season. I have learned a lot about canning and comfort food from her!
  • She is very talented and loves to shop at Goodwill, like me, and turn her finds into treasures. I enjoy her posts about projects as well as redoing rooms in her house.
  • I want to craft with her!!!!!!!!!!!!!!!
  • I’m hooked on reading all her yummy recipes!
  • I’ve learned how to refashion . . . or at least try to! If she lived next door, I could get good advice on my projects every day. And I love her photos!
  • She has taught me that age doesn’t matter, location doesn’t matter . . . what matters is that we’re all women and in it together.
  • She’s a long, long way from home, but she’s making a home where she is.
  • Her home! Her clothes! Her recipes! Her humor!
  • She weaves her faith in God into her everyday life. That inspires me!
  • She is SO gracious and SO talented . . . and her craft room is to die for!
  • I’d learn how to dress like a million dollars on my small budget if she lived next door.
  • How could anyone not want a neighbor with such a quirky sense of humor!
  • She can do everything! Inside and out! And she’s fun and funny. I’d love to be able to run next door and see what she’s up to.
  • She has a fine-tuned sense of taste. I posted a project I had worked on and how I struggled with it, and she shared a post that she had written about creating the same project. She shares her faith in her blog, which I admire, and how it keeps her going even when her health makes it hard to blog.
  • I know I’m going to laugh . . . AND be inspired . . . when I see one of her posts in the WordPress reader.
  • She is a true blue humanitarian. I want to be like her.
  • Her recipes . . .  crafts . . . kids’ party ideas . . . need I say more???
  • Her blog helps promote her business . . . but in a very non-in-your-face kind of way. Readers feel welcome to try her ideas whether they’re customers or not.
  • This blogger makes me feel like I really can make my dream of becoming a published author come true.
  • Have you seen the awesome style this designer has?  Her place is gorgeous! I want her to live next door so that we can decorate together, go hunting for bargains and great finds together, and so our fur-babies can be best friends!
  • She was one of my very first visitors and has remained a frequent visitor and commenter.  That’s special! Add to that the wonderful creativity and humanity she embodies, as well as humor and humility . . . I could learn a lot from such an inspiring woman.
  • She makes such beautiful crafts! And she encourages me in my projects, too.
  • I could run next door and get recipes, good advice, and encouragement any time I needed it if this lovely blogger lived next door.
  • She cracks me up!!! And I get so many ideas for fun activities to do with my kids. Who needs Pinterest with this blogger around?
  • She is always there to encourage me by her comments on my blog . . . she lives 3,000 miles away and I feel like we have been neighbors for a long time. I would love to have coffee with her and chat!

Please pick up your button above to display on your blog (if you wish) or pass along (if you wish). Nothing else is required . . . I just want you to know that you’ve made a big impression on someone (or many someones!) and that we’re all grateful you’re taking time out of your busy days to share your life with us. And I hope all readers will check out any blogs that you’re not already following . . . you just might make a new friend!

And before I forget . . . the blog with the MOST nominations was Cobwebs, Cupcakes & Crayons! Click here to read about your prize, Kelly, and if you choose to accept it, please email me and I’ll send you my mailing address to get the ball rolling. CONGRATULATIONS!

The GOOD NEIGHBOR AWARDS (in alphabetical order) go to . . .

Christmas Mini-Pillow Ornaments

Standard

Since I finished my fall wreath, my new “kitchen project”–as in leaving the materials out on the kitchen island to work on in spare moments–is to make enough mini-pillow ornaments to decorate a small Christmas tree. I started on these last fall but only ended up finishing five. First, I cut all my Christmas remnants into 4-inch squares to mix and match for fronts and backs. I always add a bit of embroidery a-la-mode to the front, along with buttons or jingle bells here and there. Then I stitch and stuff just as I would a regular pillow but add a ribbon for hanging before sewing. I love how festive they look, and they make a great road-trip project, too. I’ll post my decorated tree when they’re all done! ♥

Autumn Pillow Makeover

Standard

We’re off to meet the newest member of our family . . . precious baby Katy! Here’s a project from the September issue of Woman’s Day that I hope to try when I come back home. Click here for directions and here for free templates. Enjoy, and have a lovely weekend! ♥

Purple Polka-Dotted Pillow

Standard

The bit of fabric left over from my latest memo board is now a pillow (surprise! surprise!). I also had a little bag of heart buttons in coordinating colors in my stash, so I stitched them over some of the polka-dots on the front for a-la-mode. I think it will be a nice gift for a little girl whose favorite color keeps changing! ♥

What can you make with a polo shirt?

Standard

This is my third “What Can You Make With A . . .?” blog post, so maybe I’ve inadvertently started a new series! 🙂 The first remake was a flannel shirt and the second was a lace tank. This time, my sweet husband Dave donated an old polo shirt that he no longer loves, and as usual, I went a little crazy with it! I’ve already blogged about the scrabble tile pillows, which required four 8-inch squares from the front and back. Here’s what I did with the rest of the shirt:

(1) The sleeves are now fabric bins for my embroidery floss. After cutting them off the shirt, I simply evened up the sides and bottom, stitched, and made triangle corners at the bottom so they will stand up. (If you’re not sure how to do these corners, you can read about them on this tote or bracelet purse tutorial.) I previously had my floss in a large, pretty bowl, but I’ve been wanting to use the bowl elsewhere so this worked out perfectly!

(2) The ribbed collar and top-stitched hem are now a scissors pocket necklace to wear when I’m sewing or crafting, since I move from the sewing room to the dining table to the kitchen island and my scissors are always in the wrong place. (Does anyone else do that???) First, I cut the collar into thirds and used the parts with the finished ends for the bag and the other part for a flower. Then I used red buttons for the flower center and to attach the shirt-hem strap on both sides of the stitched-and-turned bag. I love it!

(3) Two random remnants are now a coffee cup cozy to take when I meet my friends for coffee or lunch. I used the cafe’s cardboard version as a pattern, cutting the fabric big enough to allow for seams, padded it with some soft quilt batting, and sewed in a red hairband at one end. After turning and pressing, I top-stitched in red and added a vintage red button. I can’t wait to try it out!

(4) One more random remnant became this pyramid bag I’ve been wanting to try from Craftser. The tutorial says it takes fifteen minutes. It does, and it’s super-cute, too!

Someday I’ll embroider over the frayed spots on the placket and pocket and reuse them along with the other small scraps I have left. When I do, I’ll be sure to share. ♥

Scrabble Tile Pillows

Standard

When I saw some scrabble tile pillows in a photo on Get In My Home, I knew I just had to try making some! Here’s how:

(1) Find some khaki colored fabric. (Lucky me, my husband had just handed me an old polo shirt in just this color that he no longer wanted!) Cut out two squares for each letter of the word you want to make. I started with 8-inch squares because I just wanted to make some small pillows to put on a shelf, but you could go much larger or smaller.

(2) Go to Fuzzimo, scroll down to where it says “Download Wooden Scrabble Letter Tiles Image,” and download the photo.

(3) Go to PicMonkey and use their tools to crop and enlarge the desired tiles.

(4) Print the tiles, cut out the letters and numbers, and tape them onto a piece of black felt.

(5) Cut out the letters and numbers, pin them on the pillow fronts, and glue or sew them into place. (I machine-sewed mine using the zig-zag stitch.)

(6) Sew each pillow front to a pillow back, right sides together, leaving an opening at the bottom for stuffing.

(7) Trim the seams, turn, and stuff, then pin and handstitch the opening. ♥

Music Pillow

Standard

One of my recent road trip embroidery projects is now paired with a fun music print to make a pillow! The credit for this idea goes to Darilyn at TheHighNoteDotNet who graciously shared this lovely quote by author Bertold Auerbach. And, if embroidery isn’t your medium of choice, she will email you an iron-on transfer to use on a pillow, T-shirt, or other fabric craft . . . how sweet is that!!!  P.S. The red one is from my flower pillow collection, and here’s a link to another music pillow from my very first month of blogging! ♥

Embroidered Pillowcases

Standard

Here are my latest pillowcases, embroidered with a simple graphic and floral design. I do love to embroider . . . it’s relaxing, portable, and the perfect way to add a bit of a-la-mode to sewing and crafting projects. I learned my first stitches from my grandma when I was ten years old . . . I hope I get to pass them on to my granddaughters someday! ♥

Scenic Pillow . . . and a Tomato!

Standard

My pile of giftable pillows was getting quite tall, so I was really happy to discover an opportunity to donate a dozen or so to a fundraiser craft show that’s coming up in August! I hope their new owners love them as much I as I loved making them! Then, silly me, I spotted a remnant in my stash that I knew would look pretty with our loveseat and the plant beside it and just had to take a few minutes to stitch up a new one. No a-la-mode needed this time . . . but it provides a nice splash of  scenery and is cushy enough for a nap. And about that tomato . . . well, it’s the first (and maybe only!) one this summer.  It’s tiny but mighty, having overcome a hail storm, high winds, and the ongoing Kansas drought to appear and redden on our plants. You’ve got to admire that kind of persistence!   P.S. I’ll bet it makes the best mini-BLT ever! ♥

Necktie Flower Pillows

Standard

When I made the tablecloth + napkin curtains for the bedroom, they replaced two valences which are now pillows! To make the necktie flower a-la-mode:

  • Cut off the fat part of the tie.
  • Unstitch the rest of the tie and remove any interfacing and lining.
  • Fold and press the tie in half (the long way!) and baste the open sides together, pulling gently to gather it as you go.
  • Curl the gathered tie around until it forms a flower shape and tack it together underneath.
  • Stitch a pretty button or earring to the center, then stitch the flower where you want it and finish making your pillow.

I’d like to thank  . . . in training for the inspiration and for suggesting that I try using neckties for flowers! ♥


What can you make with a lace tank?

Standard

A few years ago I found this beautiful lined stretch-lace tank for $5 on a sale rack at JJill! But . . . it turned out that the color made my already-pale skin looked even more washed out . . . and it got several snags from a clothes-eating teacher’s desk . . . so I decided to get out my trusty scissors to rescue it from its lonely existence at the back of the closet. Here’s what I made:

  • A headband
  • A flower pin and hair bow (each with a vintage earring in the center)
  • A mini origami lotus bag (paired with a bit of coral velvet from a robe my mom-in-law made and some thin gold cord)
  • A bracelet purse (paired with a cotton remnant in the same color family for lining)
  • A luggage tag (lace back paired with the same remnant and some burlap ribbon)
  • A contrast-corner pillow (lace back paired with the same remnant and the lace from the tank’s neckline across the corners)

Loved it . . . hated it . . . now love it again! ♥

What can you make with a flannel shirt?

Standard

This was a perfectly nice flannel shirt . . . soft fabric, pretty colors. But it didn’t fit quite right, and I didn’t like the roll-tab sleeves, and even with the ribbon belt that came with it I felt more lumberjack than feminine when I wore it. So, rather than sticking it in the back of my closet, I took my scissors to it!

Vest: Remove the collar, button and buttonhole plackets, pockets, and sleeves. Roll under the raw edges (using lace seam binding for the armholes to help with the curve) and topstitch. Sew pretty buttons into the buttonholes on the pocket flaps. Cut the ribbon belt in half and stitch the pieces to the top fronts of the vest for a tie . . . great with a white T-shirt and button necklace!

Placket Pillow: Stitch the button placket to one piece of coordinating fabric and the buttonhole placket to another. Button the two pieces together to form the pillow front. Cut a piece from one of the shirt sleeves for the back. Sew right sides together, turn, and stuff.

Pocket Pillow: Sew the tabs from the sleeves to a piece of coordinating fabric, then stitch the pockets under them so that the buttonholes on the tabs fasten to the buttons on the pockets. Fold right sides together, sew, turn, and stuff.

Fabric Flower: Cut out seven circles from the sleeves and form them into a flower. Add a pretty button in the middle  and a pin on the back.

Fabric Gift Bag: Gather the bottom of the collar and wrap it into a flower shape. Add buttons in the middle for a-la-mode. Then stitch up a simple bag with a handle from the shirt sleeve fabric and sew the flower on the front.

Mini Origami Lotus Bag: Add a square of coordinating fabric to a square of sleeve fabric plus a complementary color of  craft string for pull cords . . . just like the larger version, but a perfect size for a tiny gift or piece of jewelry. ♥

Happy Birthday, America!

Standard

Here are the rest of the pillows I made from my Americana-stamped fabric. What a lovely gift that was!

Since the cloth is loosely woven, I backed the words with a light iron-on interfacing before zig-zagging them to the pillow fabric. Other than that, I simply cut, stitched, and stuffed for a nice pop of red, white, and blue for the holiday.

Have a safe, fun, and happy 4th of July! ♥

Stars and Stripes Pillow

Standard

Several years ago a family member gave me a piece of linen-like fabric with all kinds of Americana printed on it—-stars, stripes, apples, “God Bless America,” “Home Sweet Home,” and that sort of thing. I’d never decided what to do with it until now . . . use different bits to make different pillows! Here’s the first one! And I also want to thank Oh Sew Rosy who gifted me with a Cushion Cover PDF Pattern that includes a tutorial on how to insert a zipper as she did with these lovely pillows. Easy and fun! ♥

Tablecloth + Napkins = Curtains

Standard

I was in the mood for some new curtains for two skinny bedroom windows, and I had some fabric that would work perfectly . . . a tablecloth and napkins!

  • Cut the tablecloth in half to make two curtains.
  • Cut a strip off the bottom of each piece.
  • Cut two of the napkins into fourths and sew the strips together to make long, narrow borders.
  • Sew the napkin borders to the tablecloth fabrics.
  • Hem all the unfinished edges.
  • Turn the tops under and stitch to make casings for the curtain rods.
  • Hem all the way around the two extra strips and use them for tie-backs.
  • Make a matching pillow with the other two napkins.

I love the new look! ♥

Persian Plum Pillow

Standard

This is a fun week! I just posted about the great vintage apron I received from Moosewood Vintage, and now I am the lucky recipient of ANOTHER blogging give-away . . . this gorgeous Persian Plum quilt block kit from Books Quilts and Sewing! And, Michael (the quilter) added a $5 gift card to Michaels (the store) to the package . . . what a lovely surprise!  Truthfully, I’d never pieced a quilt block before, but I knew it would be perfect for a pillow so I eagerly dove in. It was sort of like putting a puzzle together . . . and I soon learned that when the directions say to press, DO IT! Here’s my beautiful new pillow, featured in a back porch photo shoot.  Oh, and Michael has ANOTHER give-away going on right now . . . you have until July 7 to enter. Click here for information, and plan to stay a bit to browse his blog. Thanks, Michael! 🙂

Stars and Hearts Button Pillow

Standard

I got these sweet stars and hearts wooden buttons for my birthday and was waiting for just the right project for them. When I found this remnant at JoAnn with stars the same size and color as my buttons, I knew just what to do. Here is my finished 18 x 18 inch pillow, all ready for the 4th of July! ♥

Necktie Ruffle Pillows

Standard

After using the skinny ends of some ties for necktie onesies and the fat ends for necktie wristlets, I still had the middle parts left . . . so what better way to use them than pillow ruffles!  ♥

Flower Pillows

Standard

I’ve missed making pillows, so after church and lunch out with Dave on Sunday I spent a happy afternoon at my sewing machine. And, since my creative blogging friends suggested using some of my road trip flowers as pillow adornment, I did just that . . . adding in one sweater flower as well. All of the fabrics are remnants or upcycled curtains, and all of the pillows are 14 x 14 inches. I can’t wait to start giving them to my family and friends! ♥

Surprise Pillow

Standard

This was a quick and easy T-shirt-to-pillow upcycle, but it was extra fun because the person who gave up the T-shirt (my mother-in-law!) thought that one of her favorite items of clothing was heading for the rag bag due to some spots and tears (luckily not on the parts I wanted to use!) and was SO surprised (and happy!) to see it return in its new form. This pretty design, a combination of applique and embroidery, appeared on the front of the T-shirt. A smaller version appeared on one sleeve, which I cut off and stitched to the corner. Oh, and at the last minute I decided to a-la-mode it a bit with some different sizes and shapes of pastel buttons in the centers of the flowers. Now Vida has a little garden blooming on her sofa! ♥

Ruffle Pillow

Standard

As you can tell by the name, this blog started out featuring pillows . . . I’ve wandered a bit, haven’t I? But I still love to make pillows, so I made one this weekend with a small remnant I found in my stash. I added ruffle a-la-mode by cutting strips, stitching the ends together, turning under and stitching the sides so they won’t ravel, “scrunching” the strip as I sewed down the middle, and then stitching it down the middle again as I attached it to the pillow front. Finally, I added a vintage coat button, sewed the front and back together, and stuffed. The finished pillow is 10 x 20 inches. ♥

From Hoodie to Tooth Fairy Pillow

Standard

A good way to preserve a favorite item of clothing from a child’s preschool years is to upcycle it into a pillow. For example, with just a bit of embroidery, snipping, stuffing, and stitching, this hoodie turned into something new to cuddle and treasure. ♥

Yellow Sweater Pillow

Standard

As you know, I love to upcycle old clothing, which is why this “sweater with issues” is now a cushy 10 x 15 inch pillow. Although the built-in smocking added a nice bit of texture, I decided to up the a-la-mode by making a flower out of the same fabric. With the gold floss and button in the center, it even harmonizes with my sunflower paintings . . . a surprise bonus! ♥

Pink and Brown

Standard

Since my all-time favorite remnants were getting pretty slim after making the unsuccessful and then successful pink bracelet purses, I decided to finish them off by making one last “What’s not to love about pink and brown?” pillow. I added a hot pink fabric flower from my notions stash for a little a-la-mode, and the finished pillow is 9 x 22 inches.

Monster Tooth Fairy Pillow

Standard

I needed to make a tooth fairy pillow for a special little boy, so I decided to transform one of my monster pillows. (Yes, it would have been MUCH easier to decide this BEFORE I made the pillow, but oh, well! :)) First, I cut two small pocket shapes out of red felt. Next, I embroidered one for the tooth and one for the money. Finally, I hand-stitched the pockets to the pillow. It worked! ♥

“Blue, blue, my world is blue . . .”

Standard

No, I’m not depressed! 🙂 I’m just using the words of my favorite slow-dancing song from eighth grade to describe my latest project . . . actually, my first “commission” for a group of decorative pillows to set atop a young family’s new subtly-striped blue bedspread. We decided that the pillows should all be soft enough to plop down on for an impromptu nap or lean against to read books with the children, so I didn’t add any button a-la-mode. We also decided to go green with our blue by only using remnants and upcycled clothing (like a pair of old flannel PJ pants and an old sweater) and curtains (like a tie-dyed valance that no one seems to remember owning!) for the fabrics. Oh, and the man of the house also requested that I go easy on the flower prints.♥  Here are the finished pillows posed on my guest bed for a photo shoot before heading to their new home.

KU Pillow

Standard

Dave decided to clean out his closet and ran across a pair of KU shorts made out of sweatshirt fabric that were a wee bit small. However, since he’d owned them even longer than he’s known me, they were a prize possession and not something to part with lightly. My solution?  Turn them into a pillow! He’s quite happy with the result, and it might come in handy for clenching and/or throwing at the TV in the upcoming NCAA games. ♥

Tangerine!

Standard

Design-her Gals is the best web site ever for creating business cards and other personalized products. I’ve used it for several years for my Edwriter cards, and I’ve never been disappointed. Plus, it’s fun designing your “gal,” they have lots of great sales, and a portion of every purchase goes to the Gal to Gal Foundation for Stage IV breast cancer research. I was intrigued by a recent email from Design-her Gals about the “color of the year” . . . tangerine:

Tangerine combines the energy of red and the happiness of yellow. Associated with joy, sunshine, and the tropics, it represents enthusiasm, creativity, determination, and success. Add a little tangerine to your life this year!

Since this was my new favorite color last spring, I took my camera to my living/dining/kitchen space to see just how many shots of orange I could find. ♥

Monster Pillows

Standard

I made a quick dash by the remnant bin last time I was at Jo-Ann and found this adorable “Monster Mania” fleece, which made two soft, cuddly 14 x 15 pillows. They definitely didn’t require any alamode, and I don’t think I’ll have any trouble finding some little monster lovers to give them to! ♥

Napkin + Remnant + Beads

Standard

As you know, I love to make pillows from cloth napkins I find in the bargain aisle of various home and department stores. My latest find was a loner for 48¢. Once I got home, I discovered four tiny, perfectly-centered holes which were were easily camouflaged by some burgundy-bead alamode that matches the remnant I used for the back. I love the rich colors and design of this finished 16 x 16 pillow!

Flowers and Stripes

Standard

I needed to pick up an item at Bed, Bath, and Beyond on Saturday, and after the success of my last “napkin pillow,” I decided to browse the clearance aisle for potential fabrics. To my delight, I found these reversible napkins for 99¢ apiece. By getting two of each, I could use the floral sides for the pillow fronts and the striped sides for the backs. I also added some vintage buttons from my grandmother’s collection for a little a-la-mode. The finished pillows are 16 x 18. ♥

Cozy Sweater Pillow

Standard

sweater-pillowI made a sweater pillow last fall, but lately I’ve seen lots of pretty ones in magazines and on Pinterest so I was in the mood to make another. Lucky for me, I had a vintage sweater-poncho my mother-in-law had tossed out with enough “good parts” left to cut out two perfect rectangles with cabling on the side. I added my favorite metal buttons from my grandmother’s button box (I called them the “bumblebee buttons” when I was little!) and came up with this soft, smooshy, 16 x 20 pillow that will have a home on my sofa the rest of the winter. ♥

$1.48

Standard

I don’t know if you can read the price tag on this gorgeous cloth napkin I found in the clearance corner at World Market, but it’s $1.48! So, of course, I immediately snatched it up for a pillow. The back of the finished 19 x 19 inch pillow was a curtain in its previous life, and I added a little a-la-mode in the form of a shiny, marbled, 2 x 2 inch vintage button from my grandmother’s collection. So far I’ve given all my pillows away, but this one looks right at home on my sofa, so it may be here to stay. ♥

Writers and Writing

Standard

Everyone has a different reason for creating a blog. My inspiration was my new Wednesday night writer’s group. Some of our members are looking for a way to collect their poems, memoirs, and essays, so I decided to learn how to blog so I could help others create them. I chose pillows for the theme because that happened to be my new hobby, but I’ve found my blog to be a fun forum for chronicling all sorts of ideas and events . . . and reading other writers’ blogs to be rather addictive!!! For our last writer’s group meeting of the year, I compiled a list of prompts we can use to sum up our writing lives and set new goals . . . feel free to try one and share! ♥

Paper Art by Matthew Sporzynski

  • Write a haiku or other type of poem about 2011.
  • Write a 10-word sentence about yourself as a writer.
  • Write a story or poem from your computer’s point of view. How would it describe your work habits? What does it think about you as a writer? (I’m thinking of doing this one . . . but it would include eating at my desk, getting distracted by Pinterest, and staring at my husband as if I don’t know him if he happens to walk into the room when I’m on a roll with an idea . . . uhm . . . maybe I won’t. :))
  • Write an apology letter to yourself for not taking a chance you wish you would have, and explain what you will do about it.
  • Write a one-paragraph bio about your writing career to date. Then, write the one-paragraph bio you hope to have on 1-1-13.
  • Write a letter to yourself that you will open in six months. Include your current accomplishments and concerns, and remind yourself of one thing from today that you want to make sure “future you” does not forget.

Adding Texture with Felt

Standard

Since I’ve started searching out throw pillows everywhere I go, I’ve seen many that use felt to achieve a 3-dimensional look. Recently a friend gave me a huge piece of green felt, so I decided to see if I could make a fluffy Christmas wreath. First, I got a square of red fabric and drew two circles by tracing the outside of different sizes of pan lids. Then I cut out LOTS (probably 200 or so) felt circles (while watching TV of course. :)), got a needle and some green thread, and was ready to go. To attach the felt, I folded the little circle into fourths to create a point in the center. I then tacked that point to the outer circle of the pillow with three small cross-stitches. I kept going, placing each felt circle point very close to the last one, until I made it all the way around. I then did the same thing on the smaller inner circle and finished by making one last round between the first two. The result? The circles are so crowded that they all fold up like little tacos and create that texture I was going for. (Can you say frou-frou? ♥) The finished pillow is 12 x 12.

Musical Pillows

Standard

When I was in kindergarten, I got a toy xylophone for Christmas. I LOVED that thing and played it nonstop.  Soon, my parents enrolled me in piano lessons  . . . probably so they could take the xylophone away! 🙂

Long story short, piano grew to be a huge part of my life. I was even able to make a living accompanying, teaching piano lessons, and playing for weddings when I went to college to get a teaching degree, so THANK YOU, Dad and Mom! ♥

I made this pillow with embroidery a-la-mode in honor of the little music book that came with my xylophone, which has colored notes matched to the colors of the bars.  The finished size is 12 x 12.

Pillow Gift Baskets

Standard

Here are the finished gift baskets for the Art and Mission Market this Saturday!

(Click on any photo in the gallery for a larger view.) ♥

Snowman

Standard

Although we’ve only had a few flakes so far, some of you have already experienced your first blizzard of the season. One of the perks of working at home is not having to worry about driving in iffy weather . . . but I’ll admit I’ll miss hearing the early-morning news announcer say those magic words: SNOW DAY! this winter. As much as I loved teaching, this pronouncement always brought on a giddy anticipation . . . fireplace, hot chocolate, good book, nap . . . The front of this pillow was a decorative dish towel, and I simply embroidered the word as a little a-la-mode and chose a matching solid red for the back. The finished 12 x 12 pillow is now part of a gift basket for the upcoming Arts and Crafts Mission Market. Now . . . stay warm, everyone! ♥