Yes, it’s another Flamingo Toes hoop art pattern . . . a housewarming gift for a loved one who just bought a new cottage (and loves purple!). ♥

Yes, it’s another Flamingo Toes hoop art pattern . . . a housewarming gift for a loved one who just bought a new cottage (and loves purple!). ♥
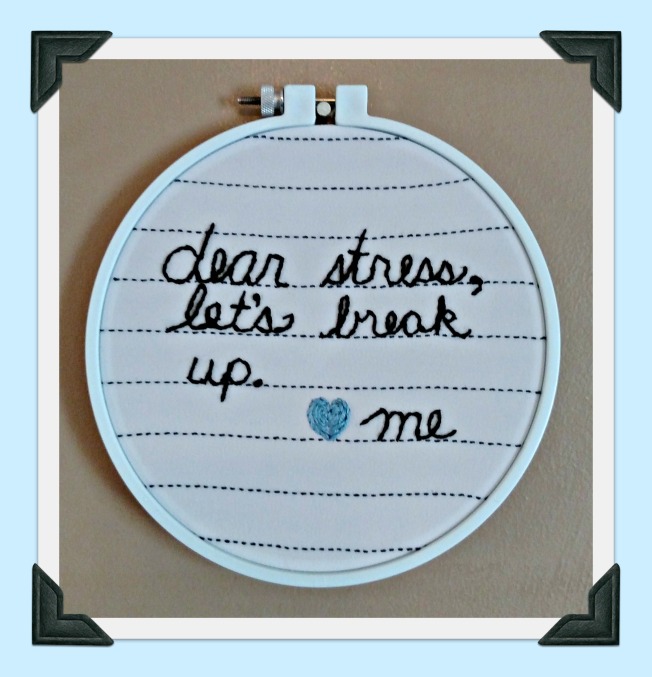
I have a little poster on my office bulletin board that says, “She believed she could, so she did.” That’s so empowering! It also matches my latest embroidery project, a reverse of the common pessimistic declaration “I’ll believe it when I see it.” It makes you think for a moment, but it’s true! ♥

I saw this on a poster, and it begged to become my next embroidery project. I hope it gives you a smile today! ♥
I’ve been embroidering lately since it fits in my here-and-there creative moments. This quote seemed the perfect choice when I found enough heart fabric to fit these two little hoops. After embroidering, I wrapped the outer hoops in red polka-dot fabric strips for a bit of extra color, and then I gathered the backs and covered them with circles of the same fabric to finish them off. I’m going to take this message to heart! ♥


I always love to get out my felt conversation heart garland when February rolls around! Remember to show extra love to everyone in your life this month, and have a fun Valentine’s Day! ♥
Other Valentine’s Day Craftiness:

Snowy blue fleece + mini crocheted doilies + stuffing = snowflake pillows to gift as gifts this winter! ♥

Since my refrigerator door is already full of grandchildren art attached by magnets, I decided to start an art wall down the hall for new creations. I tried Wallies, and I LOVE them! They stick easily to the wall, hold the projects firmly, and remove without a trace. I got the binder clip design, but the company also sells versions that look like paper clips, push pins, and clothespins, as well as many other types of wall decals and murals. The Wallies company doesn’t know I’m promoting them, but they deserve it! ♥

I’ve never won anything at the aforementioned benefit auction, but this year I did! I came home with this beautiful decoupaged pumpkin made by an artist name Alyson who is also in my writing group and this gorgeous handmade necklace made by a busy mom, teacher, and grad student named Linda. I decided that the pumpkin could wear the necklace for the rest of the autumn season, because “Joy” and “Thanksgiving” go hand-in-hand, right? ♥

I decided to refresh my autumn garland this year. While digging through my fabric stash, I found a leaf print and cut out one of each leaf. Then I stitched each leaf to one half of a yellow rectangle, doubled the rectangle. stitched the sides together on the sides and bottom, and stitched a casing at the top. After threading them through a piece of baling twine (yes, I was raised on a farm!), it was ready to hang. It makes me smile when I walk in the room! ♥

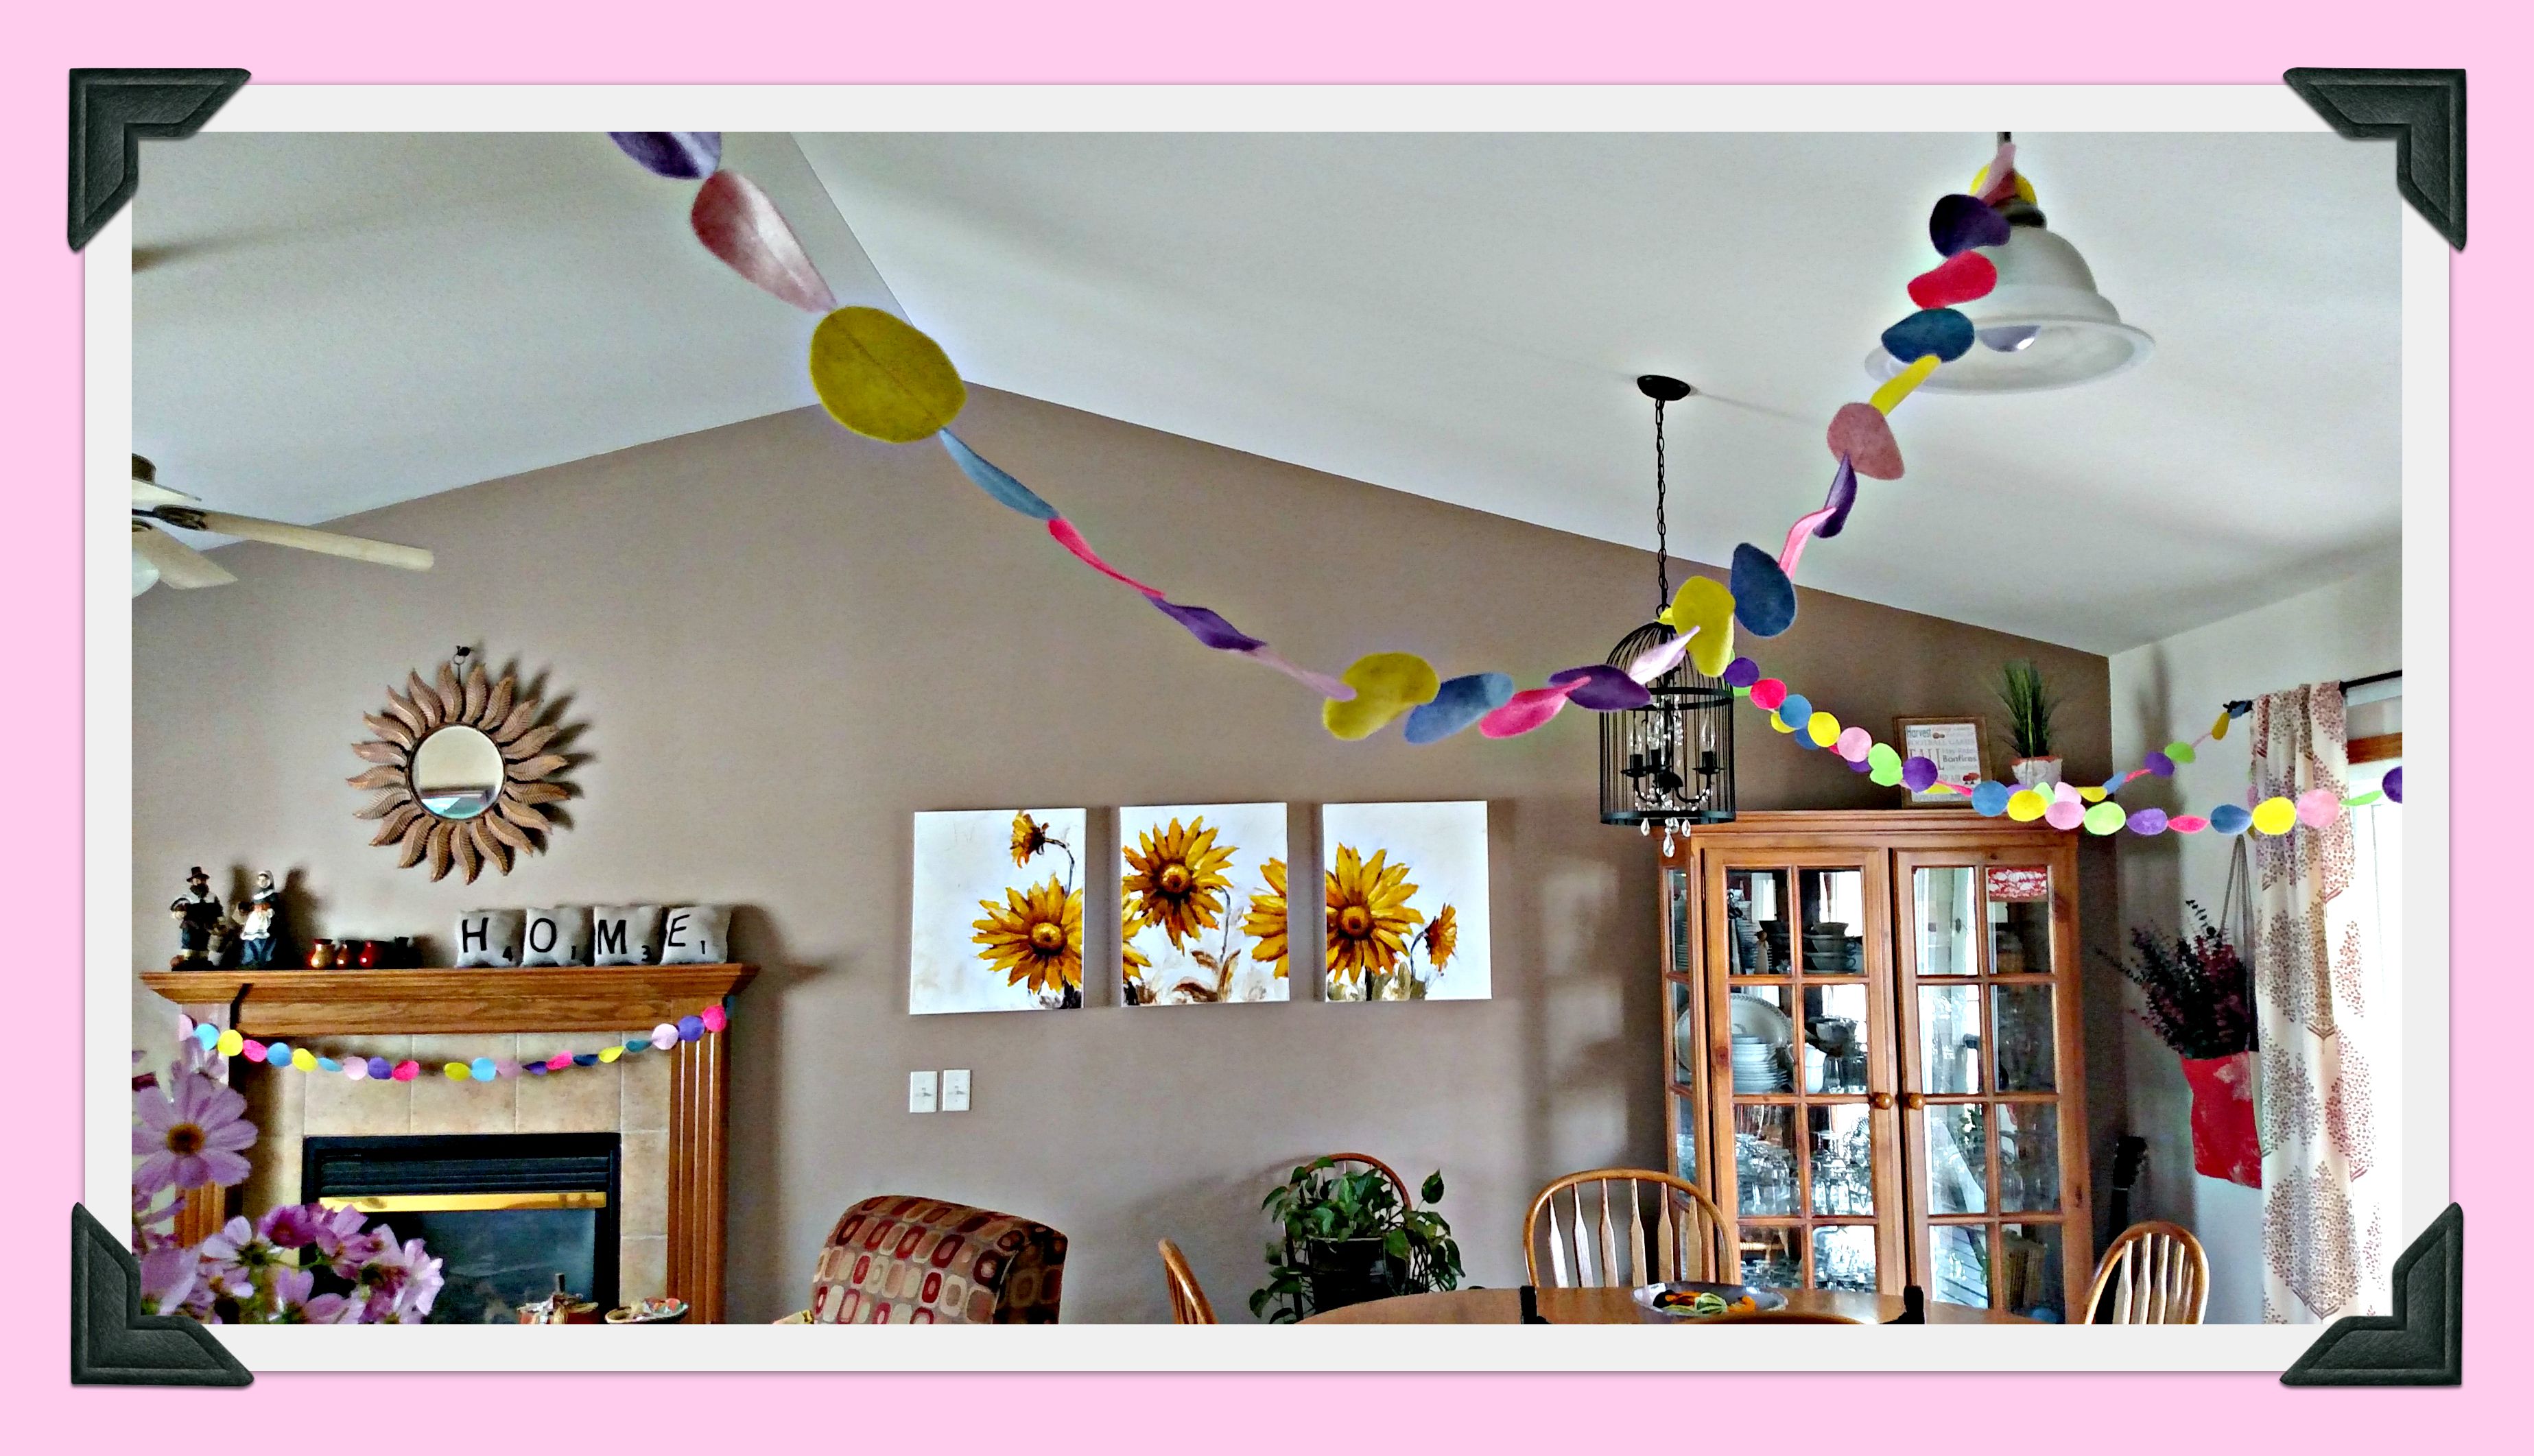
Our granddaughter Ally asked to have her family birthday party at our house (happy face!), so I decided to make some colorful, festive, girly garland to offset the autumn décor. First, I put on a good movie and cut out a bazillion or so circles from my felt stash (using a peanut butter jar lid as a template). Then I arranged the circles in color patterns, moved to the sewing machine, and stitched them together down the middle with edges touching. Finally, I draped them around the room, ready to add table decorations, balloons, a cake, and gifts. She loved it! ♥

![pillow[1]](https://pillowsalamode.files.wordpress.com/2015/03/pillow1.jpg) It’s always fun to switch out the winter decorations for spring things! Here’s my favorite pillow (and the story behind it!) and links to some other handmade goodies. Enjoy! ♥
It’s always fun to switch out the winter decorations for spring things! Here’s my favorite pillow (and the story behind it!) and links to some other handmade goodies. Enjoy! ♥
 My daughter-in-law Jen is always looking for creative ways to corral her little boys’ toys. When she found a wall-hanging car caddy on Pinterest, I was in!
Jen tweaked the design and chose the fabric, and I sewed, adding some interfacing between the front and back and doubling the fabric on the pockets to make it extra sturdy.
We got a curtain rod for hanging, but instead of the usual hardware, Jen cleverly used some removable hooks to avoid putting holes in the wall.
We think it’s cute . . . but not nearly as cute as the sweet little boys using it! ♥

 . . . is only one week away! The only new things I’ve made for the occasion this year are some infinity scarves from red-on-white and white-on-red dotted chiffon that I had in my stash. They’re super-easy to sew (check out Pinterest for tons of tutorials!) and perfect for gifting. But it’s also fun to put out some treasures from previous projects, such as:
and my February Shantilly Frame.
Have a happy week sharing *a little extra* love with your family and friends. ♥

Hello, friends! I haven’t posted OR answered my last set of comments OR read your blogs . . . I miss you! Life and work have just been a little crazy lately. I know you can all relate! But here is a quickie project I made for two sweet little girls to organize their hair accessories and necklaces in their new house. The frame is a hand-me-down from their great-grandmother, so we didn’t paint it, but it has plenty of color with ric-rac, headbands, barrettes, rubber bands, jewelry, and a little fabric flower a-la-mode. Thank you for taking a peek! ♥

My niece Amanda made this clothespin wreath . . . isn’t it festive? Here are some of her tips:
I bought 100 clothespins at Target and painted them with acrylic paint I already had. I like to paint, so it was fun for me, but it would be easier/faster with spray paint. Then I got a wire wreath and a bag of little wooden stars at Jo-Ann using a 40% off coupon and put it together! The clothespins just clip on and I used hot glue to attach the stars. I made sure that there were 7 red and 6 white “stripes.” (My Pinterest inspiration photo didn’t do that and it was driving me crazy!) I love it and it goes great with my blue front door.
Total cost? Eight dollars! Thank you for letting me share your fun project, Amanda! And happy holiday to all my U.S.A. blog friends. ♥ P.S. Click here to see the apron Amanda and I sewed together last summer!

Since I have lots of hand-me-down vintage linens and doilies, I’ve been collecting ideas for using them in new ways. One idea I’ve seen several times is to use the piece as a-la-mode on a pillow. When I saw this pink polka-dot brown flannel next to this pastel pink table scarf, it was love at first sight! I simply centered the scarf on the cut out fabric, stitched it on, and completed the pillow as usual. Mmmm . . . brown and pink! ♥

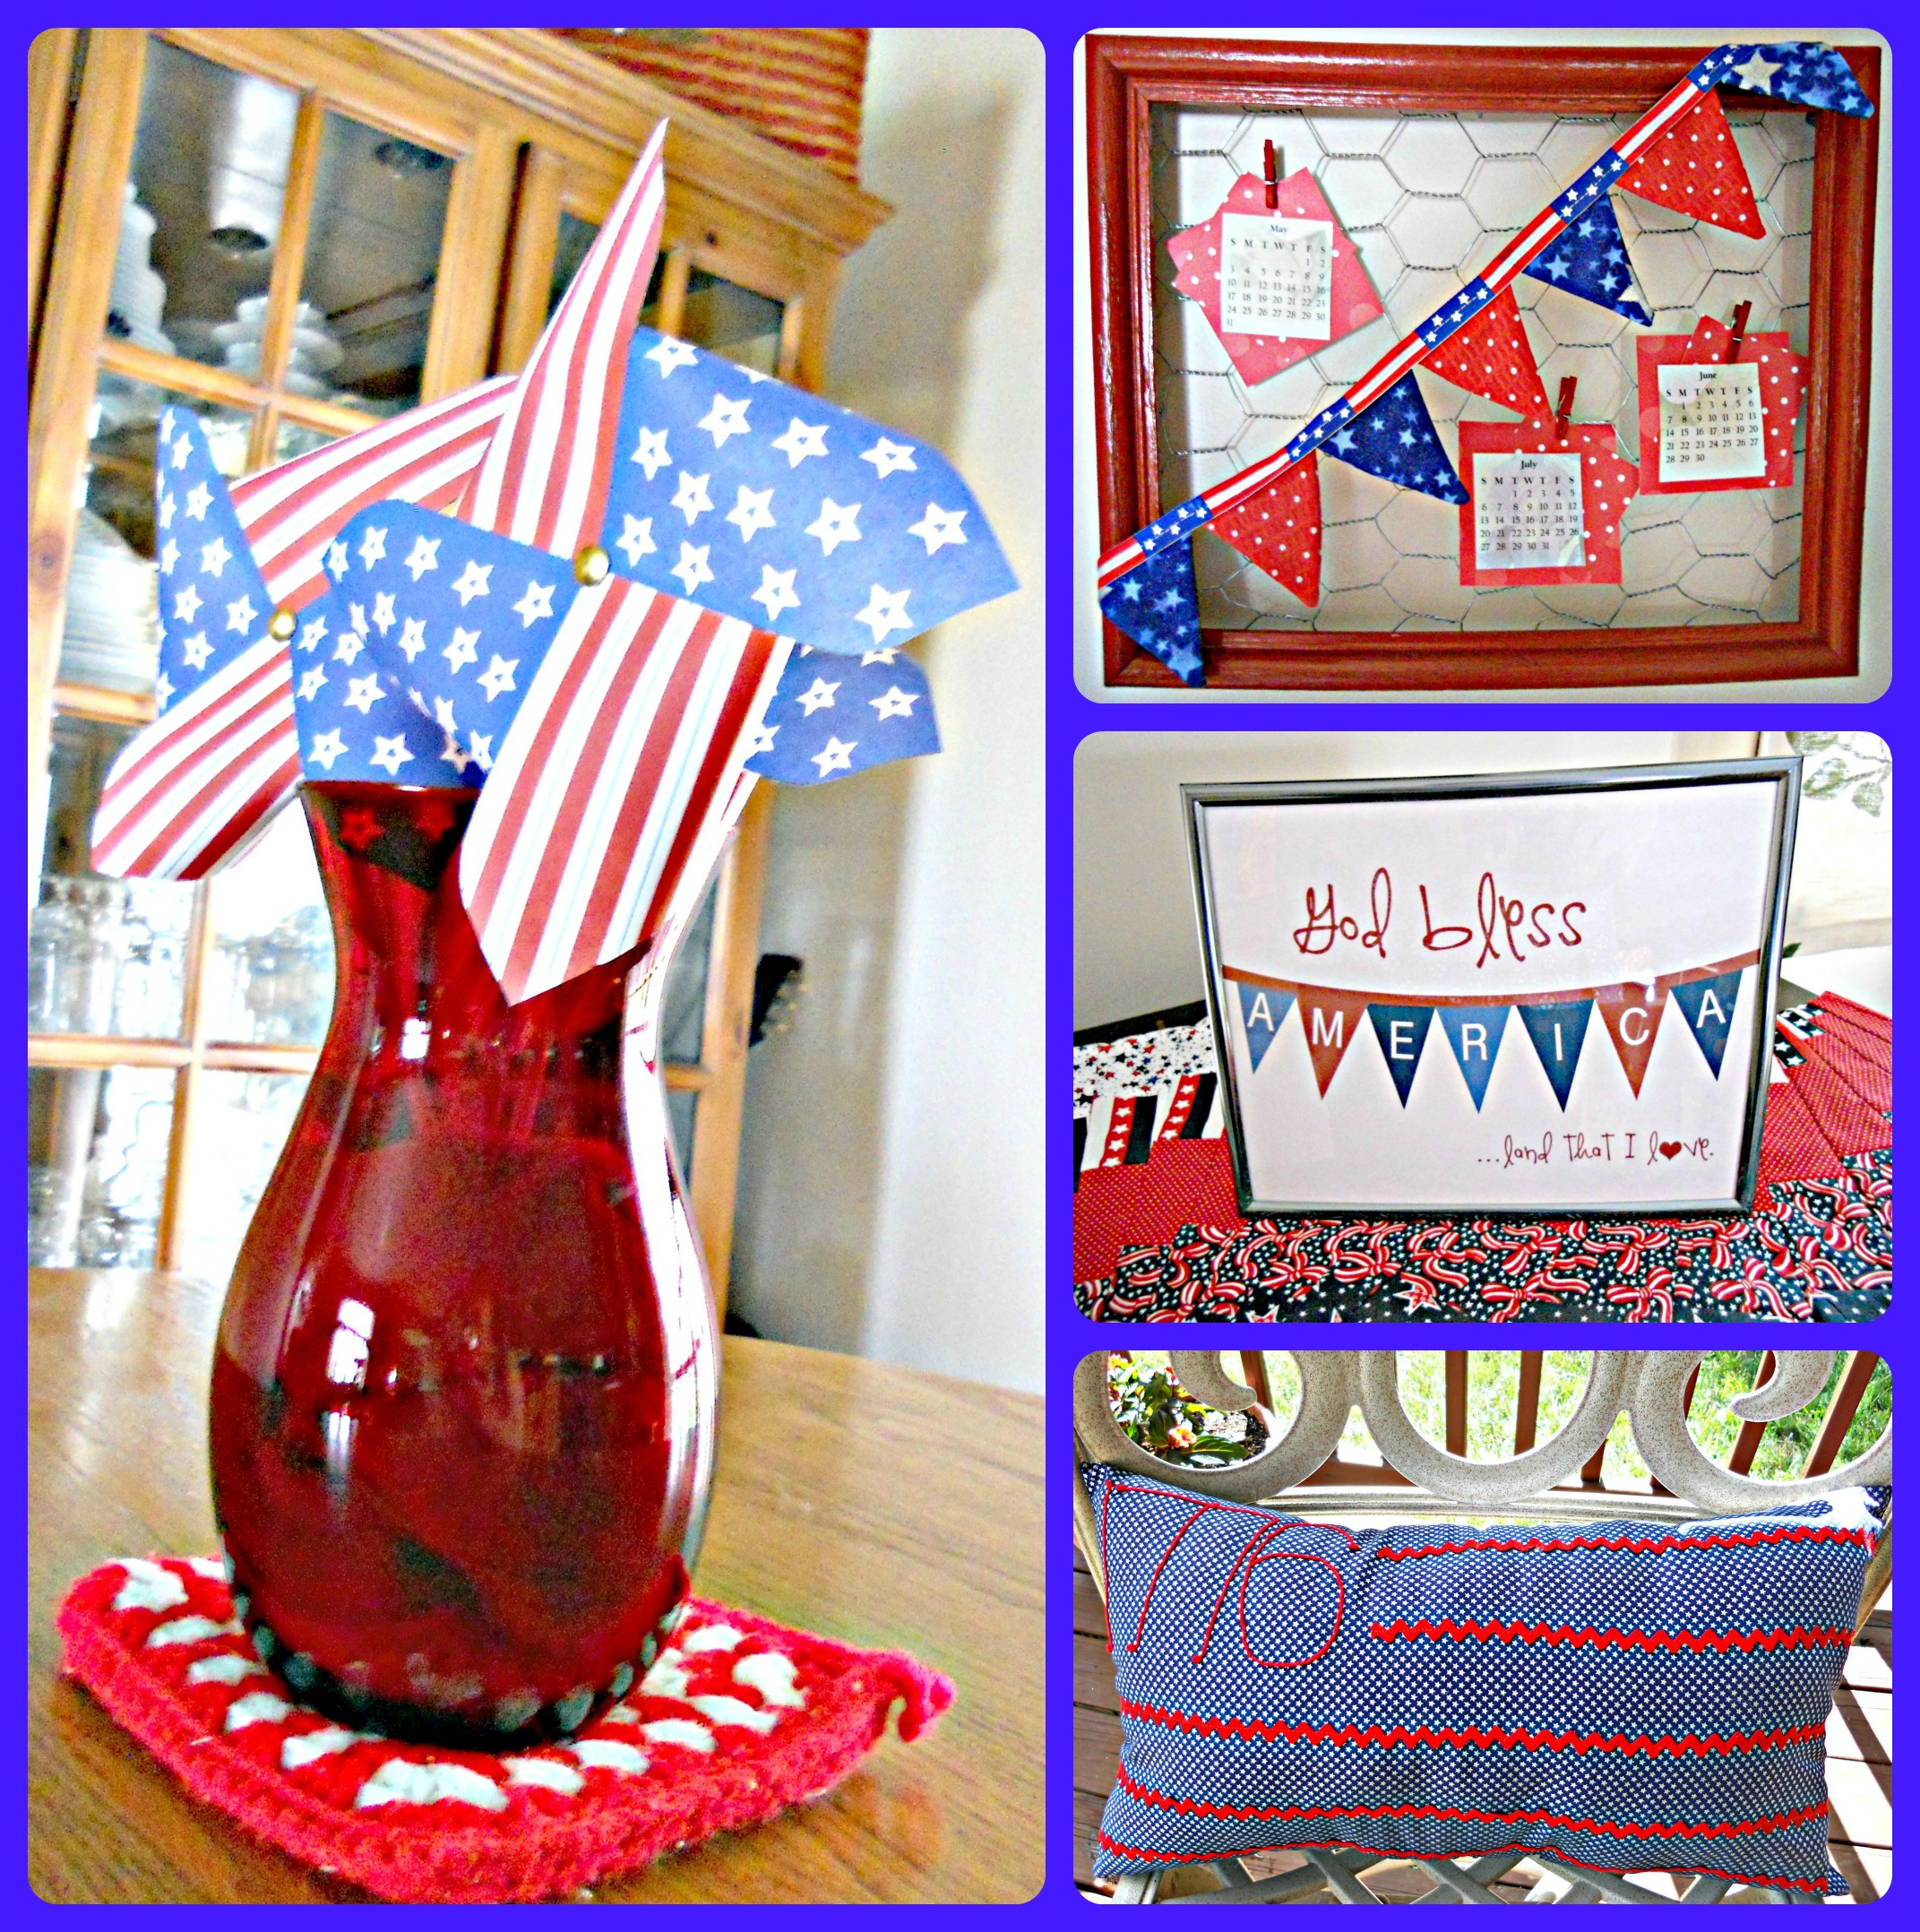
In the U.S.A., Memorial Day is today, June 14 is Flag Day, and July 4 is Independence Day, so you can’t go wrong with a bit of patriotic decor this time of year. Here is my restyled Shantilly frame, a free art print on a hand-quilted table runner my daughter-in-law Tiffany gave me for my birthday, the 1776 pillow I made last summer, and a pinwheel bouquet (also a free printable!). Happy summer! ♥
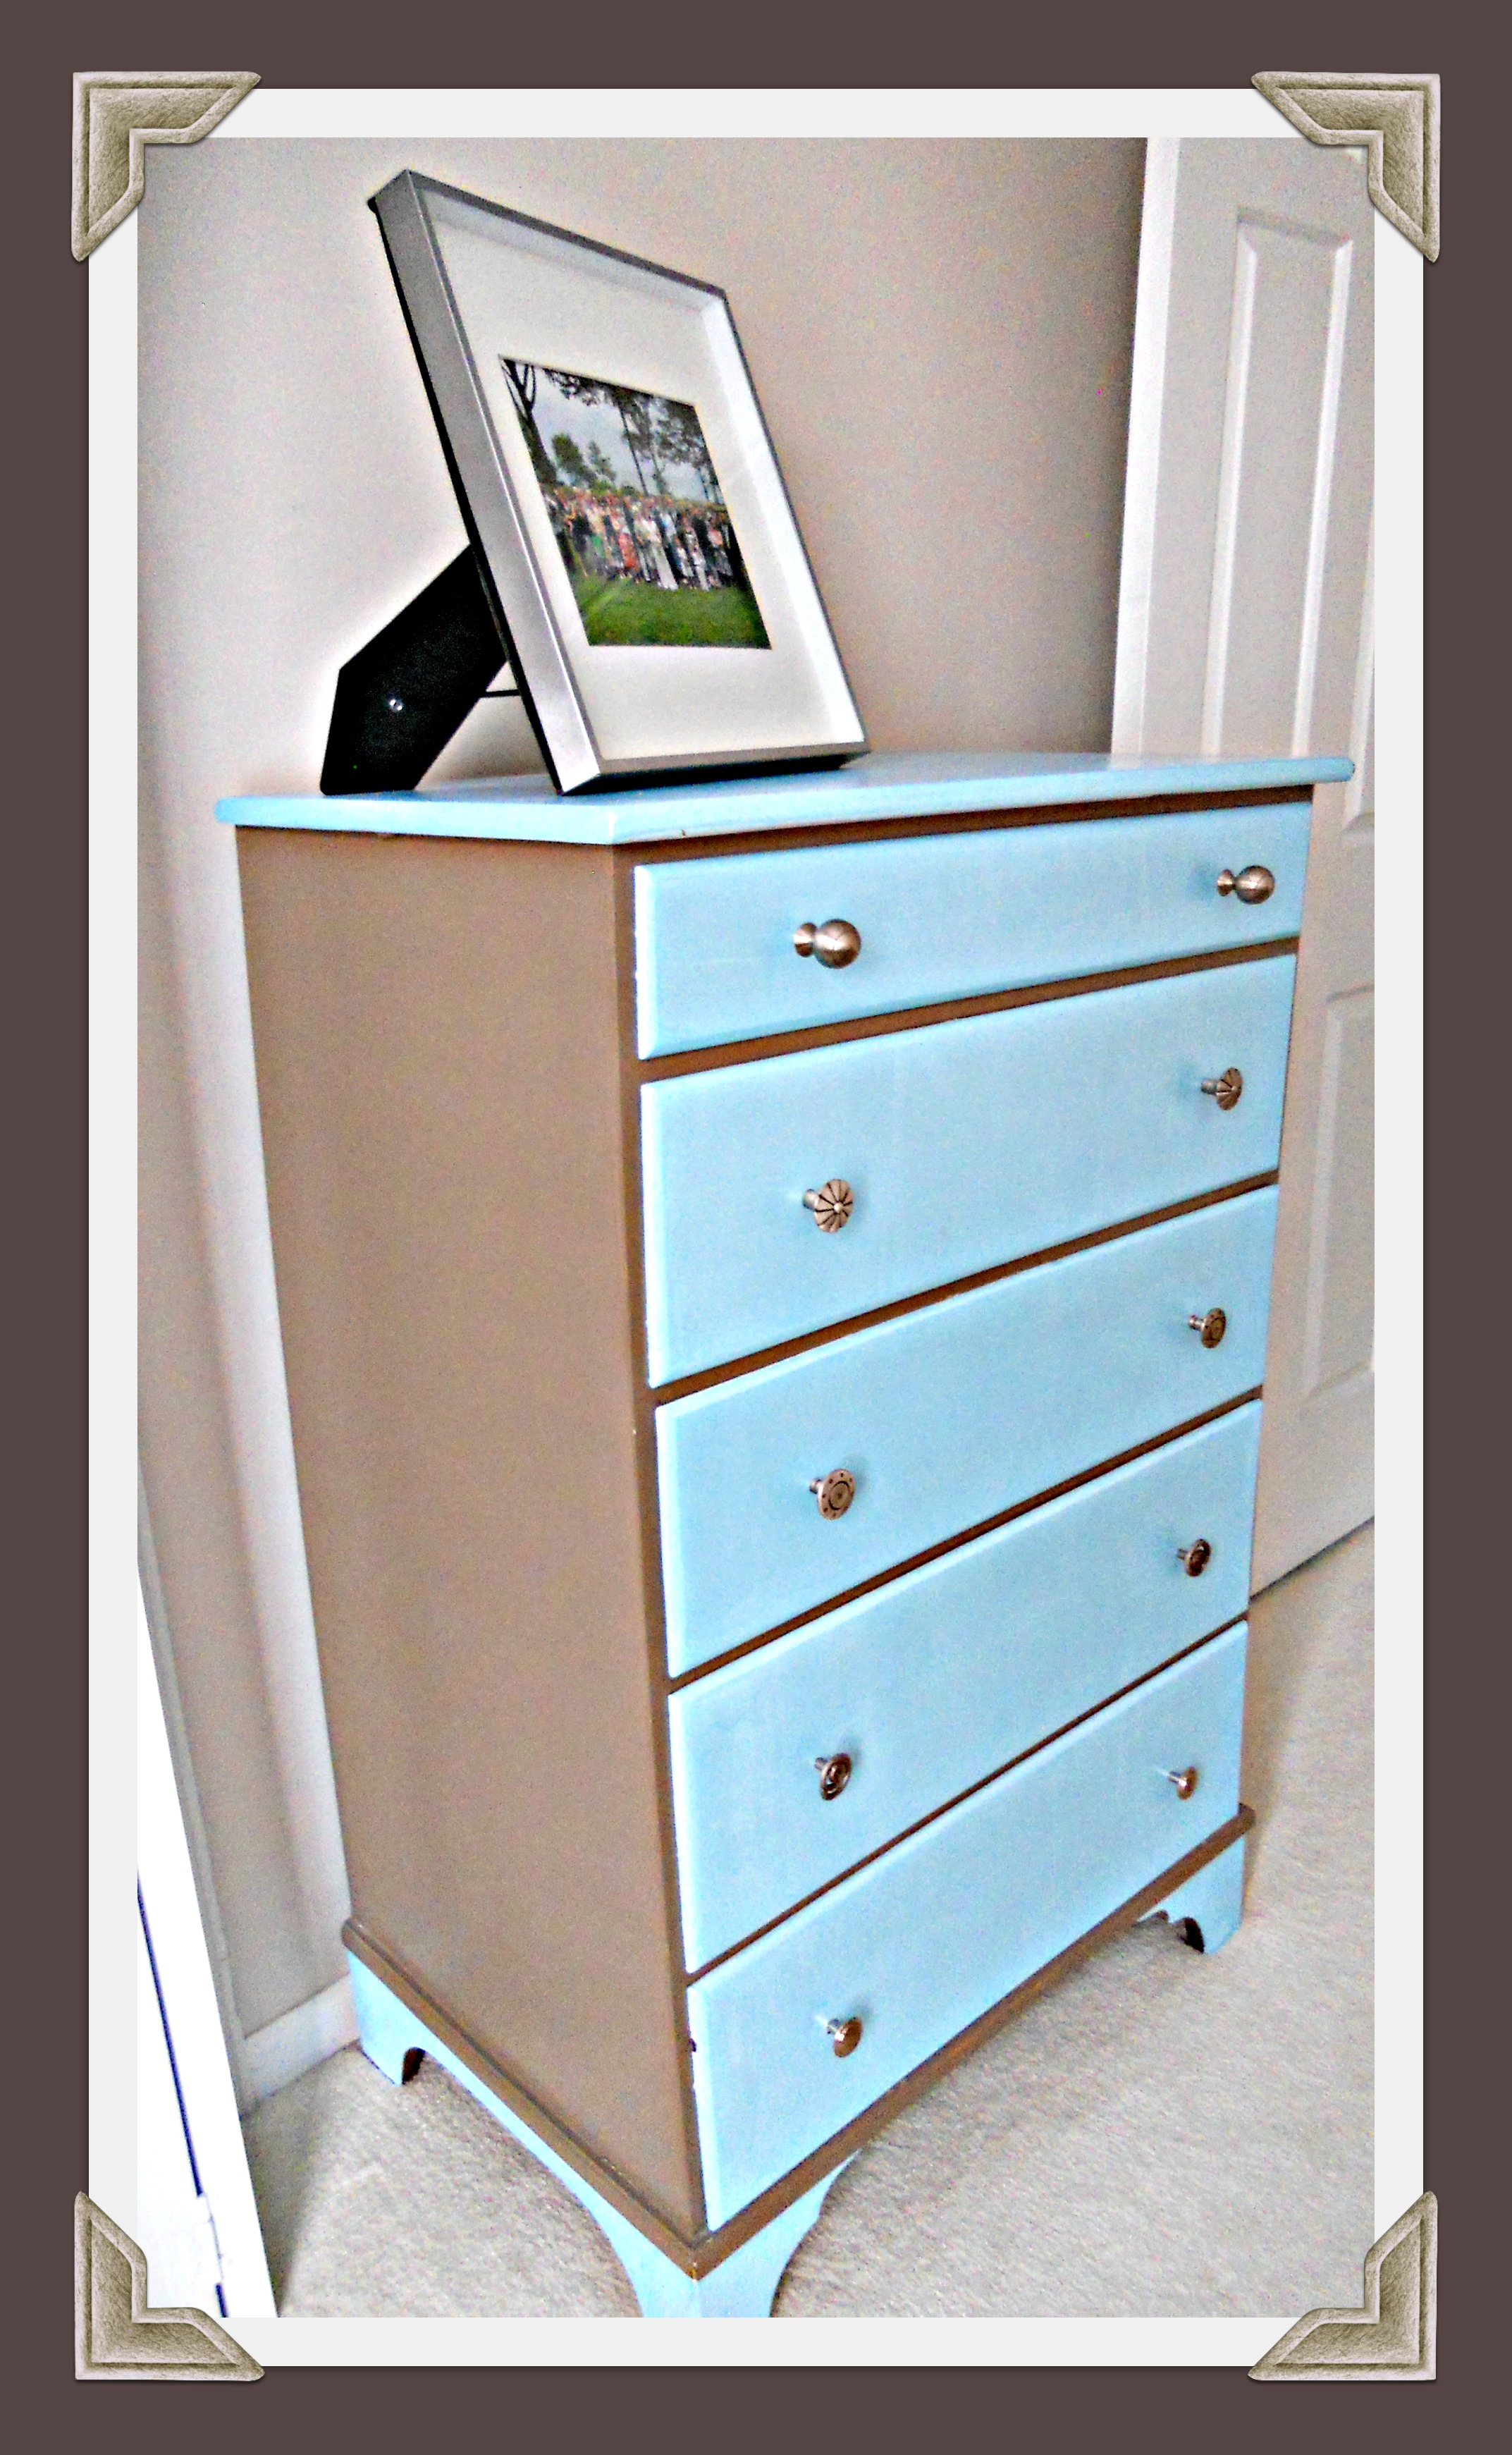
On a recent visit to our Georgia family, we got to enjoy this beautiful dresser in our guest room. Mary Ann restyled a hand-me-down with two colors of paint and a different pair of silvery knobs on each drawer. I can’t wait to try this at home! ♥

Our lovely daughter-in-law Mary Ann is a registered dietician turned physician’s assistant and sports a fun “Periodic Table of the Vegetables” poster in her kitchen. On a trip to Jo-Ann to buy a foam cushion for the toy box bench, I spotted this “Farmer’s Market” fabric—perfect for a decorative cushion for the kitchen window seat. The cat promptly nestled beside it for a nap . . . and Mary Ann loves it, too! ♥ 
Our Georgia family recently moved and needed some new pillow décor. First, we made a bench seat cushion for baby Josh’s toy box (handmade by his Uncle Jeff!). Josh’s room is morphing into a travel theme—don’t you just LOVE this map fabric his mommy picked out? We had enough for a square pillow to pose on the rocking chair, too. Then we made some floral and solid-with-button-a-la-mode pillows for the purple sofa in the living room. Mary Ann purchased the fabrics at Curtain Call in Augusta, Georgia. ♥ P.S. Now I want a purple sofa!


It’s time to change up my Shantilly frame again! I’ve been making lots of rolled fabric rosettes from remnants—the perfect handwork project for road trips or watching TV. (I use this tutorial but stitch instead of glue.) So, while waiting for REAL flowers to pop out, I decided to bunch my fabric versions into a colorful garden with a peeping PEEP left over from my spring garland for a-la-mode. Happy April . . . and don’t pull TOO many April Fool’s tricks today! ♥ P.S. Here are the red frame restyles for November, December, January, and February and the green frame design for March.

On a recent visit to our Missouri family, we were greeted by a fun St. Patrick’s wreath on the front door. Our daughter-in-law Tiffany made it from a wire form + decorative mesh + a-la-mode. Then she was kind enough to pull out the ones she had made for Valentine’s Day and Christmas so I could photograph them for you. Tiffany said to check out “decomesh wreaths” or “decorative mesh wreaths” on Pinterest for tutorials and ideas. In the meantime, enjoy these three! ♥


I recently hung the Peeps garland I made last spring (out of felt, not the candy!). Here are the super-simple directions:
(1) Draw a simple bunny shape or find a free template online.
(2) Make the bunnies from felt, fabric scraps, construction paper, or scrapbook paper.
(3) Add the eye and nose dots with fabric paint, permanent marker, or embroidered French knots.
(4) Attach the bunnies to ric-rac, ribbon, rope, string, or twine using glue or hand or machine stitching.
You’ll soon have a cheery pop of color for your spring décor. Have fun! ♥
Do you have hearts all over your home these days? My favorite new display is the clay heart my granddaughter Ally made, my collection of heart necklaces, and the beautiful mixed-media canvas Shannon of Shantilly made for my birthday. From my heart to yours . . . have a happy Valentine’s Day! ♥

During my last spring cleaning, I found NINE unopened decks of cards in the game chest. If they haven’t been claimed yet for their intended purpose, they’re up for grabs for crafting, right? So, when I saw several versions of Valentine garland made from hearts playing cards on Pinterest, I had to give it a try! I punched holes in the corners, strung them with red baker’s twine, and added a few hearts cut from the backs of the Jokers and advertising extras for a-la-mode. So easy, and they made great gifts for some special people I love! ♥ P.S. Here’s the red sweater heart pillow that’s sitting on my favorite chair this month and the felt conversation heart garland I hung across the mantle.


My Shantilly frame got a makeover for February! The inspiration was this fun suit-on-a-hangar bookmark from my BFF Susan, and the words are letters snipped from alphabet fabric glued onto rectangles cut from last year’s February calendar paper. Here are the ones for November, December, and January. Happy new month! ♥ 
It’s birthday party time again in our family! Five-year-old Tyler chose Disney Planes for the theme. I had fun searching out a yard of DP fabric (found it on ebay and got it in two days!) to use for bunting and then sewing a big pile of red goodie bags for Tyler to fill with treasures and send home with his friends. Now for some cake and ice cream! ♥

I’m afraid my “let it snow” frame worked, because we had snow over the weekend and still have below-zero wind chills today! Lucky for me, I get to work from home . . . and the lasagna, breadsticks, and chocolate cake we had for dinner warmed me up just fine. (Gym . . . I promise I’ll be there soon!) It’s also a perfect day for this fun little free printable on my living room side table . . . thank you to Pam and Lisa of Over the Big Moon. ♥

Look at the lovely ornament my sweet art-teacher-writer-friend Ginger gave me at church on Sunday! She twisted and turned a piece of wire into a heart surrounding my L-O-N-G name . . . thoughtfulness and handcrafting at its finest. And now, with Christmas Eve just one week away, I’m off to finish my end-of-year writing assignments, bake, and celebrate with my family. I wish you and yours a very merry Christmas and happy, happy New Year, and I’ll see you in 2014! ♥

Since I have so many colorful red and green decorations and busy prints up for Christmas (like here, here, here, here, here, here, and here!) I decided to go completely the other way on my newest idea . . . somewhat of a visual trick since “Deck the Halls” is such a cheerful song! I used turquoise chevron flannel with the same color embroidery floss, then I played around with the size and placement of the words to replicate the chorus’s inflection, pauses, and pitch. I love the way it makes your eyes say, “Ahhhhh . . . ” Oh, and the embroidery hoops were hand-me-downs and I already had the fabric and floss in my stash, so this was a “free” project. I love those, don’t you? ♥

 In our smaller house, we’ve downsized to a smaller Christmas tree . . . but we still have lots of special ornaments we enjoy having out. So, I like to separate them into “categories” and display like items together.
Pretty, easy, and fun! ♥

Another favorite Christmas decoration at our house is the “fabric forest” I made last winter. I enjoyed getting these colorful little trees back out to display on top of the china hutch again! You can make the trees any size, and they’re a great way to use up some remnants that might not work for other projects. For a step-by-step photo tutorial, click here. ♥

Besides my felt peppermint wreath, another favorite decoration at our home is this set of decoupaged J-O-Y letters . . . I made them from upcycled Christmas cards! Click here for complete instructions as well as links to lots of other fun, crafty Christmas projects. ♥

Ever since I found the perfect giant sunflower paintings by a local artist at one of my favorite little shops, I’ve enjoyed them in spring, summer, and fall. However, when December rolls around, they become Christmas decor! In the past, I’ve always wrapped them in Christmas paper, but this year I purchased some pretty $1/yard cotton fabric that I can use year after year for a little more Earth-friendly approach. Click here and here for the 2011 and 2012 versions! ♥

Remember the chicken-wire frame I bought at the craft show from Shantilly? And how I decorated it for Thanksgiving with cut out burlap letters and a fabric flower? My granddaughter Miranda helped me restyle it for Christmas with new letters, then we added the scrapbook paper ornament my friend Debbie taught me how to make. Perfect . . . and I’ve already got ideas for when Valentine’s Day rolls around! ♥

I’m going to take off the rest of November from blogging to finish a big writing assignment (for my “real” job!), host Thanksgiving dinner, and attend some family events. But first, here are my new strings of Christmas bunting! Last year I cut out bazillions of squares of Christmas fabric to make mini-pillow ornaments but didn’t use them all, so I turned the rest into triangles that I could stitch into seam binding. Simply turn under the ends and fasten them with buttons to create loops, and they’re ready to hang. Thank you for stopping by, and I’ll see you in December! ♥


In my Sleepover! post I told you about Shantilly, a new crafty business launched by my daughter-in-law Shannon and her sweet mom and sister. Their popular handmade items include different sizes and colors of chicken-wire frames to use for memo boards. (My friend Karen bought one for each of her nieces for Christmas!) With mine, I made a new wall decoration for our upcoming Thanksgiving dinner. The letters are snipped from a remnant of the burlap I used for my mini-screen bag, the teeny wooden clothespins are left over from my t-shirt garland kit, and for a-la-mode I pinned on one of my fabric flower brooches. I just love it, and the best part is that I can update and reuse it for Christmas, Valentine’s Day, and more! Thank you, Shantilly! ♥

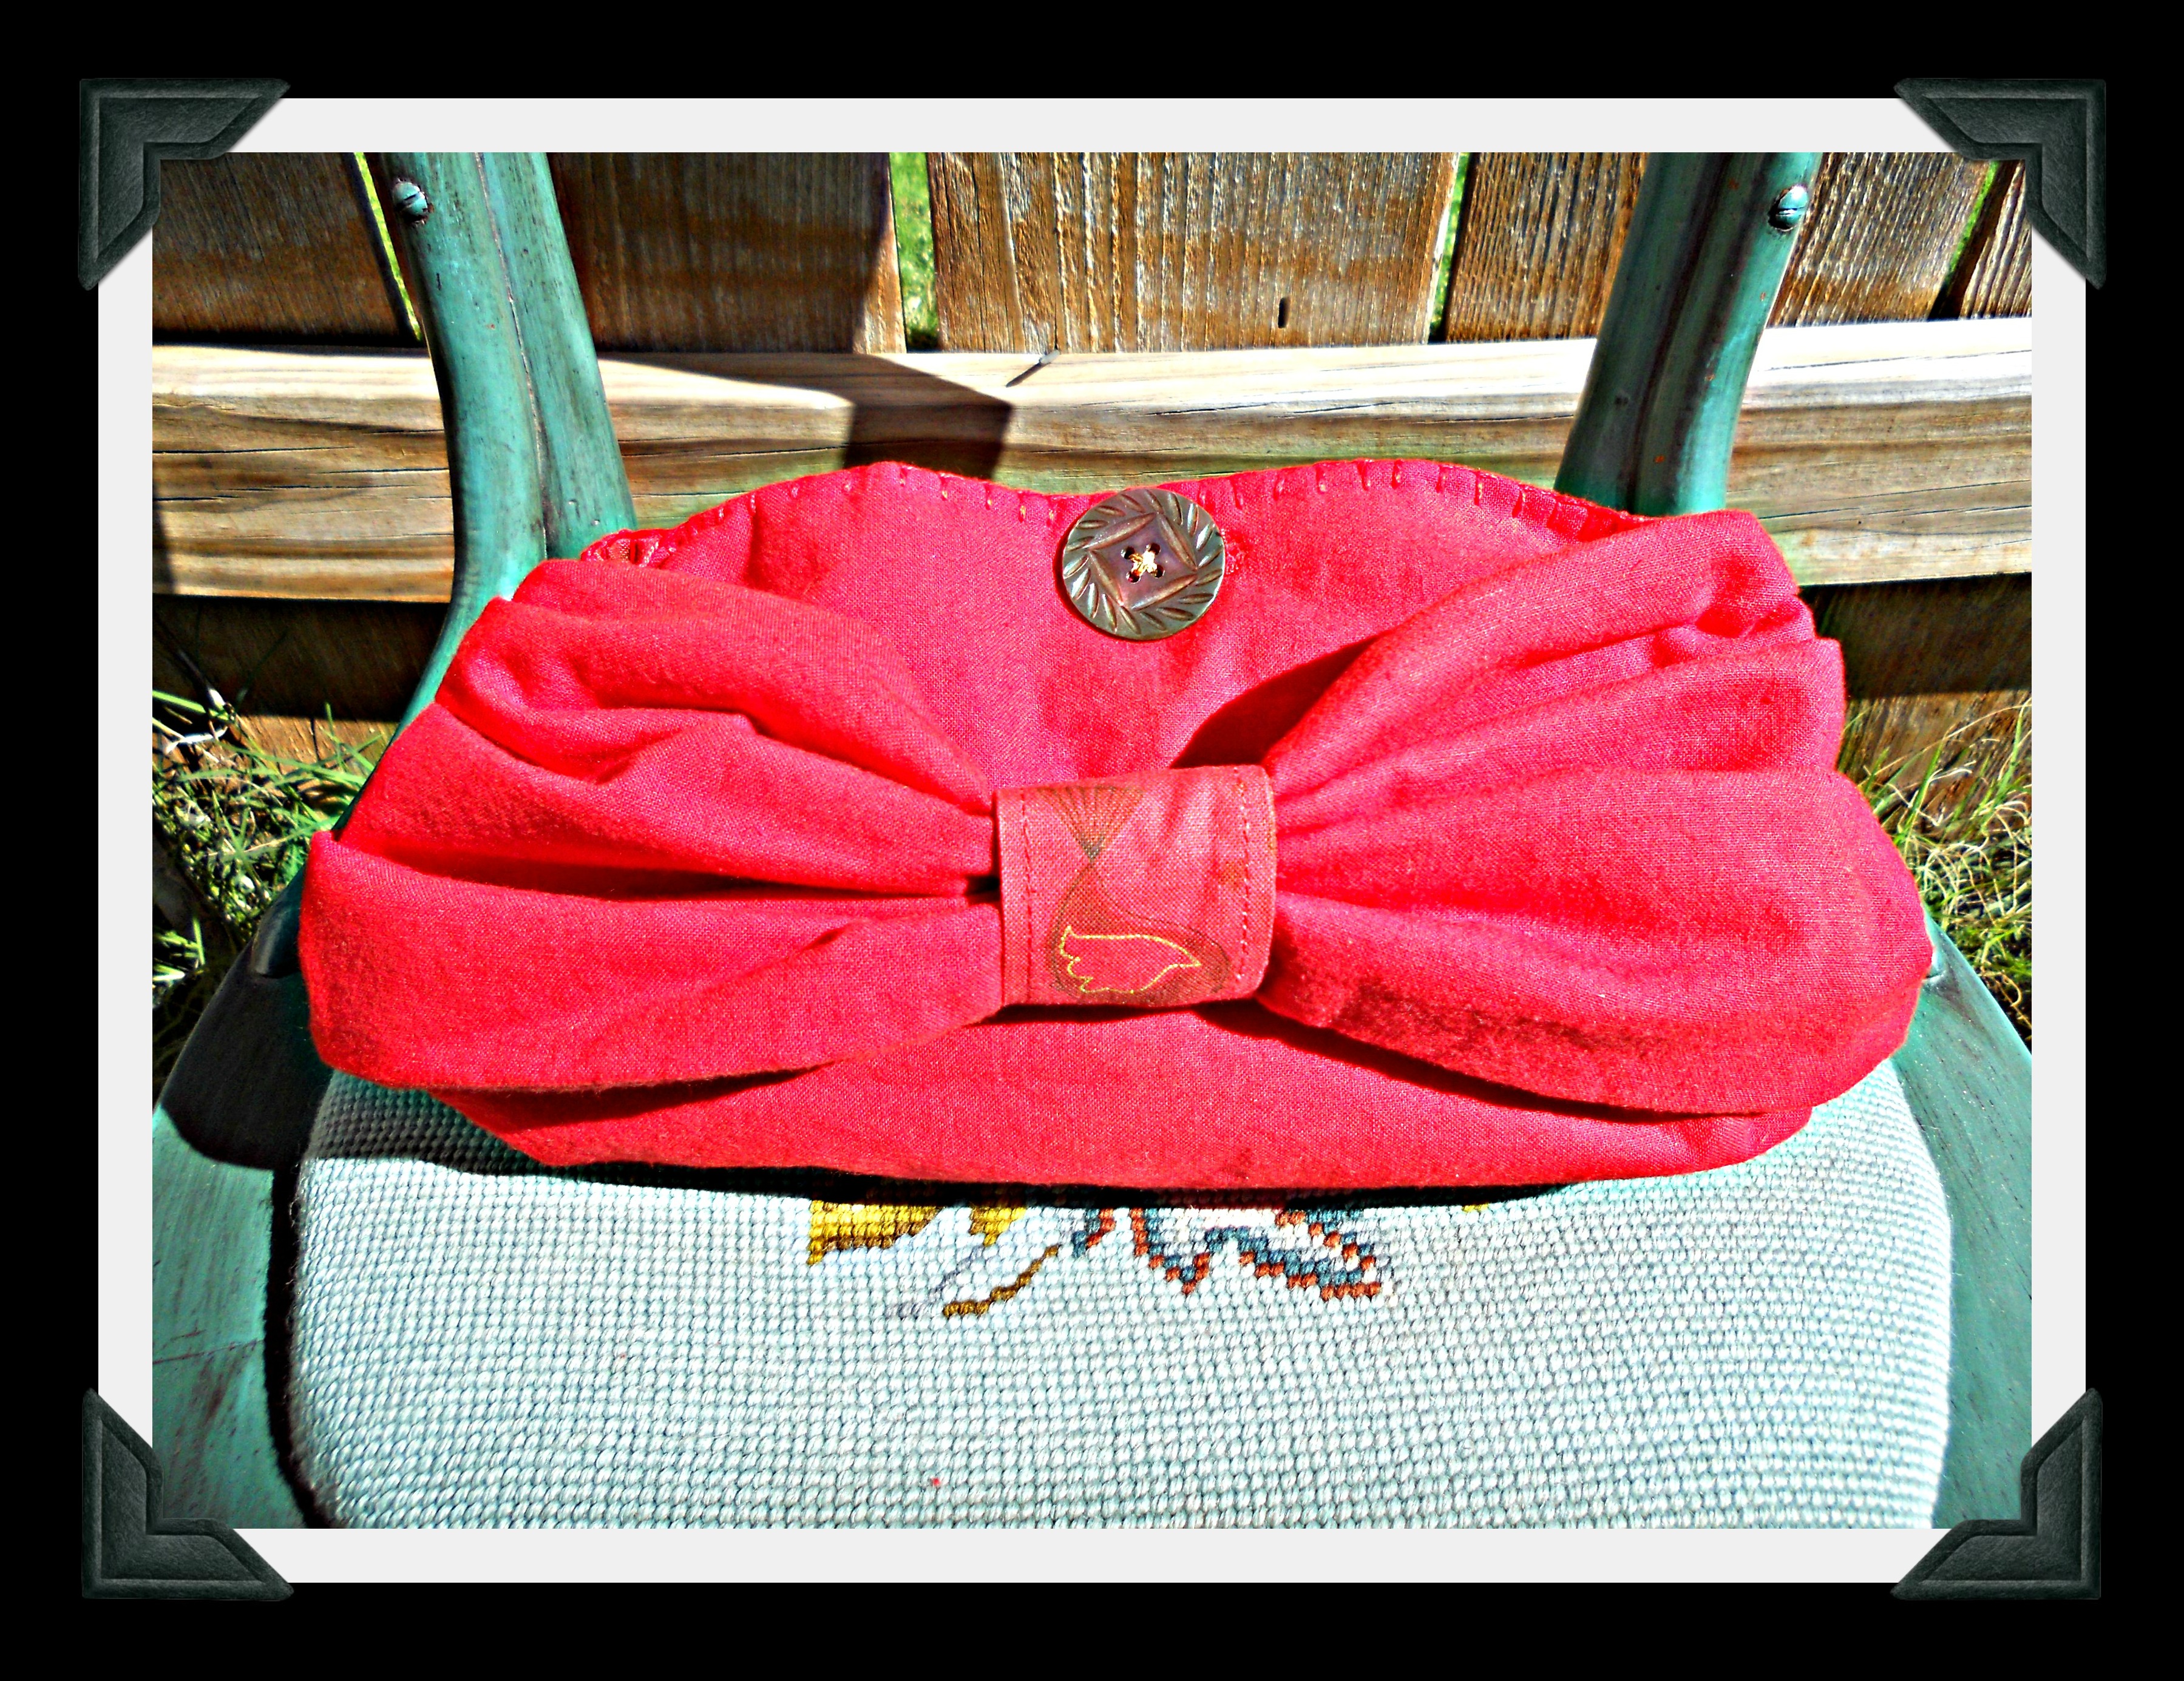
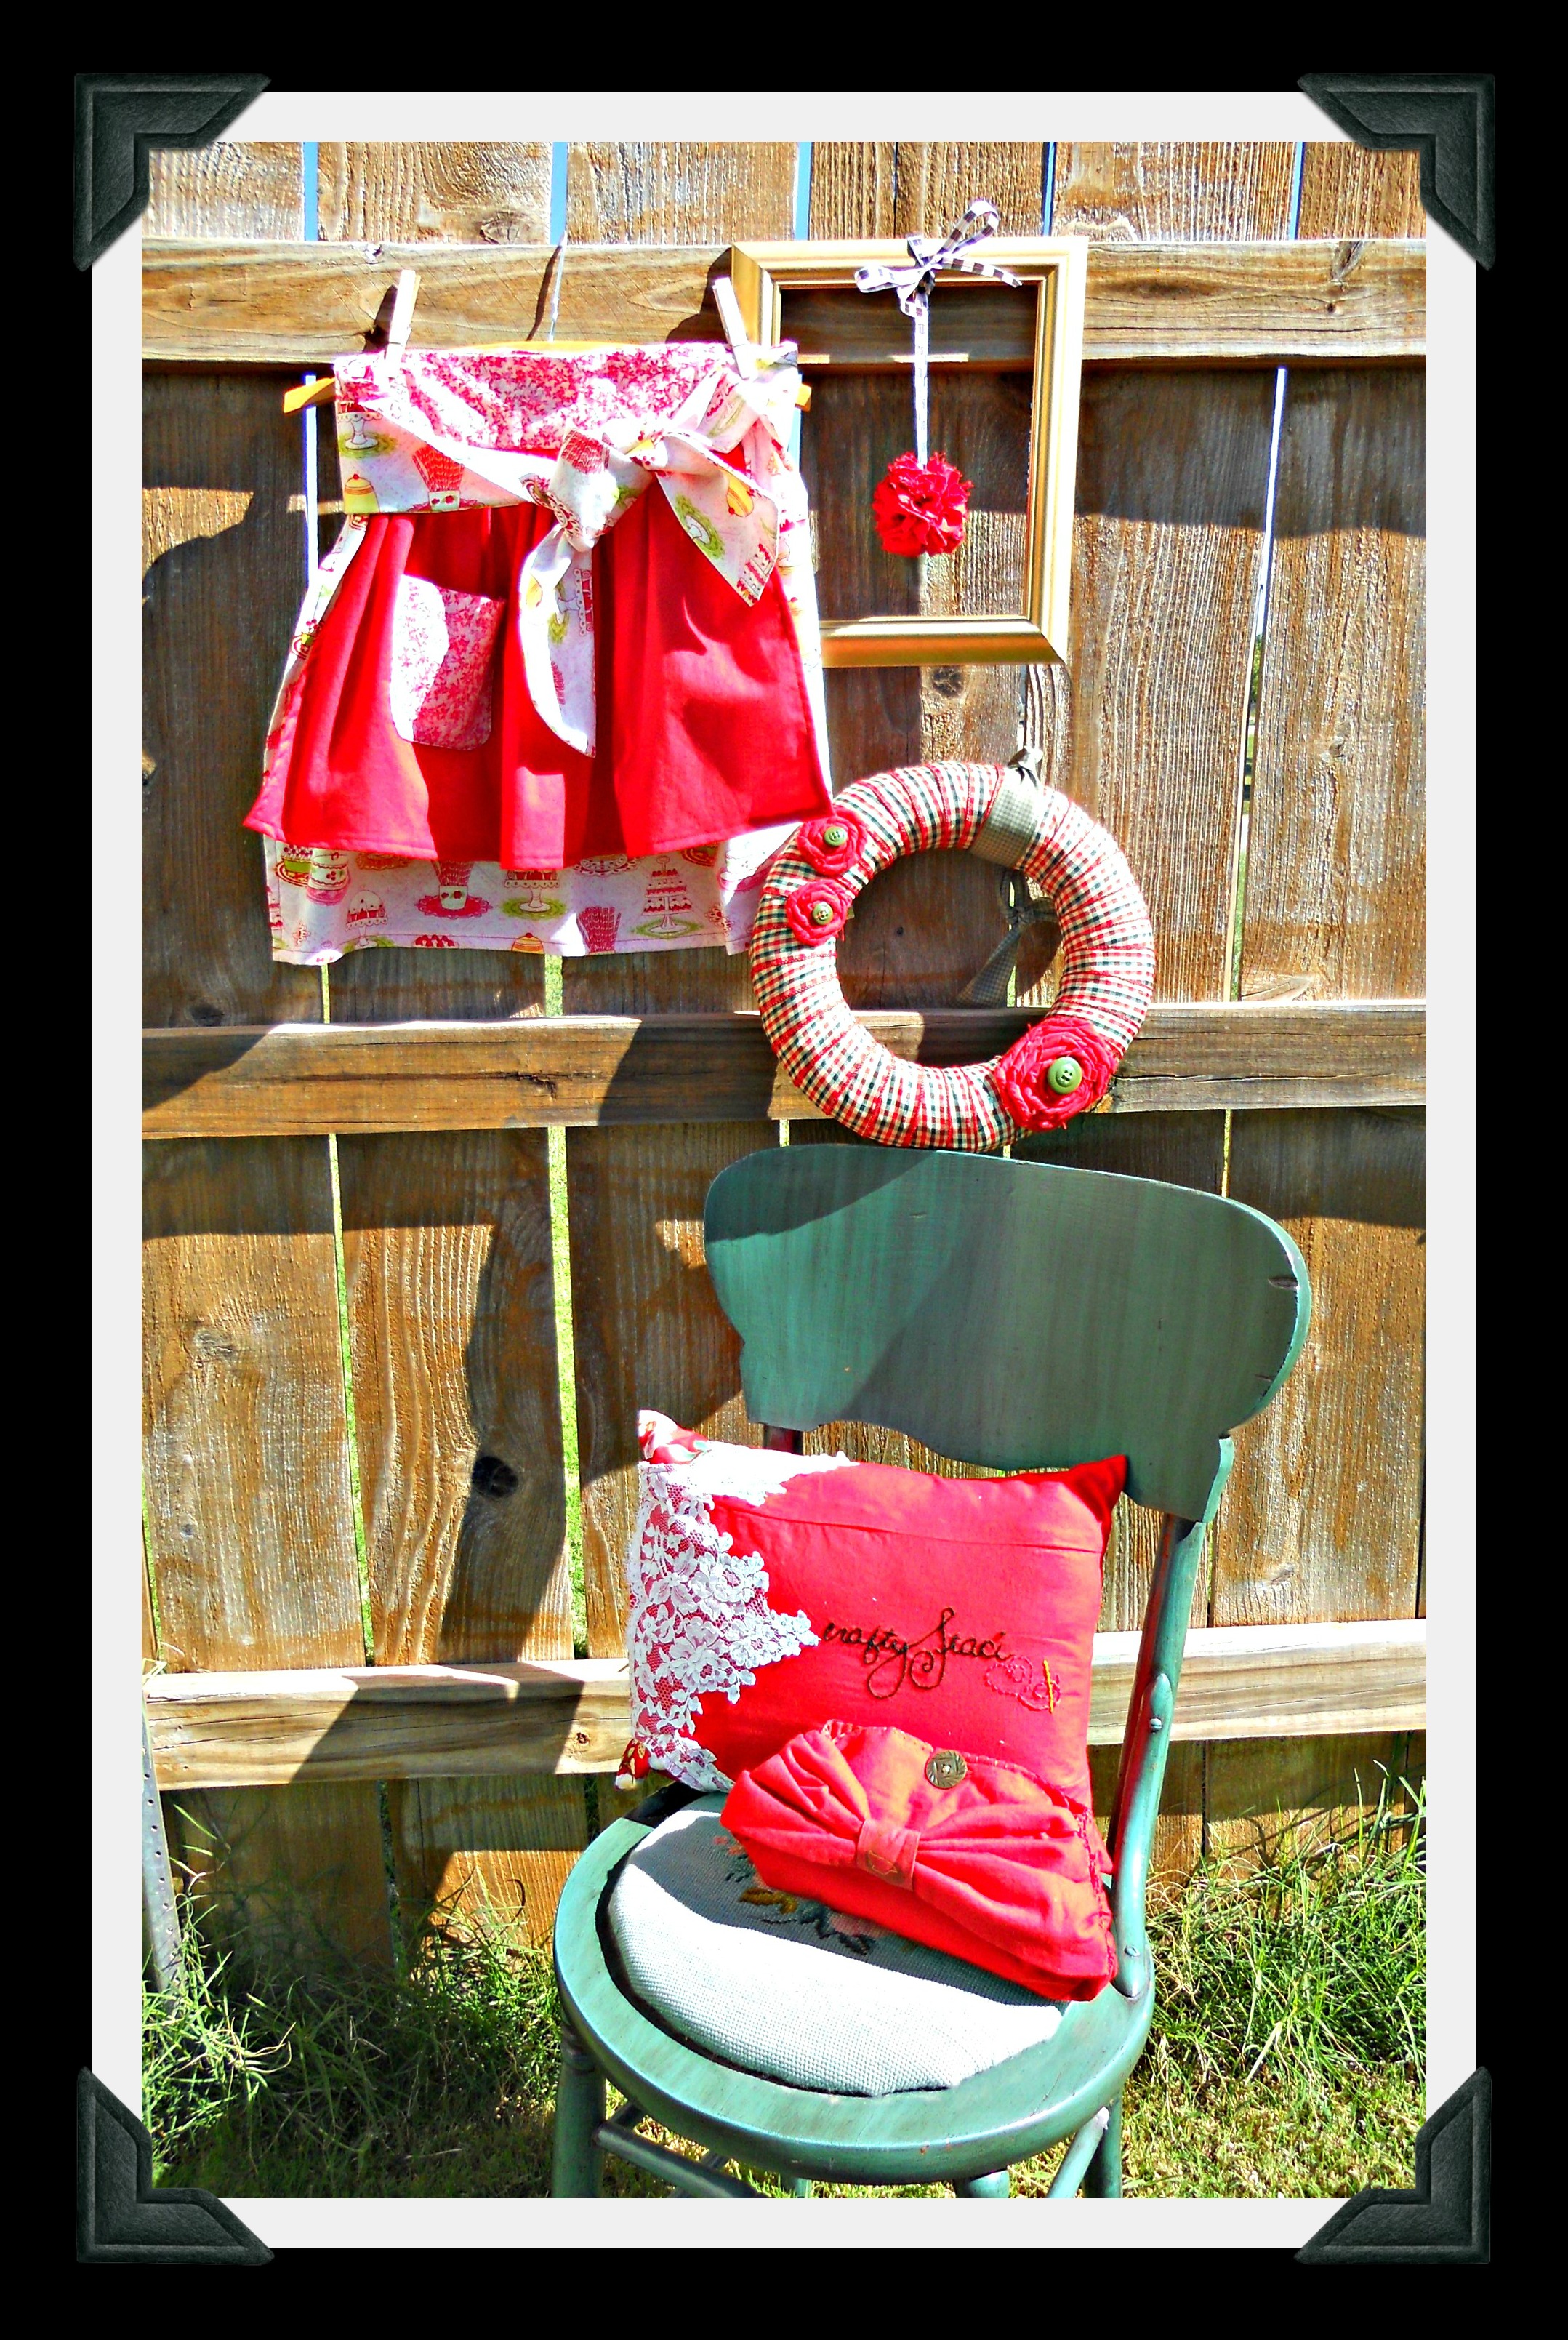
 For my two year blog anniversary, I invited you to nominate people you’ve met through the blogging world who you would like to have as next-door neighbors. It was SO heartwarming to read the lovely comments that came from around the world! The blogger with the most nominations was then invited to send me a once-loved garment to remake into some new treasures and return. This year’s winner was Staci of Crafty Staci, who decided to send her going-away dress from her wedding 22 years ago! She said, “It’s been stored under my bed ever since. I’d love to have it made into some things I could actually have out to enjoy, and red is still my favorite color, so that’s what I’ll be shipping to you.” I was so excited, and when this exquisite handmade dress arrived, my mind started spinning! So . . .today is the reveal! Here we go!
(1) I always like to start with a pillow, and the bodice of this dress was the perfect size to make a pillow cover for a 12 x 16 cushion. After detaching it from the skirt and shoulder straps and removing the boning, I traced and embroidered the logo from Staci’s blog and Etsy shop. Next, I put the pillow inside and nipped and tucked and pinned until I had a perfect fit, then took in the seams and stitched across the bottom. (The zipper is still in the back, just shortened a bit.) To fill in the armholes at the top, I made a lining with a coordinating floral fabric that could peek out at the corners, checked the fit again, pinned, then stitched the top closed. Then all I had to do was trim the seams, turn, press, and zip the pillow inside. I love that I got to showcase the lovely lace on both the front and back of the pillow!

(2) Next, I wanted to use part of the still-gathered skirt to make something to wear and decided on an apron! I found my inspiration on page 40 of my A is for Apron book by Nathalie Mornu which had a short skirt over a longer one. I used pieces from several different apron patterns along with some of my own ideas and two fun fabrics from my stash, and it came together perfectly. Here it is blowing in the wind on photo shoot day!

(3) When I saw the size and shape of the shoulder straps, I immediately thought of a bow clutch–one strap for the bag and one for the bow. However, this project turned out to be a little more challenging! I opened up one of the straps for the bag, made a lining from a coordinating fabric in my stash, and attempted to put in a zipper. Since the bottom was already closed up, that was a total fail! So I carefully removed the crooked zipper and simply blanket stitched the top and lining together, then added a button hole and vintage button for the closure. Next, I opened up the side seams and handstitched the other shoulder strap in on both sides, being careful not to catch the lining since I probably should have done this step first! (Since both pieces are padded, the seam was too thick for my machine.) Finally, I used another strip of the lining fabric to cinch the middle of the outer piece to form the bow. So . . . it’s not as perfect as I had envisioned . . . but maybe it will be cute for an evening event where the lights are low??? ♥
(4) The next step was to trim the hem from the skirt. With it, I made three of those fun “twist, coil, and stitch” flowers. I had a straw wreath and some red and green ribbon in my craft stash, so I wrapped the wreath, added green vintage buttons to the flowers, stitched the flowers onto the wreath, and added a coordinating green ribbon for hanging.

(5) Last but not least, I decided to make something kind of artsy and festive with a remaining piece of skirt fabric. I cut it into one-inch strips and made a pom-pom, then I hung it from ribbon on a gold wooden frame from my stash. I hope it will inspire the idea of “celebrating the everyday” as Staci lives her very creative life with her loved family and friends.

Thank you for being our good neighbor, dear Staci . . . and your package is in the mail! ♥
A year or so ago I had fun making some vintage earring magnets but I’ve given them all away, so it was time for another batch. Simply use pliers to pull the hardware from a clip earring, then superglue a sturdy magnet on the back! Then I had a chance to go to a new-to-me antique store last week, and I found a vintage metal tray to use as a magnetic memo board . . . a perfect match! ♥
P.S. What are the memos, you ask?

 Even though Kansas is still REALLY hot, I couldn’t resist getting out my fall decor this weekend.
After I set up the mantel, Dave added a bouquet he picked from his wildflower garden.
Isn’t it just perfect?
Thank you, Dave! ♥

I wanted to make a special hostess gift for our granddaughter Katy’s other grandmother . . . a wonderful, fun-loving lady who hosted Katy’s first birthday party earlier this month. When I read this sweet post and tutorial by Kim of Craft•Create•Connect, I knew I’d found just the right one . . . a tiny bottle vase in which to display a little flower Katy lovingly picks or a pretty leaf or feather she finds. Simply find or purchase a glass bottle (this one was less than $2 at Michaels), attach one or more charms around the neck (I used raffia-covered wire), and you’re done! And how lucky was I to find this adorable little “K” charm??? Thank you for all you do for the family we both love, dear Lydia! ♥

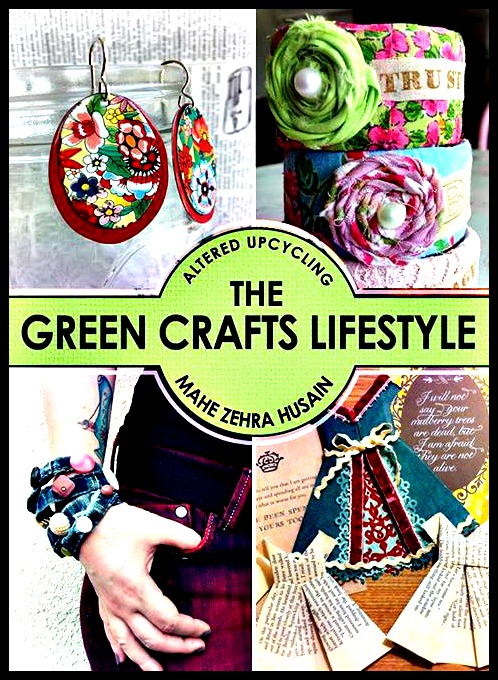 In June, I wrote in this post about our crafty upcycling friend Mahe (aka MZ) that included a call for submissions for her new upcycled craft book. The Green Crafts Lifestyle is now out, and it’s amazing! It includes sections on paper, plastic, wood, metal, and fabric and has projects from 20 artists around the world, including four of my bloggy friends:
Along with 35 projects detailed on nearly 200 pages of photographs and step-by-step directions, you’ll find author bios and photos with links to their blogs, websites, and other online contacts.
Now for the promotion! To provide all crafters with a chance to learn from these techniques, Mahe’s Altered Upcycling business will provide unlimited FREE Kindle copies of The Green Crafts Lifestyle this Friday, August 16 through Sunday, August 18! Kindle doesn’t restrict you to its device; you can read the book on any PC machine or tablet with the free Kindle App. Simply click HERE for your free copy.
AND . . . drum roll . . . MZ is looking for MORE submissions from MORE of you! In her words: “We need talented artists, crafters, and upcyclists to provide projects and tutorials based on upcycling and green crafting. Altered Upcycling will take submissions for Part 2 of “The Green Crafts Lifestyle” series, and the project submission deadline is August 31, 2013. Please make sure you send tutorials that upcycle wood, plastic, paper, glass, or fabric. The tutorials must be in MS Word format with the pictures embedded in the doc file. I will also need a photo of you as well as an artist bio and links to your blogs, Etsy shops, etc. Please email tutorials to thecraftycan@gmail.com. Let’s save the world one craft project at a time!”
Thank you, Mahe! ♥ P.S. If you haven’t entered my “Catch-up Giveaway,” please click HERE!
Since I donated last year’s 4th of July pillows (here and here and here) to a charity auction, I whipped up a new one over the weekend using a remnant from the last Wonder Woman apron and some ric-rac and embroidery floss from my stash. I love how the red pops on the bright blue and silver fabric! The finished pillow is 11 inches tall and 20 inches wide. To all my U.S. bloggy pals . . . have a safe and fun holiday with your family and friends! ♥


 The main occasion for our big family gathering over Father’s Day weekend is my husband Dave’s *milestone* birthday. Since Dave has been a teacher, principal, and Superintendent of Schools throughout his career, we’re using a school theme for the party.
The Book Page Banner designed by Lauren of The Thinking Closet (one of the sweetest, most talented bloggers I know!) sparked the idea of using bunting shapes and book-page letters for the birthday banner. My version included:
It was easy and fun and will be a perfect complement to our other decorations. And, if you haven’t checked out Lauren’s amazing banner (complete with detailed tips, a C.S. Lewis quote, a free cut file for your Silhouette, and POM-POMS!!!), then click HERE right now! And follow her blog and FB page, too! Thank you for the inspiration, Lauren! ♥
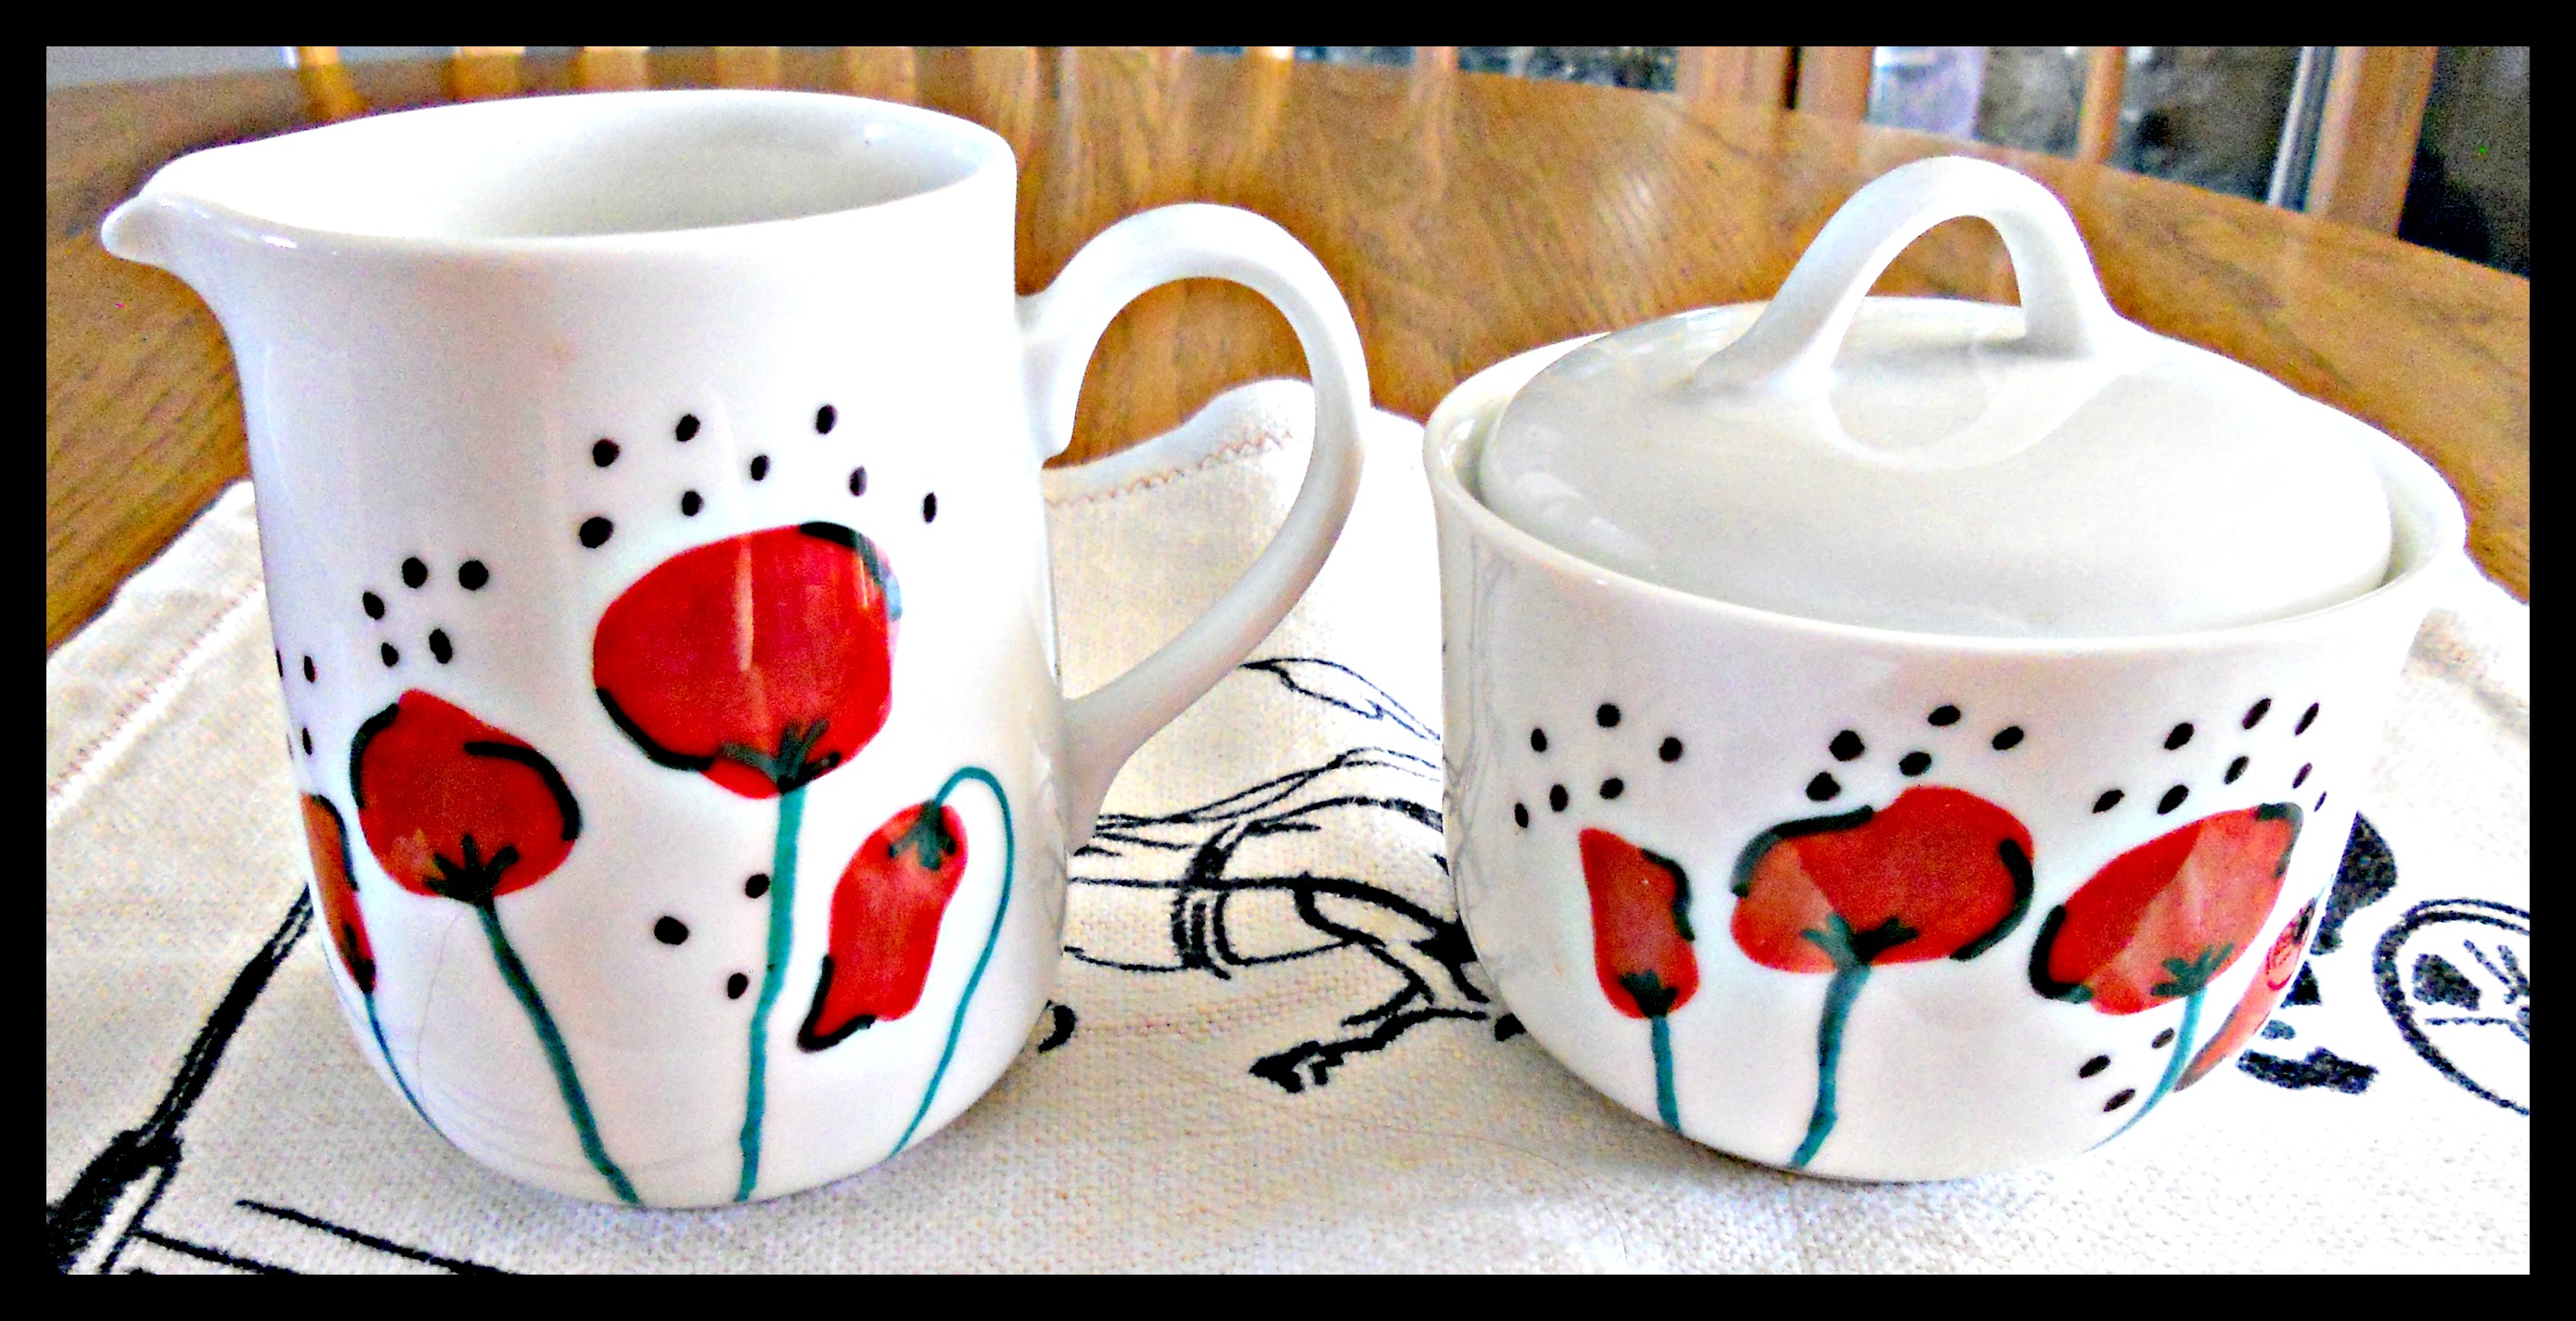
Do you ever squeal with delight when you see a blog post? Of course you do! 🙂 That’s what happened when I saw the DIY Poppy Teapot from the lovely Natalie of La gang à Nat. Seriously, go look at it now right HERE. Isn’t it gorgeous??? And all I could think of was that I had a plain white sugar bowl and creamer that I’ve used for YEARS, and wouldn’t they look LOVELY with Natalie’s poppy a-la-mode? So I emailed her to make sure I could copy her design and post it here, and she said YES! (She’s VERY nice!) The only difference is that I used Sharpies since I already had them on hand and then baked the items in the oven at 350 degrees for 30 minutes to set the color. I just LOVE them . . . thank you, dear Natalie! ♥

 When our whole family gathers in over Father’s Day weekend, I want to have some fun crafts that work for *kids* from pre- schoolers to 80+. My latest idea is a decoration that everyone helps create—T-shirt garland! To keep everything handy, I decided to make a kit with all the necessary materials. Then I can simply hang some baker’s twine across the windows and we can pin on our paper T-shirts as we “customize” them.
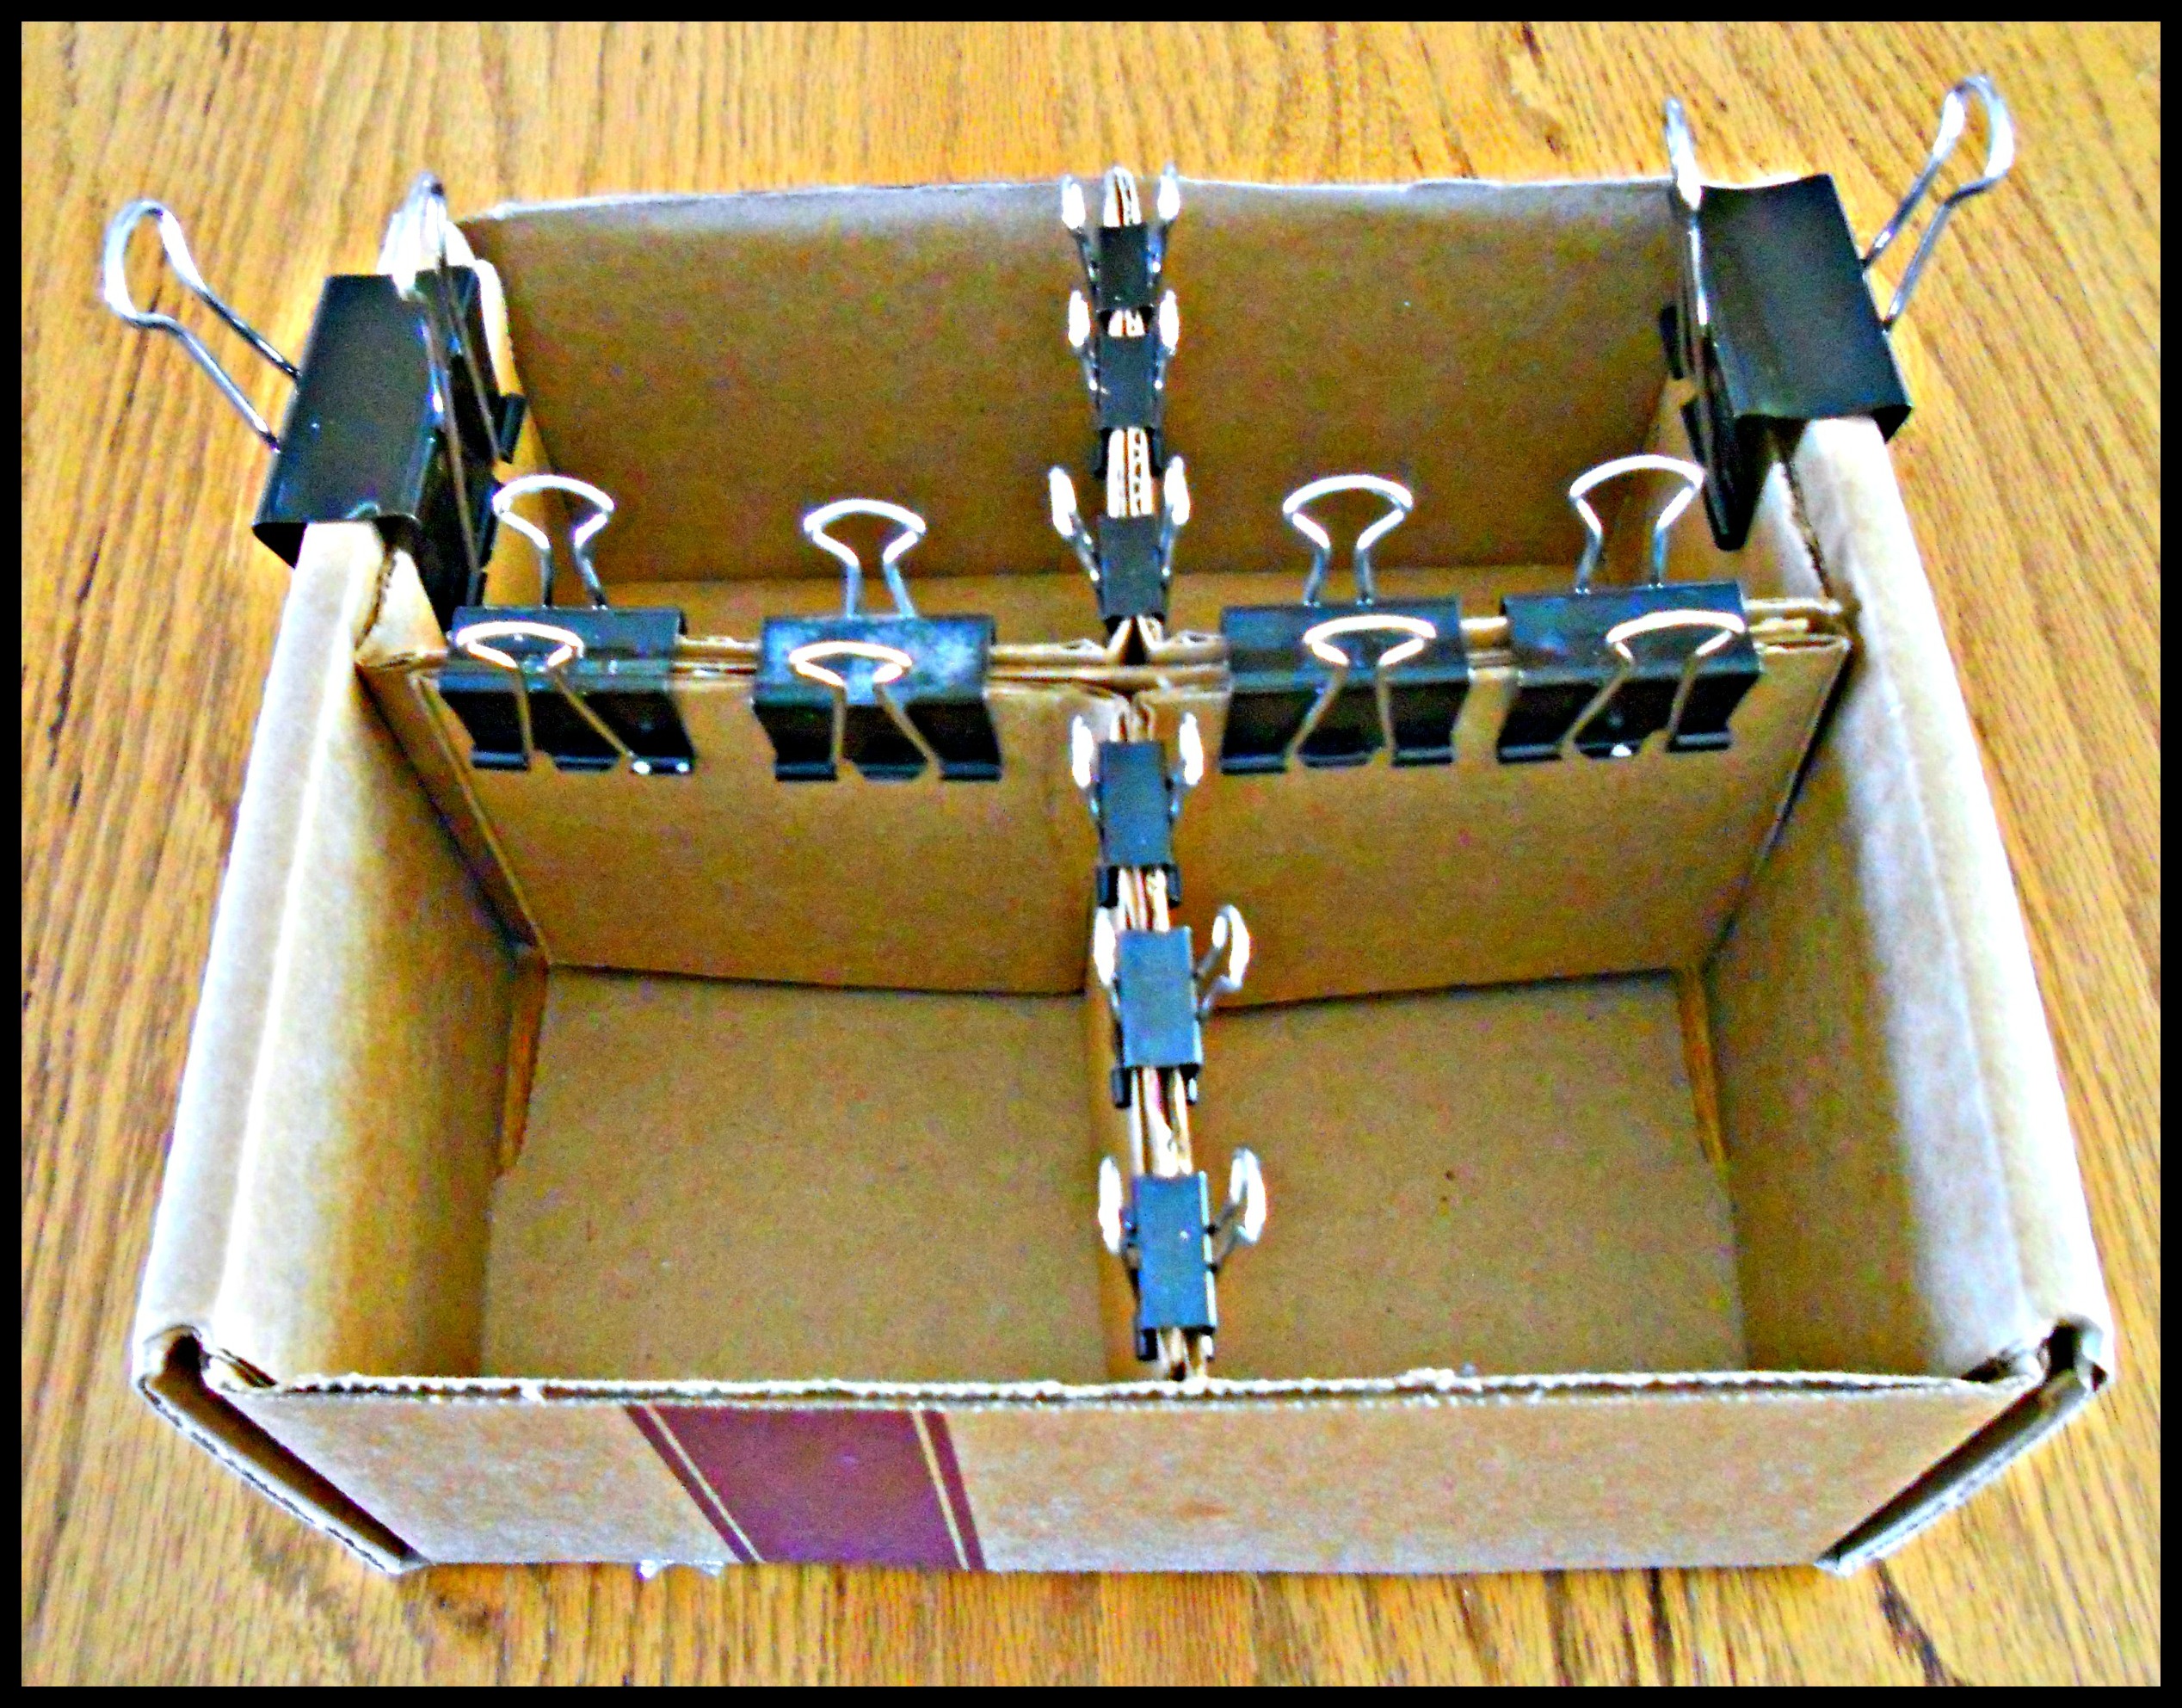 To make the kit, I first found an empty box that was just the right size. (This one once held a chocolate cake that came in an order one of our kids sent us from Omaha Steaks . . . yum!!!) I cut off the lid and then cut, folded, and glued the lid cardboard to divide the box into four compartments. Here it is with clips holding everything in place while it dried. When the inside was ready, I traced around the outsides and covered them with scrapbook paper, then made a simple word-processed label for the front using clip art and a text box.
 Next, I googled “printable t-shirt template” to find a pattern I like and watched a couple of movies while I traced and cut them out on light-colored paper. I also shopped for tiny clothespins and found these at Amazon.com. They’re REALLY tiny—about one inch long—but perfect for hanging paper items. I also found a small empty jar in the pantry to store them in since we’ll need to keep them safely away from the babies and toddlers. (I later glued three of the pins to the lid for a-la-mode.)
Finally, I added markers, crayons, and colored pencils for creating the T-shirt designs. Since I already had these and the paper on hand, my only expense was the clothespins—and they’re so cute I probably would have bought them anyway. 🙂 I’ll be sure to show you a photo of our garland after everyone is here! P.S. I think this would be a fun way to commemorate family activities over the summer, too . . . books the kids read, trips to the beach and zoo, special treats they get to eat, and that sort of thing. If only I’d thought of that when MY kids were little! ♥


 After seeing all the creative menu boards on Pinterest, I decided it would be fun to have one in our kitchen. However, I needed a tall, narrow version to fit the best spot for it, so I decided to go with a pin-up board. I made it out of cardboard, quilt batting, and fabric like the memo boards here, here, here, and here. The adorable fabric is left over from my “Mix Things Up Apron” and purchased from Laura at LC’s Cottage. (Click here for a post with links to her lovely shop!) Then I found a bit of khaki-colored knit from my polo shirt upcycle and embroidered the word “Menus” to affix to the top, finishing it off with a small length of ric-rac trim. Since I had everything on hand, the cost was $0 . . . my kind of project! 🙂 And the two recipes are perfect complements to your favorite enchiladas! The “Corn Bake” has been in my husband’s family for a long time, and the dip is from a magazine ad. I’ll write an easier-to-read copy below! ♥
Salsa and Sour Cream Dip
Combine all ingredients; mix well, and chill. Serve with tortilla chips.

 How cute is this pillow??? I won it in Jill’s giveaway at Nice Piece of Work and it *flew* all the way from South Africa to Kansas, USA! I just love the colors and the touches of crochet, and I even found this beautiful crocheted heart tucked in its wing! Jill has more owl cushion covers (including one just like mine!) in her Jam Tarts SA Etsy shop, as well as several other cushions, crocheted slippers, a gorgeous needlepoint vest (aka waistcoat), and some fun embroidery kits. Please give her store a visit from this post or anytime from my Shop Love! page above. Thank you, Jill!
P.S. My owl cushion will look PERFECT in the guest room with my David Bromstad Owl Print! I just checked, and the free printable version is still available here. (Scroll down to the bottom of the page to the word “click” to get the pdf.)

I love PEEPS . . . even though they make most of the rest of my family go “Ewwwwwwwww . . . !” But who could resist some adorable PEEPS garland? It’s super easy, and as I made it, I realized I had lots of choices. So here’s a chart! Simply pick one thing from each column (which you probably already have around the house!), and soon you’ll have your finished garland hanging among your other spring decor. Here is mine with felt, fabric paint, ric-rac, and machine stitching. (Click on the photo for a close-up.) Oh, and you can find lots of free templates for the bunny shape on Google images. Have fun! ♥
| PEEPS Bunny |
Eyes and Nose | Garland | Attachment Method |
|
|
|
|
When I meet my amazing daughters-in-law or gal pals for coffee or lunch, I love to take them a little handmade gift. My newest craze is these little spring bunnies made from fabric scraps! You can find the pattern and tutorial from Angie on The Little Fabric Blog. Thank you, Angie! P.S. The lovely tulips are a gift from our recent houseguest and friend, Nancy. The table mat is here, and the photo star on the wall is here. ♥

 March 2 is Dr. Seuss’s birthday! When I taught first grade, we always celebrated by wearing Dr. Seuss T-shirts, cooking green eggs and ham in the classroom, and reading all the kids’ favorite DS books. But now that I’ve moved on to a different career, I decided to use this well-loved T-shirt for my next “What can you make with a . . .” refashion.


 I got this bright red, gently-used sweater along with a couple of other items for free at a consignment store with a Groupon gift certificate! It was too wide and too short and stretched out here and there, so I immediately knew it was going to become my next What can you make with a . . . project.
First, I made the heart mini-pillows I shared in this post. Then I made the big sweater pillow I shared in this post. After that, I made a business card/gift card/credit card/reward card case with floral pockets and a vintage earring button closure (click here for a great tutorial from The Crafty Cupboard) and three flower brooches with vintage earring centers. The neck and hem ribbing I hadn’t used up as ruffles on the big pillow will be package wraps (picture a small box wrapped in kraft paper with these pretty red buttoned bands stretched around them). Finally, I cut all the little bits into triangles and made bunting by stitching them onto the fun button-design ribbon I recently bought from Lizzie Rose Jewelry.
Another fun haul! ♥

I recently received a bag of vintage sweaters for pillow making, and I just fell in love with this fun print. I used everything from the armholes down, leaving the zipper in the middle for a-la-mode, stitched, and stuffed. It still has the side-seam pockets, too! I think I’ll give it as a birthday or Christmas present and tuck a gift card in the pocket. Then the recipient can use the pockets for . . . hmmm . . . the TV remote? Earphones? Tissues for a sad movie? Or . . . M&M’s??? (OK, I’m still thinking about chocolate after that last post!) ♥

 Remember the little hearts I sewed on my recent travels—upcycled from a sleeve of a cozy old red sweater?
I used two of them for little-girl barrettes with pink button a-la-mode and all but four for my heart-to-heart garland.
Then I looked at the sweater again and decided that the body had to become a BIG red Valentine pillow, like this:
It’s the softest pillow ever! ♥
P.S. The drawing in my office is a print of I’m Into Art by Elizabeth “Grandma” Layton of Wellsville, Kansas. You can read a biographical sketch of Mrs. Layton’s life and see close-ups of her drawings here. She’s one AMAZING lady!
 Last week I had a work-related training meeting in NYC. By the time I came home to Kansas I’d been in four planes, one train, and numerous cars and cabs, including a four-hour airport layover. Luckily, I’d brought along a project that hardly took up any space in my bag . . . hand-stitching little hearts made from the sleeve of an old red sweater. (If you predict a What Can You Make With A . . .? post coming up, you’re right!) I cut the shapes at home using a small cookie cutter for a template, then joined each pair together with a blanket stitch on my travels, leaving a small opening for stuffing and closing when I returned. What will I do with them? So far I’ve thought of:
Your ideas are welcome! ♥
 Today I’d like to introduce my blogging friend Linda of Country By Design. I checked out Linda’s Etsy Shop and ordered this beautiful handsewn gift card case . . . but she also sent me a matching quilted bookmark! How sweet is that??? Linda also has quilted table runners, place mats, pencil cases, cosmetic bags, pouches, tea wallets, and other fabulous fabric items.
Click here for Linda’s blog.
Click here for Linda’s Etsy shop.
Or, find them anytime on my Shop Love! page above.
Thank you, Linda! ♥
 Do your New Year’s resolutions include using more of what you already have in your crafting, gift-making, and home decor? Then you’ll want to meet Mahe at The Altered Upcycling Blog and Altered Upcycling. Mahe explains that she has a Master’s degree in Operations Research, works at a software house, and is an avid altered artist who is constantly looking for ways to make the world greener one small craft project at a time. And, if you sign up on her blog or web site, you’ll receive her FREE pdf book called The Ultimate Guide to Upcycling for one-of-a-kind jewelry, cards, gift bags, wall art, and more. Mahe sends out free ideas and how-to videos in her email newsletter as well, such as how to make a beautiful card from a dinner napkin, old dictionary page, leftover ribbon, and glue! Mahe writes in a friendly, conversational style as if she’s sitting right beside you, includes what worked and DIDN’T work for her, and supports her ideas with step-by-step directions, photographs, and alternatives. You can get your copy by clicking on the link in this post or any time from my Shop Love! page above. Thank you, Mahe! ♥
I can never take down ALL the Christmas decorations on December 31, can you? Instead, I like to “tweak” some of them for the winter. Here are some of this year’s gentle changes:
(1) Keep the giant winter wreath and snowflake garland, but trade the nativity on the mantel for family photos.
(2) Keep the Christmas cards nearby to enjoy again and again, but add a free New Year’s printable in a frame.
(3) Put a fun snowman on top of the kitchen cabinet by the antique milk bottles.
(4) Change out Santa for a snowman in the fabric forest and add a “Baby It’s Cold Outside” free printable in a frame.
(5) Get out the softest, squishiest, coziest sweater pillow I’ve ever made for winter napping. ♥


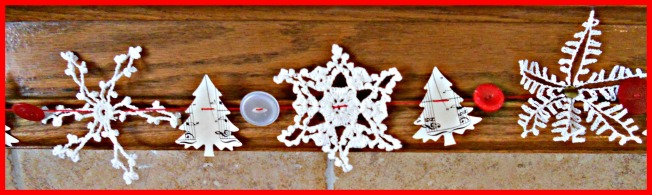
Garland:
Crocheted snowflakes: My Grandma Leona
Music Christmas Trees: TheHighNoteDotNet
Inspiration: Winter Owls

I have the sweetest friends! One of them gave me a stack of Christmas remnants this fall. I used them for my mini-pillow ornaments and decided to make a “fabric forest” from some of the other bits. I was inspired by the cute design I saw on the cover of my Fa la la la Felt book by Kathy Sheldon, but I wanted to use cotton fabric instead of felt and make all different sizes, so I came up with my own tutorial. It would also be pretty to use solid color fabrics and make them look like decorated Christmas trees with buttons, sequins, rick-rack, and other a-la-mode. I think I’ll leave my forest up through the winter, switching out their Santa companion for a snowman. Each tree takes about 15 minutes. Ready? Let’s go! ♥
 |
For the tree, find a corner of the fabric. Measure and mark the same length straight down, straight across, and at several points in the curve between, then cut along your marks. For the base, divide the length you used by .25. This measurement will be the radius of the circle. Mark a dot on the fabric. Measure and mark the radius all the way around, then cut along your marks. Example: This tree measurement is 9 inches, so the base radius measurement is 2.25 inches. |
 |
Fold the tree piece right sides together and pin along the straight edge . . . |
 |
and then sew the edge with a ¼ or 3/8 inch seam. |
 |
Turn the tree right side out. |
 |
Open the seam at the bottom and pin on the base, right sides together. Only use one pin . . . your fingers will do the rest! |
 |
Sew the tree and base together from the tree side using a 3/8 inch seam. Feed the fabric through a bit at a time, using your fingers to make tiny gathers in the tree to help it fit the curve of the base. It sounds hard, but it’s really not! |
 |
Keep going . . . |
 |
until you’re a couple of inches away from where you started. |
 |
Turn the base right side out. |
 |
Put stuffing through the opening. If needed, use a chopstick to poke the stuffing to the top. NOTE: Don’t overstuff, as that will give the tree a rounded base and it won’t stand up straight. |
 |
Pin the opening and hand-stitch it shut. |
 |
You’re done with that one! To make a little forest, simply repeat with different fabrics and sizes. Enjoy! |
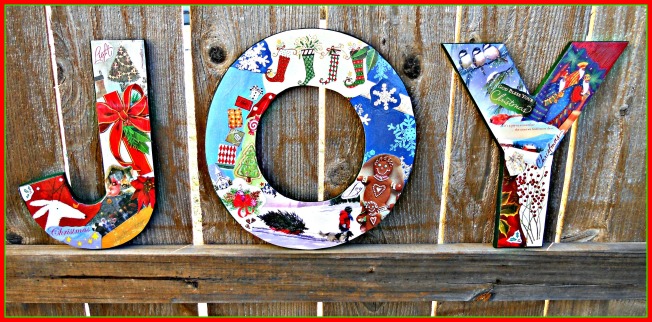
Welcome to the “JOYFUL” edition of Collectively Creative, hosted by Kelly of Cobwebs, Cupcakes & Crayons! My project is easy and fun . . . similar to the Instagram collage letters I made this summer. . . . and I love how it turned out!
(1) Purchase some wooden letters at a craft store. Mine are 12 inches tall and were on sale for around $2 each.
(2) Optional: Paint the letters and let them thoroughly dry. I spray painted these with the green paint left over from my antique milk bottle project.
(3) Get out Christmas cards you received and saved from last year and cut out pictures and words to fit the shapes of the letters, overlapping them as in a collage. Attach these bits with Mod Podge. Or, if you don’t have cards available, use images and words from holiday magazines.
(4) When each surface is covered to your satisfaction, coat the entire letter with Mod Podge and let it thoroughly dry.
(5) Display your letters on a shelf or drill small holes or attach hanging hardware to the backs and hang them on the wall. Mine are now over the stairs along with my peppermint wreath where they’ll greet our Christmas Day guests at the front door. ♥
P.S. Before I link to our other Collectively Creative posts, I’d like to give a shout out to some other amazing bloggers who have shared their J-O-Y this season. Thank you to ALL of you for your inspiration!
Made in a Day (and here!)
![]() COLLECTIVELY CREATIVE:
COLLECTIVELY CREATIVE:
 One of my VERY favorite bloggers is Liz from a A Ponytail Kind of Day. Every time I saw one of her unique creations, I’d think, “I sure wish she had a shop!” Well, now she does! It’s the Sincerely Liz Boutique, where you’ll find all kinds of beautiful handmade items for your home. Since I was looking for gifts for specific people, I ordered these fabric hangers, a set of rag coasters, and this way-cool bowl made from a Christmas record album. Then, friend that she is, Liz also put in this “Keep Calm and Sew On” framed art AND an AMAZING vintage dress and lace overlay that she bought for one dollar because she knew how much I’d have fun using it for a “What Can You Make With A . . .” project! What a sweetie! Please check out Liz’s boutique from this post or from my Shop Love! page above, and THANK YOU, Liz! ♥

Since my favorite set of paintings take up a large bit of wall space in our great room, I like to gift-wrap them in December to fit our Christmas decor. This year I used some sweet vintage Santa paper I received as a gift. Click here to see last year’s! ♥

 No, not for me . . . for a mini-Christmas tree! 🙂 I used this small tree in my classroom when I was an elementary teacher and decided to put it on a side table this year to showcase some of our homemade-by-family-and-friends ornaments. To make the skirt, I:
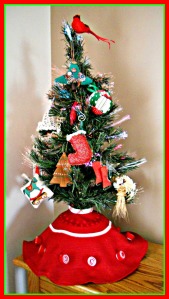 cut a 24-inch diameter circle from the thrifted red tablecloth I used for my argyle pillow and opened one side,
It was a “free” project for me since I already had all the materials and adds a festive touch to a favorite little spot in our living room. ♥ P.S. Three peppermints to go . . . one more project!
Yesterday I posted a tutorial for “Easy No-Sew Felt Peppermint Garland.” Here’s what I made with mine! We’ve had the grapevine wreath forever, and it was definitely due for refreshing, so I pulled off all the tired greenery and replaced it with my new garland. Other than tying the ends together at the top, I didn’t even have to stitch or glue anything as the branches themselves hold the garland in place. Now the wreath is hanging in my kitchen window topped with a little raffia. I love it! ♥ P.S. I have ten “peppermints” left over, so watch for one more post on them!


 I fell in love with this Christmas garland, adapted from an idea in Fa la la la Felt by Kathy Sheldon. Here are the steps:
(1) Cut red and white felt into strips. Mine are 1/2 inch x 8 inches.
(2) Lay a white strip over a red strip, then pull the white strip down about an inch. Begin rolling upward at the end you pulled down. This will give the “candy” a solid white center and a red outer layer.
(3) After the piece is rolled, put a pin through it to hold everything in place until you string the candies.
(4) Using a sturdy needle and extra-strength thread, poke the needle through the loose end of a candy, go through the middle of the candy and out the middle of the opposite side, and remove the pin. Pull the candies close together to keep the rolls tight.
(5) Hang your garland on the mantel, in a doorway or window, or on a Christmas tree or wreath! ♥

In late summer I started on my Christmas mini-pillow ornaments, and I finally decided to stop . . . for this year! (They’re addictive!) All they take are little bits of fabric and ribbon, plus buttons, bells, lace, and embroidery . . . oh, and your imagination! P.S. Please check out these links for some more ornaments to try! ♥

 Awhile back I posted the hot air balloon mobile kit I won in the Craft Schmaft blog giveaway. I finally had a block of time to put it together . . . it was SO much fun! And now that I have the pattern, I can cut out my own fabric and make as many as I like! THANK YOU, Craft Schmaft! ♥

 Awhile back I wrote a post about my blogging friend Laura of As Time Goes . . . Buy and how she inspired me to do the Good Neighbor Award project and refashion for my one year blog anniversary. Laura has been traveling, and I’ve been sewing, but she’s home, and I’m finished . . . so today is the reveal! Laura, your coat is now on my “What Can You Make With A . . .” page, and your package is in the mail! I was able to make:


 I was so excited to see some milk bottle carriers on RE: RETRO, because my dad had just given me the set above . . . that my grandparents actually USED!
The glass bottles needed some vinegar and hot soapy water, and the metal carrier needed a good sanding and coat of spray paint, but here it is!
I had some eucalyptus branches left over from my tote bag wall hanging project, so adding those in makes the perfect autumn accent for the top of the kitchen cabinets.
THANKS, DAD!
P.S. My husband Dave hung the carrier in a tree to spray it. It worked perfectly and looks lovely. Thank you to you, too, Dave! ♥

I met my super-crafty, super-sweet, and super-pretty daughter-in-law Shannon for coffee, and look what she made for me! Tiny easels with paint and ribbon a-la-mode and tiny art canvases with paint and paper decoupage (and tiny spools for Frankenstein!) for my Halloween decor! I LOVE them! THANK YOU, Shannon! ♥ P.S. Click here to see an example of Shannon’s mixed media “She Art.”


Welcome to the Pillows A-La-Mode contribution to Collectively Creative! For my project, I made two pillows (what a surprise, right? 🙂 ) for some Halloween-lovin’ sweeties I know. ♥
(1) The large pillow has a jack-o-lantern print on the “Trick . . .” side (a gift from a friend!) and *sparkly* cupcake and candy print from Jo-Ann on the “or treat!” side. The letters are orange felt handstitched with black embroidery floss.
(2) The small pillow has the cupcake/candy print on the front and “BOO” fabric (also a gift from a friend) on the back. For a-la-mode, I marked the center of the front and back (after stitching and stuffing), double-threaded a L-O-N-G needle with orange floss, stacked three buttons, went down through the left buttonholes to the back and up through the right buttonholes, pulled the floss tight to create a valley, and tied. (Click on photo for a larger view).
Oh, and before I go on . . . you MUST click here and here for two more fab Halloween pillows from Punky Purls and here for a fun burlap version from House of 34. I love them all!
![]() NOW . . . DRUM ROLL . . . here are EIGHT . . . yes EIGHT!!! . . . more Collectively Creative posts with amazing Halloween tricks n’ treats for you to try. Please take a moment to visit each one . . . you’ll be glad you did! ♥
NOW . . . DRUM ROLL . . . here are EIGHT . . . yes EIGHT!!! . . . more Collectively Creative posts with amazing Halloween tricks n’ treats for you to try. Please take a moment to visit each one . . . you’ll be glad you did! ♥
 Here are the pillows I’m ready to pack up for the silent auction at the PumpkinFest at my church. All the proceeds will go to the youth groups’ summer mission trips, so I hope lots of pillow lovers come! ♥

 Recently I’ve been pondering an intriguing quote I read on Bows, Baubles, and Beliefs, so I decided to make something with it! I cut the letters for the saying in not-perfect rectangles from a remnant of black and white alphabet print I’ve used for a few pillows and glued them onto the squares of some gingham a friend gave me–a bit of “randomness on order.” I ran into a little glitch when I discovered that the fabric has no r’s . . . but I took the quote’s advice to “use what you have” and turned some n’s into r’s with a black sharpie, so all is well. ♥ I finished the project the same way I made my fabric memo boards (here and here), by covering a piece of cardboard with quilt batting and then stretching the fabric over it and stitching it together at the back. Finally, I added my biggest black button for a-la-mode. Will it hang on my office wall? Or become a gift? Time will tell! ♥ P.S. THANK YOU to SownInPeace for helping me track down the author of this quote. The original version was “Do what you can, with what you have, where you are.” (Teddy Roosevelt)
All three of the leafy placemat tote bags I made last spring have finally found a niche. I shared the red one a few days ago—it’s hanging on the wall in the dining room filled with dried eucalyptus branches. The green one is now on the coat/umbrella rack by our front door filled with pretty scarves and gloves to grab on the way out. And the orange one . . . well, it’s the perfect autumn running-around tote . . . for now . . . ♥


My crafty friend Debbie gave me a fun gift. . . a sample of her new Halloween treat bag! Isn’t he cute??? Mine is filled with paper to use as a decoration, and he looks right at home beside my bowl of giant fabric candy corn! I’m going to try my best to make some for our trick-or-treaters this year. Thank you, Debbie! ♥ P.S. If you love owls, remember that you can get a free David Bromstad owl art print by following the link you’ll find here!


Thank you to all my blogging friends for the lovely mantel inspiration the past few weeks! Besides the bunting from my last post, I especially loved the concept of using books with seasonally-colored covers (Daisey Jayne) and mini pumpkins on candlesticks (Cobwebs, Cupcakes & Crayons). I also added some dried polished gourds, a painted wood “Count Your Blessings” knick-knack I found at a craft show, and my Scrabble tile pillows to emphasize the idea of snuggling in at home as the weather cools. Now. . . bring on the autumn houseguests! ♥


When I saw the gorgeous mantel designed by Mrs. Hines’ Class, I decided I MUST add some bunting to my autumn decor this year. I used up most of my fallish remnants making my fabric-tie wreath, but I DID have a reversible quilted placemat in just the right colors that hadn’t found its way into a project yet. I snipped it into triangles, zigzagged all the edges, then connected the tops with a strip of green fabric from my stash. I can’t wait to add it to the mantel! ♥

I LOVE this fabric from Jo-Ann! I used some strips for my fabric-tie fall wreath, a small piece for a mat for my upcycled fan cover tray, and a big piece for this autumn pillow. For a-la-mode, I marked the center of the front and back (after stitching and stuffing), double-threaded a L-O-N-G needle with orange floss, stacked three buttons, went down through the left buttonholes to the back and up through the right buttonholes, pulled the floss tight to create a valley, and tied. I love using this technique on pillows to add an extra bit of visual interest and texture! (Click photo for larger view.) The finished pillow is 18 x 18 inches and will go to the silent auction at the Pumpkinfest at my church later this month. In the meantime, I’ll enjoy seeing it on the wooden rocker in my living room. ♥

 When I saw these black cat pillows on the Women’s Day website, I knew someone in my family who would LOVE them! I already had black fabric in my stash, as well as buttons and white embroidery floss. They’re quick and easy and cute, too! Have fun! ♥

I was so intrigued when I saw some wooden letters decoupaged with maps on House of 34 and decided to make a set for a gift. However, the birthday guy is an amazing photographer who creatively explores the city of Philadelphia with all of its amazing architecture, landmarks, murals, and street art. So . . . I printed off some of my favorite Instagram photos he’s shared on FB and cut out different bits to create a “Mod Podge collage” on each letter instead. I love that I can show him how proud I am of him . . . and it was fun, too! ♥ P.S. You can follow on Instagram at mr_fisher. And Ashley Bollinger has some other fun Instagram art projects here.

I was SO excited that the October issue of HGTV magazine has a tear-out print of a new painting by designer David Bromstad! Click here to see a 30-second video about his creative process via Pier I Imports. But guess what . . . you don’t even have to buy the magazine to get it! Simply click here and scroll to the bottom of the page to download a pdf you can print at home! I think it would be lovely as fall decor or in a nursery. At our home, it’s the perfect guest room dresser buddy for this fun lamp. ♥ P.S. Click here for more fun and free autumn prints!

When I posted photos of the placemat tote bags I made last spring, I mentioned that I might use them for decorating instead of in the usual fashion. I found the perfect spot for one of them in my fall decor—hanging on the wall in the dining room filled with dried eucalyptus branches. The ceramic hook is from World Market. (They’re about $2 apiece in a big bin in their store, and I love them for hanging jewelry, too!) I’ll keep you posted if the other two bags appear somewhere! ♥

 I was rummaging for a frame yesterday and found my long-lost fork easel! I didn’t make it . . . I bought it at a craft show. But I think I could make one now that I know A Ponytail Kind of Day! She has a post here about her fork easels. Plus, if you go to her Category Cloud and click on “silverplate,” you’ll see knives, forks, and spoons made into candleholders, bracelets, necklace pendants, money clips, vases, key chains, and napkin rings! I’ll try it if you will! ♥
P.S. Click here for a tutorial for a rock and wire photo display option . . . another fun upcycle! P.P.S. And now I just discovered this AMAZING silverware starburst mirror! You must check it out! P. P. P. S UPDATE: Spoon rings now on A Ponytail Kind of Day! 🙂

One of my sweet daughters-in-law just moved AND got a new classroom (see Embroidered Classroom Poster), so I had fun sewing valences for both places. For the kindergarten room, I found a crayon print on the sale table at my local Hancock Fabrics and bought a yard of alphabet/number print for a contrast border. For the dining nook, Jen and Greg chose a green/blue plaid from Fabric.com and I found a matching blue trim at Jo-Ann. They’re in the mail to their new homes! ♥

Do you have toy dinosaurs in your toy box? I do! Now one of them is holding my bangle bracelets! He’s so cute . . . and a surprise pop of fun in the room. P.S. Check out these dino ring holders on My So Called Crafty Life, too! ♥

If you haven’t already visited the 9-15-12 post at We Don’t Need Sleep, you MUST take the next 60 seconds to do so . . . and download your beautiful FREE seasonal art print! I so love this gift, and it’s available to EVERYONE! Thank you, Kristin and Callie! UPDATE on 9-24-12: I just got a tip that we can find 12 more free fall printables at My Blessed Life! Thank you, Myra! ♥


Since I finished my fall wreath, my new “kitchen project”–as in leaving the materials out on the kitchen island to work on in spare moments–is to make enough mini-pillow ornaments to decorate a small Christmas tree. I started on these last fall but only ended up finishing five. First, I cut all my Christmas remnants into 4-inch squares to mix and match for fronts and backs. I always add a bit of embroidery a-la-mode to the front, along with buttons or jingle bells here and there. Then I stitch and stuff just as I would a regular pillow but add a ribbon for hanging before sewing. I love how festive they look, and they make a great road-trip project, too. I’ll post my decorated tree when they’re all done! ♥

