Tag Archives: Organization

Happy New Year!

Standard

2016CalendarEven though the new year begins on a Friday this time, I always like to remember “Short Monday Poem” by Ellen Grace Olinger on Poems From Oostburg, Wisconsin when January 1 rolls around:

Monday
and planning
the week
what will grow
what should rest

By replacing a couple of words, it’s also the perfect way to frame the new year. What needs to grow in 2016? What needs to rest? Thank you once again for the inspiration, Ellen! ♥


A New Way to Think About a New Day . . .

Standard

Last fall I lit up when I read “Short Monday Poem” by Ellen Grace Olinger on Poems From Oostburg, Wisconsin:

Monday
and planning
the week
what will grow
what should rest

What a lovely way to frame a new week . . . or month . . . or year . . . or even a day. Now when I make a to-do list, I find myself prayerfully asking, “What needs to grow? What needs to rest?” I even made a chart to share with my writing group. We can put our writing or personal goals at the top (Find more time to write? Feel more energized? Learn to ______?) and then list what needs to grow and rest in order to accomplish the goal. Thank you so much for inspiring me, Ellen!  P.S. My blog is on my “rest” list for a bit while I finish three big projects for work. I’ll be back for Valentine’s Day! ♥

Calendar

Thread Shelf

Standard

BowlWhen I did my spring cleaning this year, I found a few forgotten treasures in the closet. One was a “miniatures” shelf that we used in our last house.

When I saw this post, I knew just what to do with it!  Even though Mandy re-purposed a cutlery tray instead, the idea worked perfectly.

All the leftover spools are still on their kabobs in a bowl.  (I have a LOT of hand-me-down spools of thread . . . lucky me!)

I love the fun shots of color in my sewing room! ♥

Shelf

Earring Frame

Standard

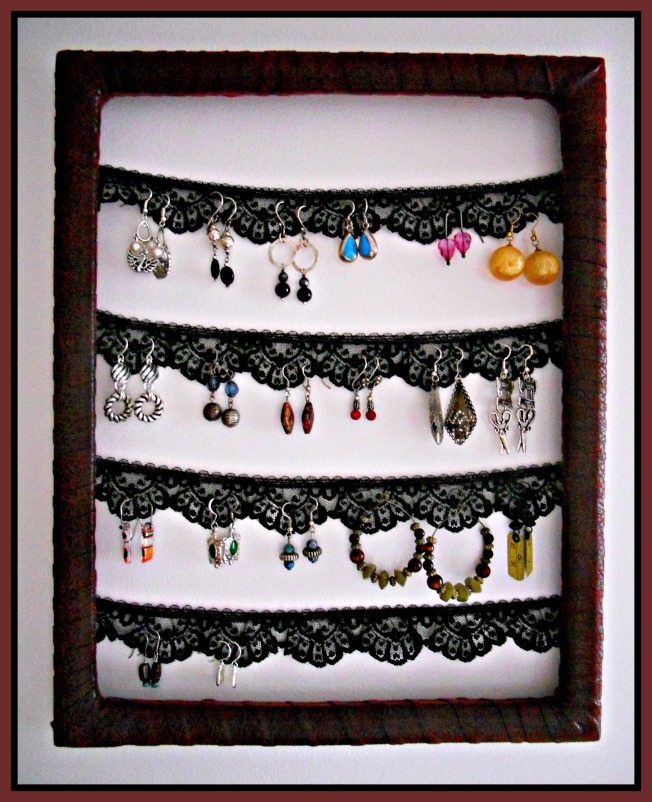
The beautiful vintage sewing machine earrings I won in the Hugs & Kisses blog giveaway inspired me to take all the danglies out of my overcrowded jewelry box and hang them on the wall.  Since I already had all the materials on hand, it was free, too!  Simply wrap an old frame in fabric strips (I used a faux suede remnant), staple strips of lace across the back, and poke the earring wires through the holes in the lace.  It’s easy-peasy, pretty, and makes choosing just the right pair of earrings a breeze.  P.S. One of my Thanksgiving guests exclaimed, “That’s just what I need!” so now I’m making one as a gift for her, too!  P.P. S. (1-3-13) I was just going through some bookmarked websites and found THIS! I couldn’t remember before where I got my inspiration, but now I know! Thank you, This Italian Family! ♥

Earring Frame

Crafty Corner

Standard

One thing I LOVE is seeing my blogging friends’ sewing and crafting spaces. Some have whole rooms dedicated to their art, some have one bookshelf or a few pretty boxes, and many (most???) of us spill over onto the dining room table for big projects. When I recently finished a weeks-long high-priority project for work, I couldn’t wait to get reacquainted with the “crafty corner” of my small home office (which also includes jewelry, scarves, and belts, a Mary Azarian print my mom loved, and some of my grandma’s vintage hats) . . . but first I decided to reorganize it so I’ll be ready for all the fun ideas I’ve been collecting. Then, when I snapped a photo of my finished work, I was amazed at how many projects I already saw in this tiny space! So here’s the photo, here’s the list, and now . . . to start playing! ♥

  • Click here for pretty tape dispensers.
  • Click here for a ribbon dispenser.
  • Click here for neat bobbins.
  • Click here for “spool kabob” thread storage.
  • Click here for penny pattern weights.
  • Click here for bin labels and a pattern weight jar.
  • Click here for a pink fabric basket.
  • Click here for a scissors pocket necklace and shirt-sleeve fabric bins.
  • Click here for embroidery floss clothespins, jewelry frames, and notion jars.
  • Click here for a zebra-print origami lotus bag
  • Click here for a sewing machine cover.
  • Click here for a fabric flower storage display.
  • Click here for a reversible lace belt.
  • Click here for a dinosaur bracelet holder.
  • Click here for beautiful ceramic wall hooks.
  • Click here for mini-pillow Christmas ornaments (in progress!).

Red, Green, and Orange

Standard

All three of the leafy placemat tote bags I made last spring have finally found a niche.  I shared the red one a few days ago—it’s hanging on the wall in the dining room filled with dried eucalyptus branches.  The green one is now on the coat/umbrella rack by our front door filled with pretty scarves and gloves to grab on the way out.  And the orange one . . . well, it’s the perfect autumn running-around tote . . .  for now . . .  ♥

T-Shirt Drawer!

Standard

My To-Do list has had “clean closet and dresser” on it for WEEKS, but I never seemed to find a couple of free hours to cross this one off. Then Kelly at Cobwebs, Cupcakes & Crayons came to my rescue with her “Clutter-Buster Boot Camp”, the perfect solution to helping me solve my problem one small step at a time. Last Friday’s assignment was the T-shirt drawer. I’ve never HAD a T-shirt drawer before, but I do now! Can’t wait for the next project! And it’s not to late to play along, so come join the fun! ♥

One-Minute Jewelry Display

Standard

Do you have toy dinosaurs in  your toy box? I do! Now one of them is holding my bangle bracelets! He’s so cute . . . and a surprise pop of fun in the room. P.S. Check out these dino ring holders on My So Called Crafty Life, too! ♥

Whatever happened to that kite???

Standard

Awhile back I posted photos of some vintage treasures from my dad, including an old kite he’d found in his garage. After being assured that no one had ever been able to get the kite to actually fly, I agreed to take it home to upcycle. When I took it back out to “study,” I noticed that it had two long, skinny pockets, which made me think of the plastic bag holders I’ve seen some other creative bloggers make. (Like you, I really DO try to remember my reusable tote bags for shopping, but  . . . ) So, I folded it in half vertically and zigzagged along all the seams, which resulted in three more bag-stuffing spaces. With a piece of pretty rick-rack threaded through the kite string loop for hanging, it’s all ready to go!  P.S. I love these upcycled can trash bag containers from Neaten Your Nest, too (and check out Erin’s beautiful new business logo while you’re there!). If you’ve posted a tutorial for bag storage, please send me a note in a comment and I’ll add your link here. Thank you! ♥

Colorful Fabric Memo Board

Standard

Once one of my teen-age sons accompanied me to a teacher supply store. The next thing I knew, he was sitting on a bench outside. When I asked him why he left, he said, “Mom! It looks like a rainbow threw up in there!” So, if you’ve ever felt the same way, it’s probably best to move on to another blog now. 🙂

Today’s project is a fabric memo board . . . but for holding girly hair things, like:

Click here for a tutorial (starting with a cardboard box!) and here for a photo of the zebra-print version filled with flower hair clips and pins. I can’t wait to give this one to a special little girl for her birthday! ♥

Another 5-Minute Craft Room Idea

Standard

AFTER!

BEFORE . . .

When I ran across a paper towel holder I no longer use, I immediately thought of the rolls of ribbon I recently bought at Michaels (three for a dollar!) to make some more fabric memo boards. They’re a perfect fit! Here are a few other craft and sewing room ideas:

  • For pretty tape dispensers, click here.
  • For a pattern weight jar, storage bin labels, and needle book, click here.
  • For no-tangle bobbins, click here.
  • For easy-access thread storage, click here.
  • For neat and pretty embroidery floss storage, click here.
  • For a pretty ironing board, click here.
  • For a way to store and display your fabric flowers, click here and here.
  • For a portable way to store your colored pencils (or knitting needles or crochet hooks), click here and here.  Happy weekend! ♥

UPDATE: Emily at Two Purple Couches just sent me a tip that this and lots of other great storage tips are included in the September HGTV magazine! I did a little sleuthing and found a link here. Enjoy!

What can you make with a polo shirt?

Standard

This is my third “What Can You Make With A . . .?” blog post, so maybe I’ve inadvertently started a new series! 🙂 The first remake was a flannel shirt and the second was a lace tank. This time, my sweet husband Dave donated an old polo shirt that he no longer loves, and as usual, I went a little crazy with it! I’ve already blogged about the scrabble tile pillows, which required four 8-inch squares from the front and back. Here’s what I did with the rest of the shirt:

(1) The sleeves are now fabric bins for my embroidery floss. After cutting them off the shirt, I simply evened up the sides and bottom, stitched, and made triangle corners at the bottom so they will stand up. (If you’re not sure how to do these corners, you can read about them on this tote or bracelet purse tutorial.) I previously had my floss in a large, pretty bowl, but I’ve been wanting to use the bowl elsewhere so this worked out perfectly!

(2) The ribbed collar and top-stitched hem are now a scissors pocket necklace to wear when I’m sewing or crafting, since I move from the sewing room to the dining table to the kitchen island and my scissors are always in the wrong place. (Does anyone else do that???) First, I cut the collar into thirds and used the parts with the finished ends for the bag and the other part for a flower. Then I used red buttons for the flower center and to attach the shirt-hem strap on both sides of the stitched-and-turned bag. I love it!

(3) Two random remnants are now a coffee cup cozy to take when I meet my friends for coffee or lunch. I used the cafe’s cardboard version as a pattern, cutting the fabric big enough to allow for seams, padded it with some soft quilt batting, and sewed in a red hairband at one end. After turning and pressing, I top-stitched in red and added a vintage red button. I can’t wait to try it out!

(4) One more random remnant became this pyramid bag I’ve been wanting to try from Craftser. The tutorial says it takes fifteen minutes. It does, and it’s super-cute, too!

Someday I’ll embroider over the frayed spots on the placket and pocket and reuse them along with the other small scraps I have left. When I do, I’ll be sure to share. ♥

Spool Kabobs

Standard

Sometimes the pillow stuffing I buy has wooden chopstick-like instruments packed inside to help poke the fluffy stuff into tight corners. I’ve been collecting them in my desk drawer knowing that someday a light bulb would go on and I’d think of a creative way to use them. It did! 🙂 I wrapped embroidery floss around each grooved end to create a “stop,” slipped my thread over the sticks, and stood them up in a parfait bowl to display on a shelf. Now, instead of hiding away in a tote bag, the colorful spools are an easily-accessible part of my sewing room decor. I love it! ♥

Sometimes It’s the Little Things . . .

Standard

I had a few spare minutes today and decided to tackle some quick-‘n-easy projects with my materials and supplies, so now I have . . .

(1) a clasp on my needle book (braided embroidery floss stitched to the back cover wrapped around a small button on the front cover),

(2) labels on the red fabric bins where I keep my office/sewing/crafting supplies (typed lists taped to scrapbook paper rectangles and clipped to the fronts of the bins), and

(3) a home for my ever-growing collection of PW‘s (pattern weights) . . . the mason jar from my Mother’s Day gift labeled with a Publishers Weekly logo. (I don’t think they’ll mind, do you?) ♥


Bobbin Magic

Standard

My bobbin bowl before . . .

If you sew, you’re going to love this fabulous idea for keeping your bobbins neat and tidy!

  • First, read this post from Schlosser Designs.
  • Next, go to the hardware store to buy some clear tubing . . . mine was only 37¢ for one foot!
  • Finally, cut the tubing “doughnuts” (I used scissors instead of a an X-Acto blade), slice them open, and pop them on your bobbins. No more stray strings! ♥

My bobbin bowl after . . . thank you, SD!

Storage With Style

Standard

I’m working on a project that requires 16 colors of embroidery floss. I decided to start with all new skeins to make sure I wouldn’t run out, so I was tickled pink to find a new way to store the leftovers once I’d finished with them. (Thank you, Pinterest! ♥) I think they look extra pretty in this bowl Greg made, don’t you? This concept also fits a new decorating strategy I adopted when we decided to downsize to a smaller home. Instead of putting up decorations AND finding places to store things, why not use storage solutions that decorate?

Organized!

Standard

Like many of you, I started the new year by reorganizing my clothes closet and office/craft room. Everything looked great except that I always left my current sewing project on the chair in the bedroom. Then, I got the perfect birthday gift from my sweet son and daughter-in-law Bradley and Danielle. Here it is, filled with my first “Year of Homemade Gifts” project (post to come!). Don’t you just love the fabric? Now my handiwork sits BESIDE the chair so we can actually sit IN the chair. Thank you, B&D! ♥